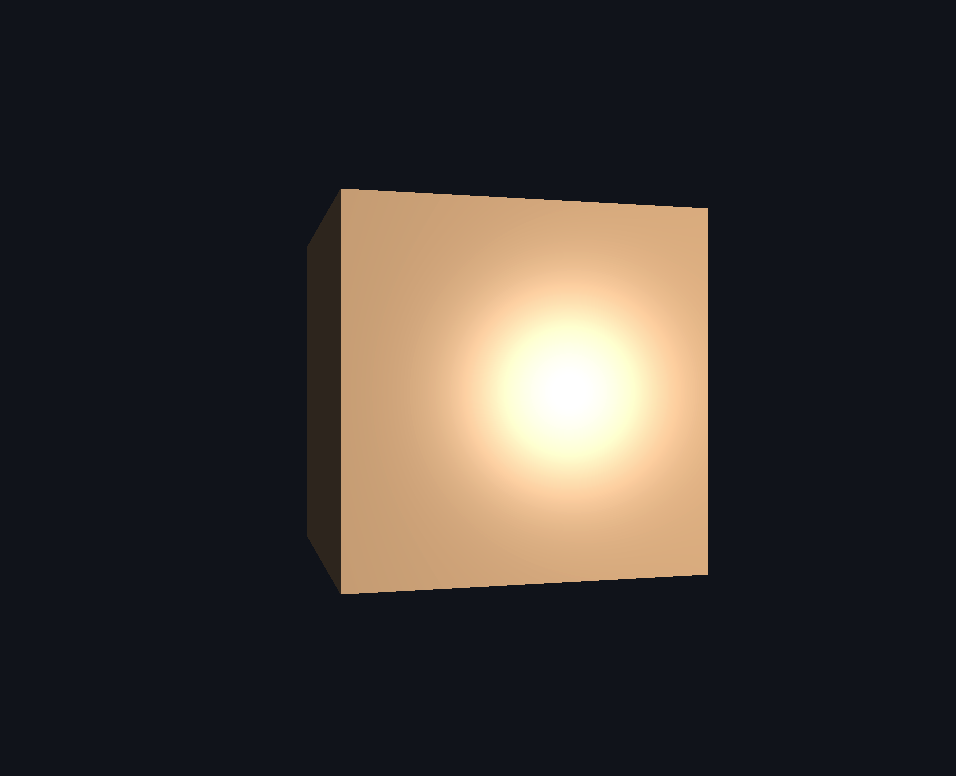
Welcome back to the fourth lesson of Realistic Lighting with the Phong Model! We've made excellent progress implementing ambient and diffuse lighting components, creating a cube that exhibits natural directional shading and three-dimensional depth. Now we're ready to add the final and most visually striking component: specular highlights. These bright, mirror-like reflections are what make surfaces appear shiny and wet, from the glint on a polished apple to the gleam on a metallic surface. Specular lighting responds to both the light source's position and the viewer's perspective, creating highlights that move and dance as we navigate around our scene. By the end of this lesson, we'll complete the full Phong lighting model, transforming our matte-looking cube into a surface with convincing material properties that responds realistically to both illumination and viewing angle.
Understanding Specular Highlights
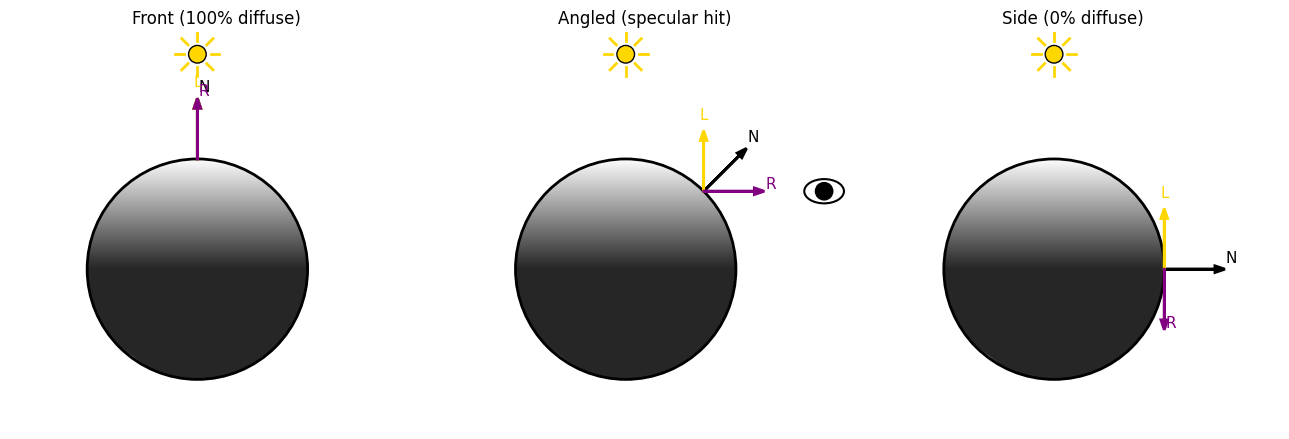
Specular highlights represent the mirror-like reflection of light sources on surfaces, creating the bright spots that make materials appear glossy, wet, or metallic. Unlike diffuse lighting, which scatters uniformly in all directions, specular reflection follows the law of reflection: light bounces off the surface at the same angle it arrives, but in the opposite direction. This directional behavior means that specular highlights are highly dependent on the viewer's position relative to the surface and light source. When we look at a shiny ball, the bright highlight moves as we change our viewing angle because we're seeing the direct reflection of the light source. In computer graphics, we simulate this phenomenon by calculating the angle between the reflected light ray and the direction toward the viewer's eye, creating highlights that appear most intense when these directions align perfectly.
The Mathematics of Reflection
Join the 1M+ learners on CodeSignal
Be a part of our community of 1M+ users who develop and demonstrate their skills on CodeSignal
The foundation of specular lighting rests on computing the reflection vector, which represents the direction that light would bounce off a surface following the law of reflection.
R=2(N⋅L)N−L
The reflection vector R is calculated using the surface normal N and the light direction L. This formula elegantly captures the physical law that the angle of incidence equals the angle of reflection.
The intensity of the specular highlight is computed using the following formula:
Ispecular=ks⋅(max(R⋅V,0))α
Here, ks is the specular reflection coefficient (controlling the brightness of the highlight), R is the reflection vector, V is the normalized view direction (from the surface point to the camera), and α is the shininess factor that determines the sharpness of the highlight. The dot product R⋅V measures how closely the viewer's direction aligns with the reflection direction, and raising it to the power of α creates the rapid falloff characteristic of specular highlights.
Once we have the reflection vector, we compute the specular intensity by taking the dot product between the reflection direction and the view direction V, then raising it to a power called the shininess factor. This exponential relationship creates the characteristic sharp falloff of specular highlights: surfaces appear brightest when the reflection direction perfectly aligns with our viewing direction, but the intensity drops rapidly as the angle increases.
Computing View Direction and Reflection Vector
Implementing Specular Calculation
The heart of our specular lighting implementation computes the highlight intensity using the relationship between the reflection vector and view direction, raised to a power that controls the highlight's sharpness.
The specular intensity spec uses the dot product between the view direction V and the reflection vector R, clamped to prevent negative values with max. The pow function raises this value to the 64th power, creating the characteristic sharp falloff of specular highlights. Higher exponents produce smaller, more focused highlights, while lower values create broader, more diffuse reflections. We multiply the specular intensity by a neutral gray color vec3(0.5), simulating white light reflection. The diffuse strength has been reduced to 0.7 to balance the three lighting components. The final color combines all three components: ambient provides base illumination, diffuse reveals form, and specular adds surface material properties.
Passing Camera Position to Shaders
Our main application now passes the camera's world position to the fragment shader, enabling view-dependent specular calculations that update as we move through the scene.
We obtain the uniform location for viewPos and update it each frame with the camera's current position using camera.getPosition(). This ensures that specular highlights respond correctly to camera movement, creating the realistic behavior where highlights appear to move across surfaces as our viewing angle changes. The glUniform3fv function passes the camera position as a three-component vector to our fragment shader. This dynamic updating is crucial for convincing specular effects: static highlights would break the illusion of realistic material properties and three-dimensional interaction.
Complete Phong Model Integration
Our rendering pipeline now implements the complete Phong lighting model, combining all three components to create surfaces with convincing material properties and realistic light interaction.
while (!glfwWindowShouldClose(window)) { float currentTime = (float)glfwGetTime(); float deltaTime = currentTime - lastTime; lastTime = currentTime; camera.processInput(window, deltaTime); // Create rotating model matrix glm::mat4 model = glm::rotate(glm::mat4(1.0f), currentTime, glm::vec3(0, 1, 0)); glClear(GL_COLOR_BUFFER_BIT | GL_DEPTH_BUFFER_BIT); // Update all uniforms including camera position glUniformMatrix4fv(modelLoc, 1, GL_FALSE, glm::value_ptr(model)); glUniformMatrix4fv(viewLoc, 1, GL_FALSE, glm::value_ptr(camera.getViewMatrix())); glUniformMatrix4fv(projLoc, 1, GL_FALSE, glm::value_ptr(projection)); glUniform3fv(viewPosLoc, 1, glm::value_ptr(camera.getPosition())); glDrawElements(GL_TRIANGLES, 36, GL_UNSIGNED_INT, 0); glfwSwapBuffers(window); glfwPollEvents();}
The render loop now updates the camera position uniform each frame alongside the view matrix, ensuring that specular highlights respond correctly to camera movement. As the cube rotates and we navigate around it using the WASD keys and arrow keys, the specular highlights create dynamic bright spots that move across the surface in a physically plausible manner. The combination of rotation and camera movement provides multiple opportunities to observe how specular highlights behave differently from the static ambient and diffuse components we've implemented in previous lessons.
Observing the Enhanced Lighting
The complete Phong model creates a dramatically more realistic appearance, with bright specular highlights that respond dynamically to both object rotation and camera movement.
The specular highlights create bright spots that appear and disappear as the cube rotates, most visible on faces that are both lit and oriented to reflect light toward the camera. When we move the camera using the arrow keys, the highlights shift position on the surface, creating the convincing illusion that we're viewing a physical object with reflective properties. The high shininess exponent produces tight, focused highlights reminiscent of polished surfaces, while the neutral gray specular color simulates white light reflection common in many materials.
Conclusion and Next Steps
We've successfully completed the full Phong lighting model by implementing specular highlights, the final component that transforms flat surfaces into convincing materials with realistic reflective properties. The mathematics of reflection vectors and view-dependent calculations create highlights that respond naturally to both object rotation and camera movement, bringing our 3D scenes to life with authentic material behavior.
The complete Phong model we've built represents one of the most fundamental and widely used lighting techniques in computer graphics, providing the foundation for understanding more advanced rendering methods. With ambient lighting providing base illumination, diffuse lighting revealing form, and specular highlights adding material character, we now have the tools to create compelling 3D scenes with realistic lighting. Get ready to put this complete lighting system to work in the practice exercises, where you'll master the art of balancing these three components to create different material effects!
Our fragment shader now calculates both the view direction toward the camera and the reflection vector from the light source, establishing the foundation for specular highlight computation.
glsl
uniform vec3 lightPos = vec3(2.0, 0.0, 3.0);uniform vec3 viewPos;uniform vec3 ambientLight = vec3(0.2);void main() { vec3 N = normalize(vNormal); vec3 L = normalize(lightPos - vWorldPos); vec3 V = normalize(viewPos - vWorldPos); vec3 R = reflect(-L, N); // Specular calculation continues...}
The view direction vector V points from the surface toward the camera position, calculated by subtracting the world position from the camera position and normalizing the result. We use GLSL's built-in reflect function to compute the reflection vector R, passing the negated light direction -L because the function expects the incident ray direction (pointing toward the surface) rather than the light direction (pointing away from the surface). The viewPos uniform carries the camera's world position, which changes as we move through the scene, making specular highlights dynamic and view-dependent. Our light has been repositioned to (2.0,0.0,3.0) to create more interesting highlight patterns.