Welcome back to Advanced Rendering and Visual Effects! In our previous lesson, we built a powerful multi-perspective system using framebuffers. In this third lesson, we'll take that foundation to the next level by exploring stylized post-processing effects, transforming our rendered scene with cartoon-style edge detection and realistic screen glare. This marks an exciting step in our course as we move from realistic rendering to creating unique, artistic visual styles.
Building upon the render-to-texture techniques we've established, we will enhance our framebuffer system with sophisticated visual effects that turn ordinary rendered content into stylized imagery. These techniques are fundamental to modern non-photorealistic rendering (NPR) and form the backbone of many popular visual styles in games and digital media. By combining edge detection algorithms with specular glare calculations, we will create a compelling visual experience that demonstrates the creative potential of shader-based post-processing.
Post-processing is a powerful technique in which we apply visual transformations to an image after it has been rendered. Instead of working with 3D geometry, post-processing operates directly on the final 2D image, treating it as a grid of pixels that can be analyzed and modified. This approach allows us to implement complex effects like bloom, motion blur, color grading, and the stylized effects we will build today.
The beauty of post-processing lies in its flexibility. We can achieve stunning visual styles without altering our core 3D rendering pipeline. Since our framebuffer system already captures our 3D scene into a texture, we have the perfect starting point for applying these image-based transformations in a second rendering pass.
Edge detection algorithms work by identifying areas of sharp contrast in an image, which usually correspond to object boundaries or abrupt changes in lighting. A classic and highly effective approach for this is the Sobel operator. It functions by calculating the image gradient, which is a measure of how quickly pixel colors change across the image.
By sampling a pixel and its immediate neighbors, we can compute the rate of change horizontally () and vertically (). The total gradient magnitude, , which represents the "strength" of the edge, is then found using the Pythagorean theorem:
Let's see how this edge detection logic is implemented in our plane_fragment.glsl shader. The first step is to sample the pixels needed to calculate the gradient.
We start by calculating texelSize, which is the size of a single pixel (a texel) in UV coordinates. This tiny vector is our key to navigating the texture grid, allowing us to sample the exact neighboring pixels with perfect precision. We then sample five points: the current pixel and its four neighbors. The gradient is then simply the absolute difference between opposite neighbors, giving us the rate of color change in both directions.
Once we have the horizontal and vertical gradients, we combine them to determine the final edge strength and decide whether to draw an outline.
We combine the gradients into a single "edge strength" value. The GLSL length() function calculates the magnitude of the combined gradient vector. Note that while we introduced the standard Sobel formula earlier (), our implementation uses a : , which computes . This is computationally simpler and produces visually pleasing results for our stylized effect, though it's not mathematically equivalent to the true Sobel operator. For performance-critical post-processing effects, such approximations are common and acceptable when the visual results meet our artistic goals. By comparing this strength against a threshold, we can make a simple decision: if it's a strong edge, draw a black outline; otherwise, use the original texture color. This binary choice is what creates the sharp, clean lines characteristic of cartoon-style rendering.
To make our virtual monitor feel like a physical object, we'll add a specular glare effect. This simulates how light reflects off a glossy surface, creating a bright highlight that changes with our viewing angle.
This calculation uses the classic Phong reflection model. We define the plane's normal as pointing toward the camera, then calculate the light and view directions. The reflect() function gives us the perfect reflection of the light ray. The pow() function is key here; by raising the dot product to a high power (shininess), we create the tight, focused highlight that we associate with a shiny screen.
Our effects aren't limited to the monitor's surface. When the user presses F to switch to the fullscreen virtual camera view, we apply the same edge detection to the entire screen. This is handled by the screen_fragment.glsl shader.
This fullscreen implementation uses the exact same edge detection algorithm. It receives the framebuffer's content as uScreenTexture and processes every pixel to create a stylized, cartoon-like appearance across the entire viewport. This ensures a consistent visual style between the monitor display and the fullscreen viewing mode.
The final touch is to blend our two effects — edge detection and glare — seamlessly on the monitor's surface.
Instead of just adding the glare, which can look harsh, we use the smoothstep() function. This creates a more natural falloff, making the glare appear intense at its center and fade out smoothly at the edges. We then use mix() to combine the edge-detected color with the glare, using the glare's intensity as the blending factor. This results in a convincing illusion of a bright light reflecting off the monitor's surface.
An important detail in our multi-pass rendering system is the strategic use of different clear colors for each rendering pass. This creates visual distinction between our virtual monitor content and the main scene while serving as a debugging aid.
In our first rendering pass, we use a distinctive purple clear color for the virtual camera's framebuffer:
For the second pass, we switch to a darker background for the main scene:
This clear color differentiation provides visual separation between the monitor's display content and the surrounding environment. The purple background becomes part of the monitor's display, while the darker background frames the entire scene. During development, these distinct colors also make it immediately obvious which rendering pass is being displayed, simplifying debugging when switching between views.
When we run our enhanced system, the visual style is dramatically transformed. The rotating cube on the monitor now has bold, black outlines that give it a distinct cartoon-like appearance. As we move our main camera, the monitor's surface exhibits a realistic glare that shifts and changes based on our position, adding a layer of realism to the stylized content.
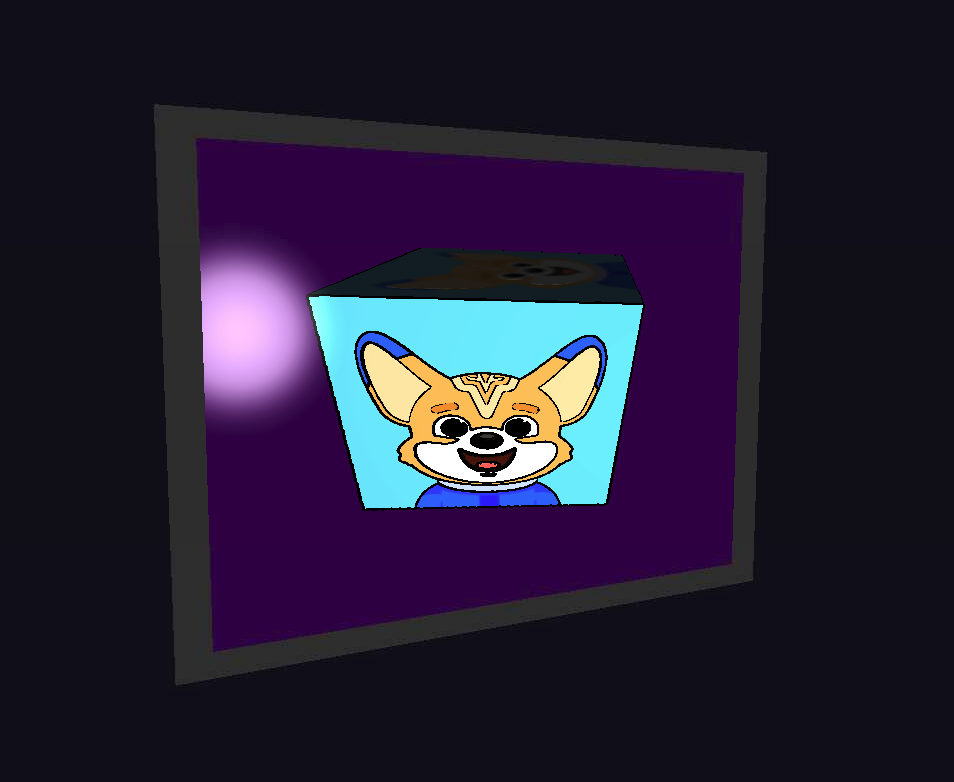
The combination of sharp, hand-drawn-style outlines with convincing surface reflections creates a unique and compelling aesthetic. Toggling to the fullscreen view extends this stylized look to the entire scene, demonstrating the power of a well-integrated post-processing pipeline.
We have successfully enhanced our rendering pipeline with powerful post-processing techniques. By implementing Sobel-based edge detection and specular glare, you've learned how to transform a standard 3D scene into a stylized work of art. These shader-based effects are fundamental to non-photorealistic rendering and open up a world of creative possibilities.
These concepts demonstrate the flexibility of modern graphics programming, where the final rendered image is just the beginning of the artistic process. As you move on to the practice exercises, you will have the chance to experiment with these effects firsthand. Get ready to fine-tune the parameters and solidify your understanding of shader-based image manipulation.
