Welcome back to Advanced Rendering and Visual Effects! We've made tremendous progress, and in this fourth lesson, we'll tackle one of the most fundamental yet challenging aspects of realistic rendering: smooth transparency with alpha blending. In our previous lesson, we explored stylized post-processing effects, transforming rendered content with cartoon-style edge detection and realistic glare. Now, we'll build on that foundation to create a convincing holographic display.
Today, we'll render a 3D teapot model that appears to float behind a translucent virtual screen. This project will teach us about proper alpha blending setup, the critical importance of rendering order, and how transparency can be dynamically modulated to create compelling visual effects. The skills we've developed with framebuffers and multi-pass rendering will prove essential as we add the complexity of transparency to our pipeline.
Alpha blending is the cornerstone of transparency effects in computer graphics. The concept revolves around the fourth component of the RGBA color model: the alpha channel, which represents a pixel's opacity. While RGB values define the color, the alpha value determines how much of the background should show through, with 0.0 representing complete transparency and 1.0 representing complete opacity.
The mathematical foundation of alpha blending is elegantly simple. When we blend a source color with alpha over a destination color , the final color is calculated as:
Before we can render any transparent objects, we must instruct OpenGL on how to perform blending. This is a one-time setup in our application's initialization phase that involves enabling blending and defining the function that governs it.
The glEnable(GL_BLEND) call activates OpenGL's blending functionality. The real magic, however, is in glBlendFunc(). The parameters GL_SRC_ALPHA and GL_ONE_MINUS_SRC_ALPHA correspond directly to our mathematical formula: the source color is multiplied by its alpha value (), and the destination color is multiplied by one minus the source alpha (). This specific configuration is the industry standard for creating natural-looking transparency.
One of the most crucial aspects of alpha blending is the rendering order. Unlike opaque objects, which can be rendered in any order thanks to the depth buffer, transparent objects must be drawn in a specific sequence to look correct. The golden rule is simple: render all opaque objects first, then render all transparent objects sorted from farthest to nearest.
In our main.cpp, we first position the teapot behind the screen, then enforce the correct rendering order in our main loop.
We render the opaque teapot before the translucent screen. If we did it the other way around, the screen would write its depth information to the depth buffer first. Then, when the teapot (which is farther away) tries to render, the depth test would fail, and it would never be drawn. By rendering the teapot first, its pixels and depth values are already in the frame, allowing the semi-transparent screen to be correctly blended over it.
The magic of our holographic screen happens in the plane_fragment.glsl shader, where we dynamically calculate the alpha value for each pixel. We'll build this effect in layers, starting with an opaque border and then adding variable transparency to the center.
First, we define a solid, opaque border to frame our display.
This logic creates a realistic monitor-like frame. For the central area, we make the surface translucent and modulate its opacity based on lighting. A strong specular glare should make the screen appear more opaque, just as a bright reflection on glass does in the real world.
Here, we establish a baseAlpha to make the screen mostly see-through. We then increase this alpha based on the glareIntensity. This dynamic relationship between lighting and transparency is what sells the effect, making the holographic display feel like a tangible object that responds naturally to its environment.
When we run our complete alpha blending system, the result is a convincing holographic display that showcases the power of properly implemented transparency.
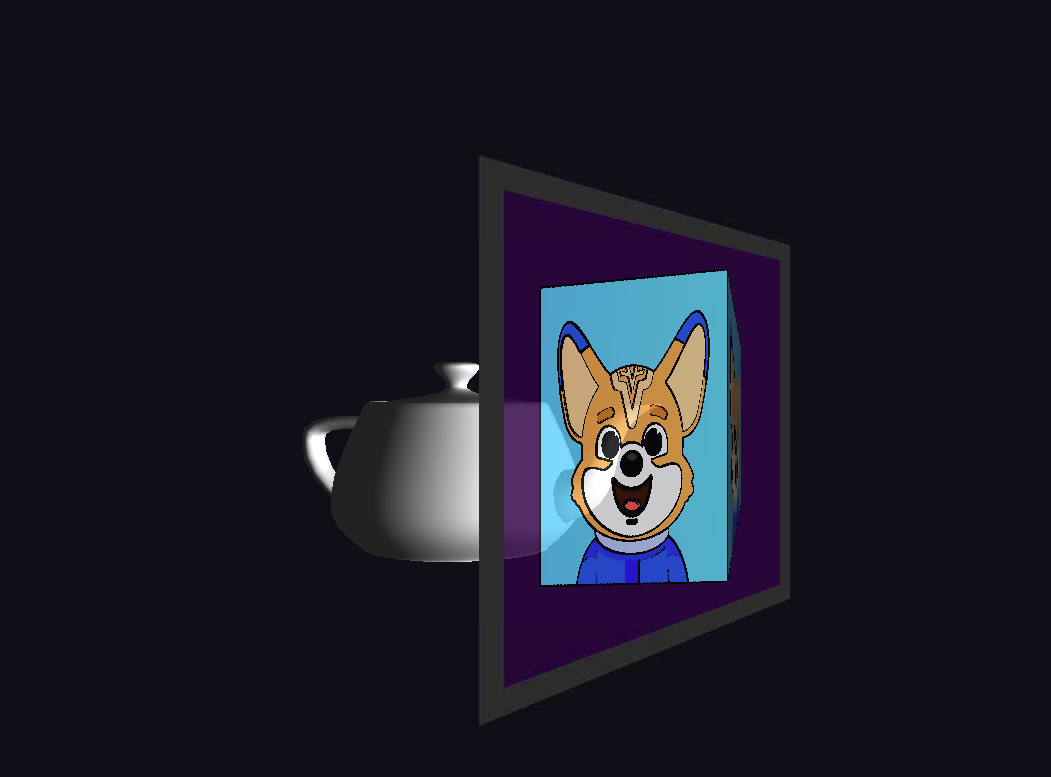
The teapot appears to float behind the translucent screen, visible through its surface while the screen itself displays the rotating cube from our virtual camera. As you move around, the glare shifts realistically, and the screen's opacity changes with your viewing angle. This creates the compelling illusion of a three-dimensional hologram suspended within a physical display.
We have successfully implemented smooth transparency with alpha blending, creating a sophisticated holographic display that demonstrates the core principles of rendering see-through objects. Through careful attention to rendering order, dynamic alpha modulation in shaders, and proper OpenGL configuration, we've built a system that convincingly simulates a complex, light-interactive transparent surface.
The techniques mastered in this lesson are essential skills that extend far beyond this single effect to any application requiring realistic glass, water, or other transparent materials. As you progress to the hands-on practice exercises, you will have the opportunity to experiment with these transparency effects and solidify your understanding of this crucial rendering topic.
