Welcome back to Understanding Inequalities! This is the second lesson of the course, and you are building momentum. In our first lesson, we learned how the symbols < and > express which of two quantities is larger or smaller. Those two symbols handle a lot of comparisons, but they leave out one important scenario: what happens when a value is allowed to equal the boundary, not just stay above or below it? That is exactly what this lesson is about. Today we introduce the symbols ≤ and ≥, and we will see why that small horizontal line underneath makes a big difference.
When the Boundary Itself Counts
Think about a speed limit sign that reads 65 mph. Are you breaking the law at exactly 65? No — driving at 65 is perfectly fine. The limit includes 65 itself. Now think about a concert that admits only people under 18 for a youth discount. If you are exactly 18, you do not qualify. The boundary, 18, is excluded.
These two situations feel different because one includes the boundary value and the other does not. The strict symbols < and > from our first lesson handle the second type. To handle the first type, we need a new pair of symbols that say "or equal to." That is where ≤ and ≥ come in.
The Inclusive Symbols: ≤ and ≥
Strict vs. Inclusive at a Glance
Join the 1M+ learners on CodeSignal
Be a part of our community of 1M+ users who develop and demonstrate their skills on CodeSignal
Each new symbol is simply its strict counterpart with a short horizontal line added beneath it:
≤ means less than or equal to
≥ means greater than or equal to
The added line represents the "or equal to" part. You can think of it as a tiny equal sign tucked under the angle. Here is a comparison side by side:
x<10vs.x≤10
In x<10, a value like x=10 does not satisfy the statement because 10 is not less than 10. In x≤10, the value x=10does satisfy the statement because 10 is equal to 10, and "equal to" is explicitly allowed.
The same logic applies to the "greater" pair:
x>5vs.x≥5
With x>5, plugging in x=5 fails. With x≥5, plugging in x=5 succeeds.
The table below summarizes all four symbols so you can see the full picture in one place:
Symbol
Name
Boundary Value Included?
<
less than
No
>
greater than
No
≤
less than or equal to
Yes
≥
greater than or equal to
Yes
A number line makes that boundary difference easy to see:
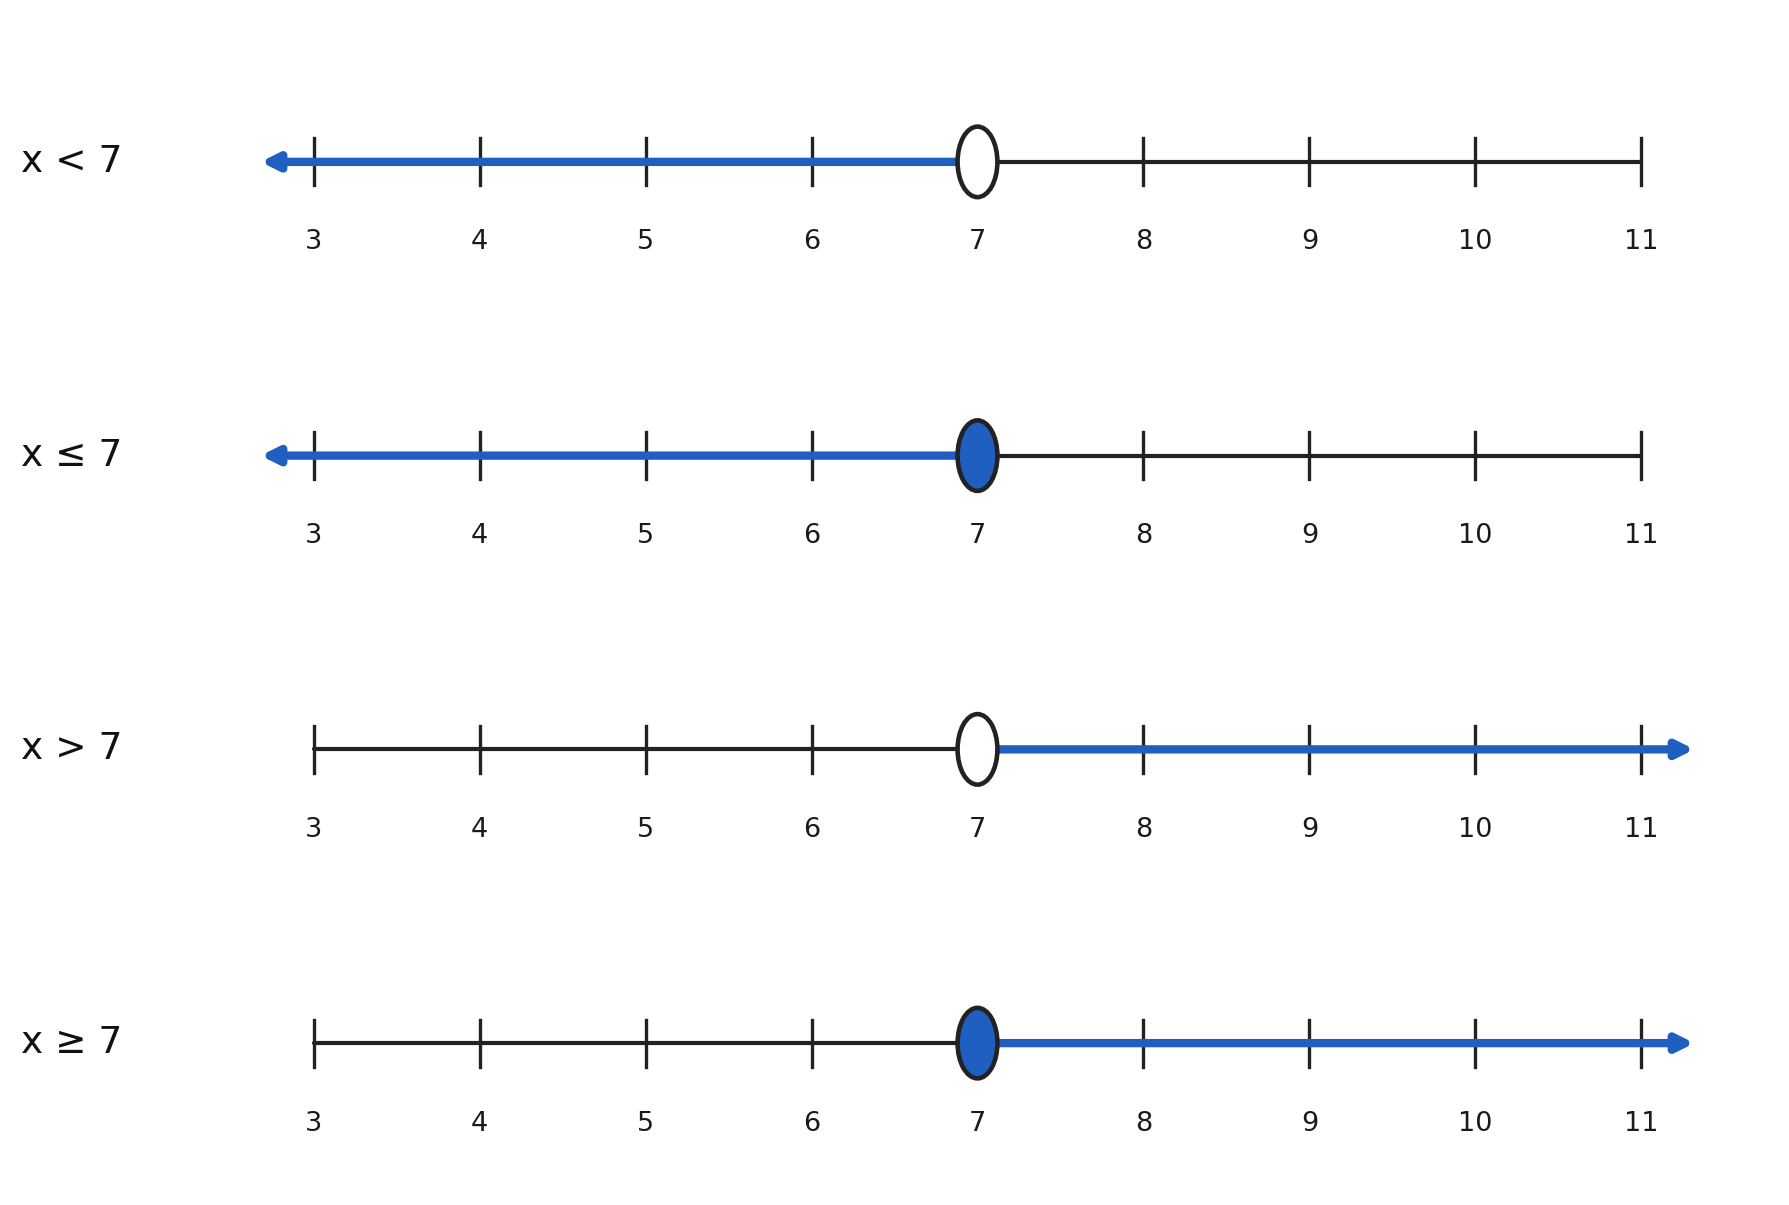
Notice that every value satisfying x<7 also satisfies x≤7. The inclusive version simply adds one extra value: the boundary itself. That single value may seem small, but in many real situations it is the one that matters most.
Testing the Boundary Value
Everyday Situations That Need the Boundary
Common Mistakes to Watch For
Conclusion and Next Steps
In this lesson we expanded our symbol toolkit from two comparison symbols to four. we learned that ≤ and ≥ work exactly like < and > but with one crucial addition: they allow the boundary value itself to satisfy the statement. We also saw that testing the boundary is the fastest way to tell whether an inclusive or strict symbol is needed.
Now it is time to put these ideas to work! In the upcoming practice section, you will test boundary values, match each of the four symbols to its meaning, sort everyday phrases into strict or inclusive categories, and apply the correct inclusive symbol to real-world rules. Let's get started and lock in the difference between strict and inclusive for good!
A reliable way to decide whether you need a strict or inclusive symbol is to plug the boundary value in and ask, "Should this be allowed?" Let's walk through a quick example.
Suppose a roller coaster requires riders to be at least 48 inches tall. "At least 48" means 48 itself is tall enough, so we write:
h≥48
If we test h=48: is 48≥48? Yes, because 48 equals 48 and the symbol permits equality. Now imagine the rule said riders must be over 48 inches. "Over 48" excludes 48 itself, so we would write h>48, and h=48 would fail the test.
This "test the boundary" habit is simple, but it will save you from choosing the wrong symbol again and again.
Many real-world rules specifically include the boundary value, and recognizing that pattern helps you pick the right symbol quickly:
Age requirements. "You must be 16 or older to join the gym" means exactly 16 is allowed: age≥16.
Budgets. "Spend no more than $50" means spending exactly $50 is fine: spending≤50.
Weight limits. "This elevator holds up to 2,000 pounds" includes 2,000 itself: weight≤2000.
Notice how phrases like at least, no more than, and up to all signal an inclusive boundary. In the next lesson we will dive deeper into translating phrases like these, but for now, simply notice that the inclusive symbols ≤ and ≥ appear whenever the boundary value is part of the rule.
Two errors are especially common when learners first work with these symbols:
Treating ≤ and < as identical. It is tempting to think the little line underneath does not matter. But x<10 and x≤10 give different answers when x=10. That one value is exactly what separates the two symbols.
Mixing up ≤ and ≥. Just like with < and >, the pointed end of ≤ and ≥ aims at the smaller quantity whenever the two values are different. The horizontal line simply adds the possibility that the two sides are equal. So in 5≤9, the point faces the smaller value (5), but in 10≤10, the statement is true because the added line allows for equality.