Animating Objects with Rects
Introduction: From Static Scenes to Motion
Welcome back to Pygame Foundations for your first game! We are now at the third unit out of four, and we have made solid progress: our display is 800 × 600 pixels, the game loop handles quit events and redraws the screen sixty times per second, and we can paint rectangles and circles using RGB colors.
There is one thing missing, though: nothing ever moves. The loop faithfully redraws the same picture sixty times per second, which is a lot of work for a scene that looks like a still image.
In this lesson, we will fix that. We will store the red rectangle's position inside a pygame.Rect object and nudge that position slightly on every frame. The result: a red block that falls steadily from the top of the display, reaches the bottom, and reappears at the top to fall again, while a green block stays parked near the bottom as a landmark.
Meet Pygame Rect: A Box That Remembers Its Position
Before we animate anything, we need a place to keep track of where our object is. Pygame gives us exactly that with pygame.Rect, the standard way to describe a rectangular area in a game.
The four arguments read in a fixed order:
375is the left edge:375pixels from the left side of the display, which is roughly centered horizontally.0is the top edge: flush with the very top of the display.40and40are the width and height in pixels, giving us a small square.
This is what those four numbers mean on the screen:
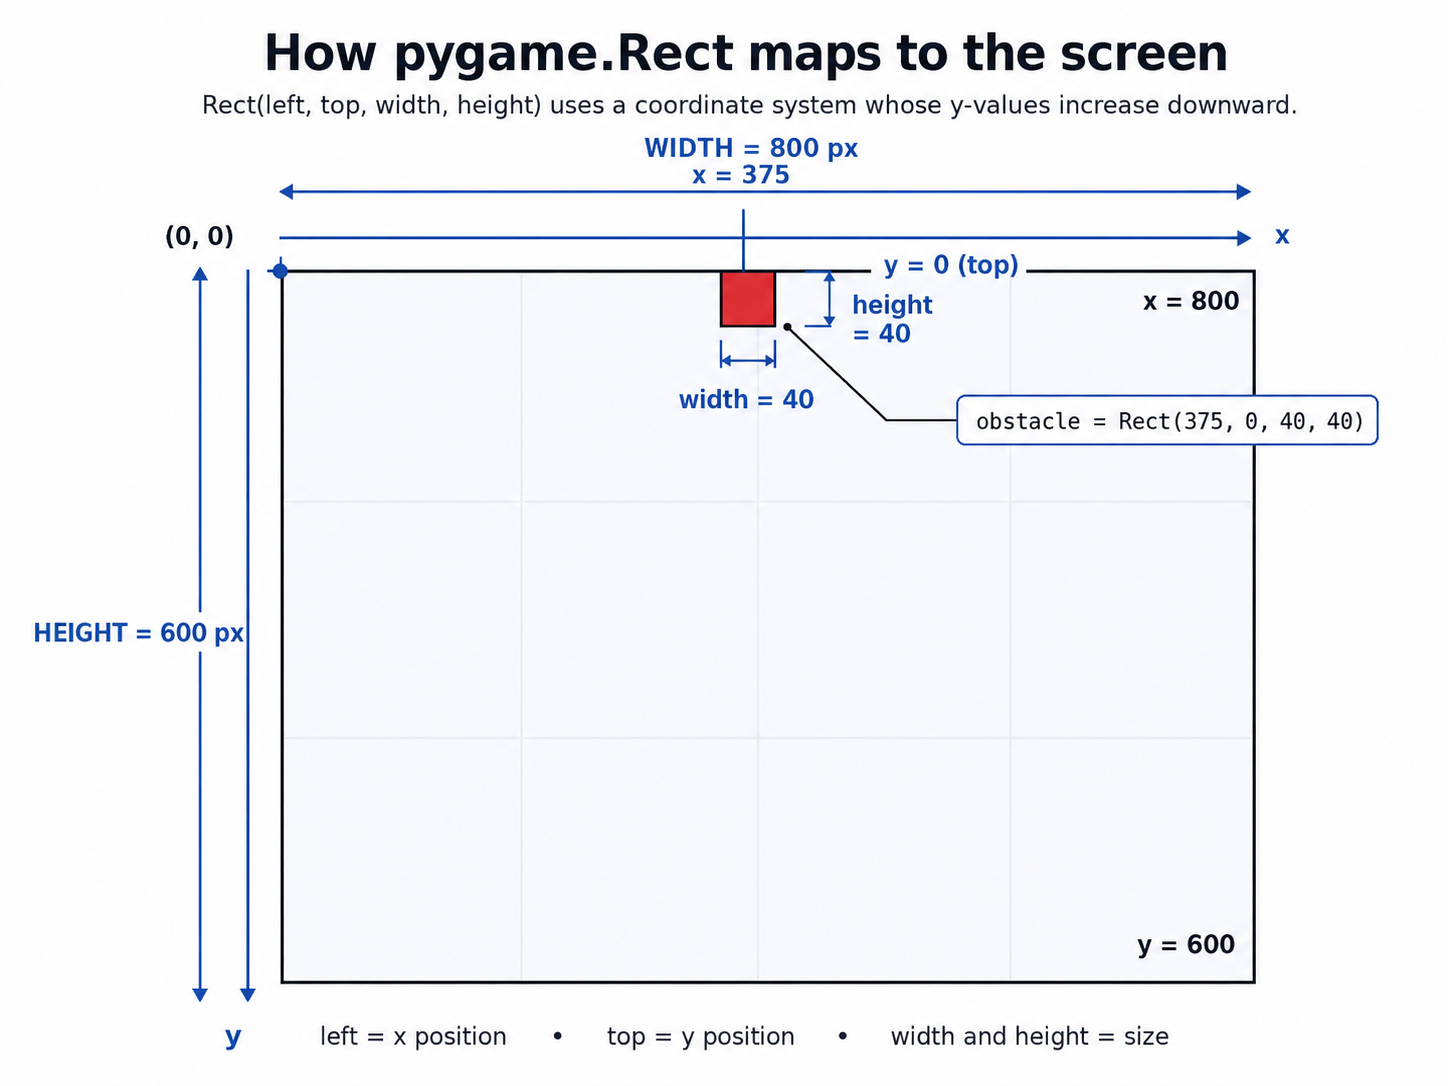
Once created, the Rect exposes those numbers as attributes we can read and write: obstacle.x, obstacle.y, obstacle.width, and obstacle.height. It also provides edge attributes such as obstacle.top, obstacle.bottom, obstacle.left, and obstacle.right.
Note that y and top refer to the exact same coordinate (the top edge), just as x and left refer to the same horizontal coordinate. We often use .y for movement math and .top or .bottom when checking boundaries to make the code more readable.
Keep in mind that a Rect is pure data; it stores numbers and nothing else. It never draws itself, and it does not know that a screen exists.
Drawing a Rect Instead of a Tuple
Since a Rect is just data, we still need pygame.draw.rect() to put it on the screen. Happily, that function accepts a Rect in the very same slot where we passed a plain tuple in the previous unit.
Both lines draw a rectangle; the difference is who owns the position:
- The green rectangle's numbers are written directly into the call, so changing its position means editing that line by hand.
- The red rectangle's numbers live in the
obstaclevariable, so any code anywhere in the loop can move it, and the drawing call automatically follows along.
We are deliberately leaving the green rectangle as a tuple. It is static decoration, a floor marker for the player that will arrive in the next unit. The red one is a live game object, so it earns its own Rect.
The Animation Recipe: Update, Then Draw
Animation in a game is less magical than it looks: on every pass through the loop, we change the object's numbers a little and then redraw the entire scene. Because that happens sixty times per second, our eyes read the sequence of still frames as smooth motion.
obstacle_speed is measured in pixels per frame, not pixels per second, so the frame cap from our first unit matters here. At 60 FPS, our square travels pixels every second, crossing the 600-pixel display in about two and a half seconds. Doubling the speed value doubles that pace.
The order inside the loop is important and stays the same from now on: handle events, update positions, clear and draw, then flip the display.
Wrapping the Obstacle Back to the Top
The update line alone has an obvious flaw: obstacle.y grows forever. After roughly two and a half seconds, the square slides past the bottom edge and keeps going, so we are left staring at a scene without the obstacle while its y value climbs into the thousands.
Remember that in Pygame, the y-axis grows downward: y = 0 is the top row of pixels, while y = 600 is the boundary immediately below the final visible row of an 800 × 600 display. For a downward-moving object, the square is fully below the display as soon as its top edge is greater than or equal to the display height. Using obstacle.top >= HEIGHT therefore resets it on the first frame when none of its pixels are visible, avoiding an additional invisible frame.
Setting y back to 0 recycles the same Rect instead of building a new one. That wrap-check habit will pay off in the next course, when a whole list of obstacles needs to keep flowing without piling up in memory.
Putting It All Together
Here is the full program with the Rect, the per-frame update, and the wrap check in place.
Tracing a single frame: we drain the event queue, add 4 to obstacle.y, check whether the square's top has reached the display's bottom boundary, repaint the DARK_BLUE background over the previous frame, draw the GREEN floor marker, draw the RED square at its brand new position, draw the YELLOW circle, update the display with flip(), and let clock.tick(FPS) wait just long enough to keep us at 60 FPS.
On the screen, the red square glides down the middle of the display and returns to the top as soon as its top edge reaches the bottom boundary, producing a steady loop without an extra invisible frame.
Conclusion and Next Steps
Three ideas carried this lesson. First, a pygame.Rect bundles an object's position and size into one variable that we can read and modify. Second, changing that position a little on every frame, then redrawing, is all that animation really is. Third, a single bounds check recycles the object so the motion never stops and no memory is wasted.
In the next unit, we will hand a Rect to the player instead of an obstacle, and drive it with the arrow keys while keeping it inside the display. Before that, it is time to make this fall happen with your own hands: the upcoming practice tasks walk you from a static red block to a Rect, then to a moving Rect, then to an endlessly looping one, one small change at a time.
