Adding Player Movement
Introduction: From Watching to Playing
Welcome back to Pygame Foundations for your first game! We have reached the fourth and final unit of this course, and our scene is already alive: a dark blue 800 × 600 display redraws itself 60 times per second, while a red obstacle Rect slides down the screen and wraps back to the top as soon as it is fully below the bottom edge.
Something important is still missing, though. Everything on the screen moves on its own schedule, and the person sitting at the keyboard is just a spectator. A game becomes a game the moment input changes what happens on the screen.
By the end of this lesson, we will have a green player rectangle that glides left, right, up, and down while the arrow keys are held down, and firmly refuses to walk off the edge of the display. To keep the final scene focused on its two gameplay objects, we will intentionally remove the decorative yellow circle introduced in Unit 2. Three ingredients get us to the interactive result:
- A
pygame.Rectthat represents the player; - A per-frame reading of which keys are currently held;
- A boundary check that keeps the player inside the display.
Giving the Player a Rect of Its Own
In the previous unit, the green rectangle was drawn with hard-coded numbers passed straight into the draw call. That was fine for a decoration, but a player needs to remember and update its own position, so it deserves a Rect of its own, just like the obstacle.
The four numbers follow the familiar Rect(x, y, width, height) order: the player starts at and , which places it near the bottom center of the display, and it measures 50 pixels wide by 40 pixels tall. We also store the movement speed in player_speed instead of typing 5 directly into our movement code; we are about to use that number in four different places, and keeping it in one variable means we can tune how fast the player feels by editing a single line.
Notice that both variables live before the game loop. They describe the starting state of the game, so they should be created once, not rebuilt 60 times per second.
Two Kinds of Keyboard Input: Events vs. State
Pygame offers two different ways to learn about the keyboard, and picking the right one matters a lot here. The first is the event queue we already use for pygame.QUIT: a list of things that happened since the last frame. Pressing a key adds a pygame.KEYDOWN event to that queue, and releasing it adds a pygame.KEYUP.
That model is perfect for one-off actions, but it is not the best fit for continuous movement. What we actually want is state: not "was a key pressed?" but "is a key down right now?" That is what pygame.key.get_pressed() gives us. It returns a snapshot of every key on the keyboard, telling us which ones are currently held. We call it fresh each frame, right after the event loop and before any drawing code.
Turning Key State into Movement
With that snapshot in hand, moving the player is a matter of nudging its coordinates. Here is the block that goes inside the game loop, just after the event handling:
We index keys with constants like pygame.K_LEFT to check individual keys, and each one that is held shifts the player by player_speed pixels. As we saw with the falling obstacle, the -axis grows downward, so subtracting from player.y moves the player up and adding moves it down.
The detail worth pausing on: these are four separate if statements, not an if/elif chain. An elif chain would let only one direction win per frame, but separate checks let Left and Up both apply in the same frame, giving us free diagonal movement. And since each frame shifts the player by 5 pixels at 60 frames per second, the player travels about pixels per second when the target frame rate is maintained.
The Problem: The Player Can Escape
Run the scene with just that movement code, and something quickly goes wrong. Hold the Left arrow down and the green rectangle slides to the edge of the display, then keeps right on going until it disappears entirely.
The player has not been destroyed; it is simply somewhere we cannot see. Its -value keeps shrinking past into negative numbers, frame after frame, and Pygame faithfully draws it off-screen, where nothing is visible. Release the key, hold Right for the same amount of time, and it eventually wanders back into view.
We could fix this by hand with a chain of checks: if player.x < 0, set it to 0; if player.right > WIDTH, pull it back; then repeat the same idea for the top and bottom. That works, but it takes four if statements to say something quite simple, and it is easy to mix up an edge. Pygame gives us a better tool.
Clamping the Player Inside the Display
Those four manual checks collapse into a single line placed right after the movement block:
Two pieces work together here. screen.get_rect() asks the display surface for a Rect describing itself, which is Rect(0, 0, 800, 600): the entire play area. Then clamp_ip shifts the player Rect just enough to sit fully inside that boundary, without changing its width or height. If the player has drifted 5 pixels past the left edge, it gets pushed back to ; if it is already inside, nothing happens at all.
Here is what that correction looks like at each edge:
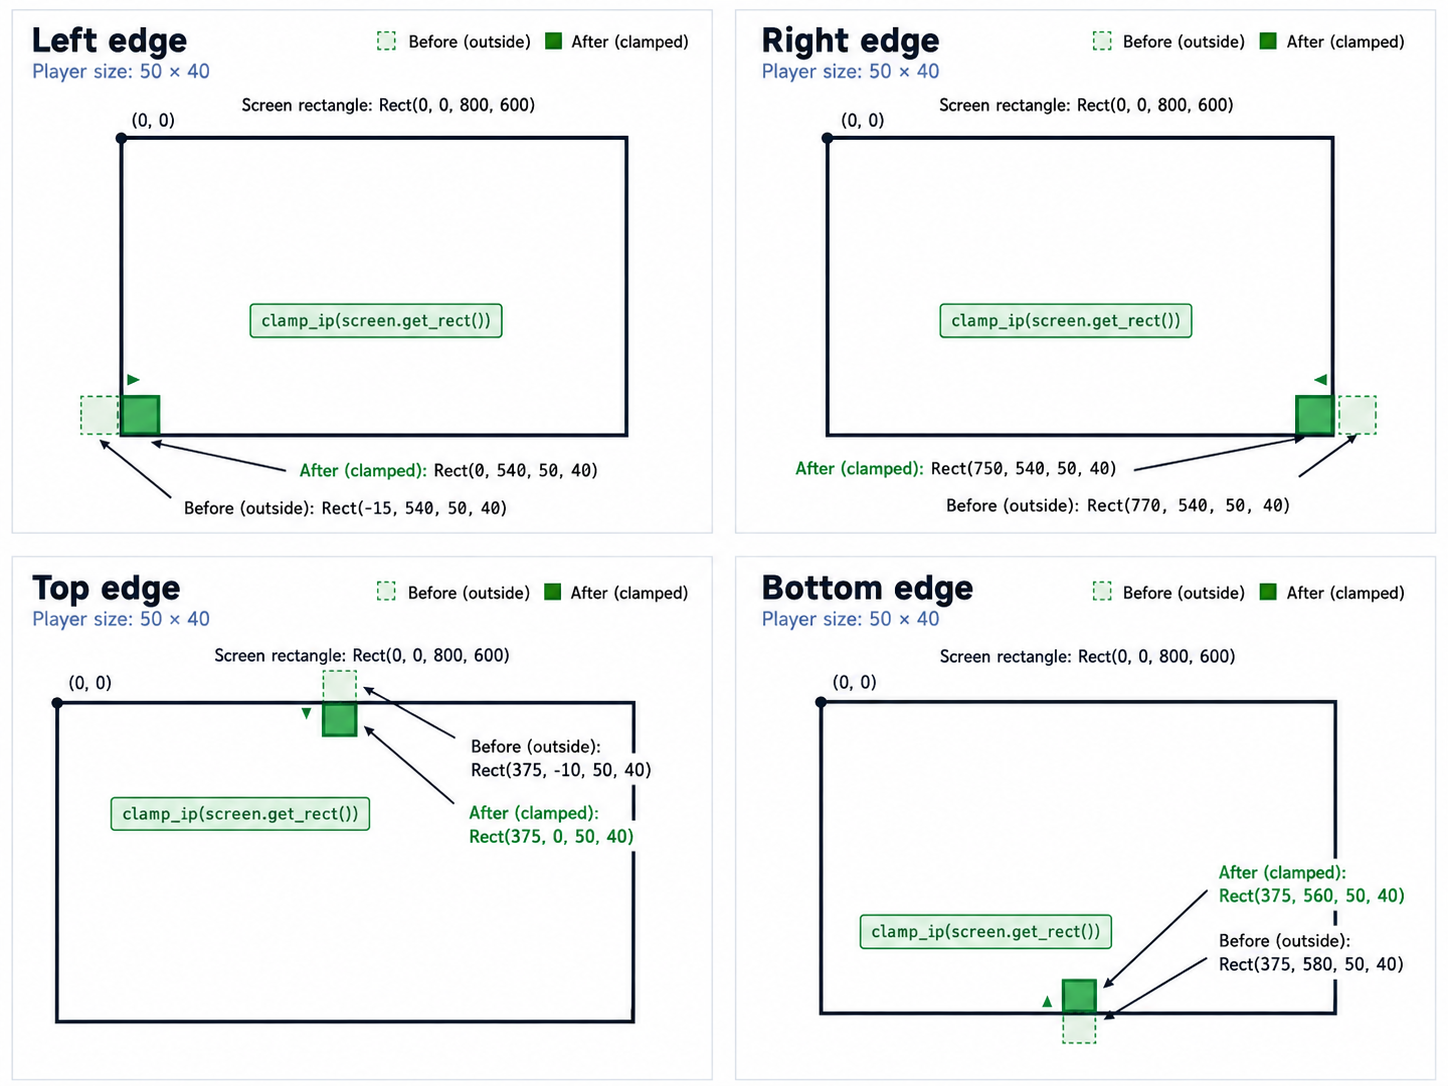
The _ip suffix stands for in place, meaning that the method modifies player directly. Pygame also offers a plain clamp(), but that one returns a new Rect and leaves the original untouched, which is a classic source of "why isn't anything happening?" confusion. Order matters too: clamping must come after all movement for the frame, so the correction is applied before we draw.
The Full Interactive Scene
Putting every piece together, here is the complete program. Notice that YELLOW and the circle draw call are no longer present; the circle was decorative, and this final scene intentionally focuses on the controllable player and falling obstacle.
Each trip through the loop follows the same rhythm: handle events, read the keys, move and clamp the player, move and wrap the obstacle, then fill the background, draw both rectangles, flip the display, tick the clock, and yield control with await asyncio.sleep(0). Notice the clean split that has emerged: all state updates happen first, all drawing happens second. One consequence is worth calling out: the green and red rectangles can now slide right through each other because nothing in this code is watching for that overlap yet.
Conclusion and Next Steps
Excellent work! Four ideas carried this lesson: a Rect is the natural home for any movable game object, pygame.key.get_pressed() reports continuous key state instead of one-time events, four separate if blocks unlock diagonal movement, and clamp_ip() enforces all four boundaries in a single line.
That also wraps up this course. In four short units, we went from an empty display to a smooth, browser-ready, fully interactive scene: a game loop running at a steady 60 FPS, shapes drawn from colors and coordinates, an obstacle animating and wrapping on its own, and now a player under our direct control. In the next course, that harmless pass-through between the player and the obstacle becomes the heart of the game: many obstacles at once, collision detection, a score, and sound effects.
Now let's put the arrow keys to work: the upcoming practice tasks will have us turn the green rectangle into a real player Rect, wire up movement in all four directions, and lock it inside the display, one step at a time.
