Drawing Shapes in Pygame
Introduction: From an Empty Window to a Visible Scene
Welcome back to Pygame Foundations for your first game! In the first unit, we built the skeleton of a game: an 800 × 600 display with a caption, a loop that listens for the quit event, a solid background color, and a Clock that keeps everything running at a steady 60 frames per second. Although that display works, it is currently empty.
In this second unit, we will fill it. By the end, our display will show three shapes on the DARK_BLUE background:
- a
green rectanglenear the bottom center, - a
red rectangleup and to the left, - a
yellow circleover on the right.
These are not just decorations. The green rectangle is a stand-in for the player we will control with the arrow keys, and the other shapes preview the obstacles that will soon fall down the screen.
Colors as RGB Tuples
Pygame describes every color as a tuple of three numbers: (red, green, blue). Each channel ranges from 0 (no light) to 255 (maximum intensity). Mixing them produces any color we need: (255, 255, 255) is white, and (0, 0, 0) is black.
Look at DARK_BLUE: all three channels are low, so the color is dark. Since blue (48) is the largest of the three values, the darkness leans toward blue. In RED, the red channel dominates while green and blue remain low. YELLOW is high red plus high green, which is how screens produce yellow light.
We write these names in uppercase because they are constants: values we set once and never change. Defining them at the top of the file means we type GREEN instead of (87, 215, 170) every time; if we later want a different shade of green, we edit exactly one line.
The Screen Coordinate System
Before drawing anything, we need to know how Pygame addresses pixels. The display is a grid, and the origin (0, 0) sits at the top-left corner. The x value grows to the right, as expected, but the y value grows downward, which is the opposite of how graphs work in math class. A larger y value means a position lower on the screen.
For our 800 × 600 display, the corners are:
| Position | Coordinate |
|---|---|
| Top-left | (0, 0) |
| Top-right | (799, 0) |
| Bottom-left | (0, 599) |
| Bottom-right | (799, 599) |
| Center | (400, 300) |
A quick sketch makes that flipped y direction much easier to visualize:
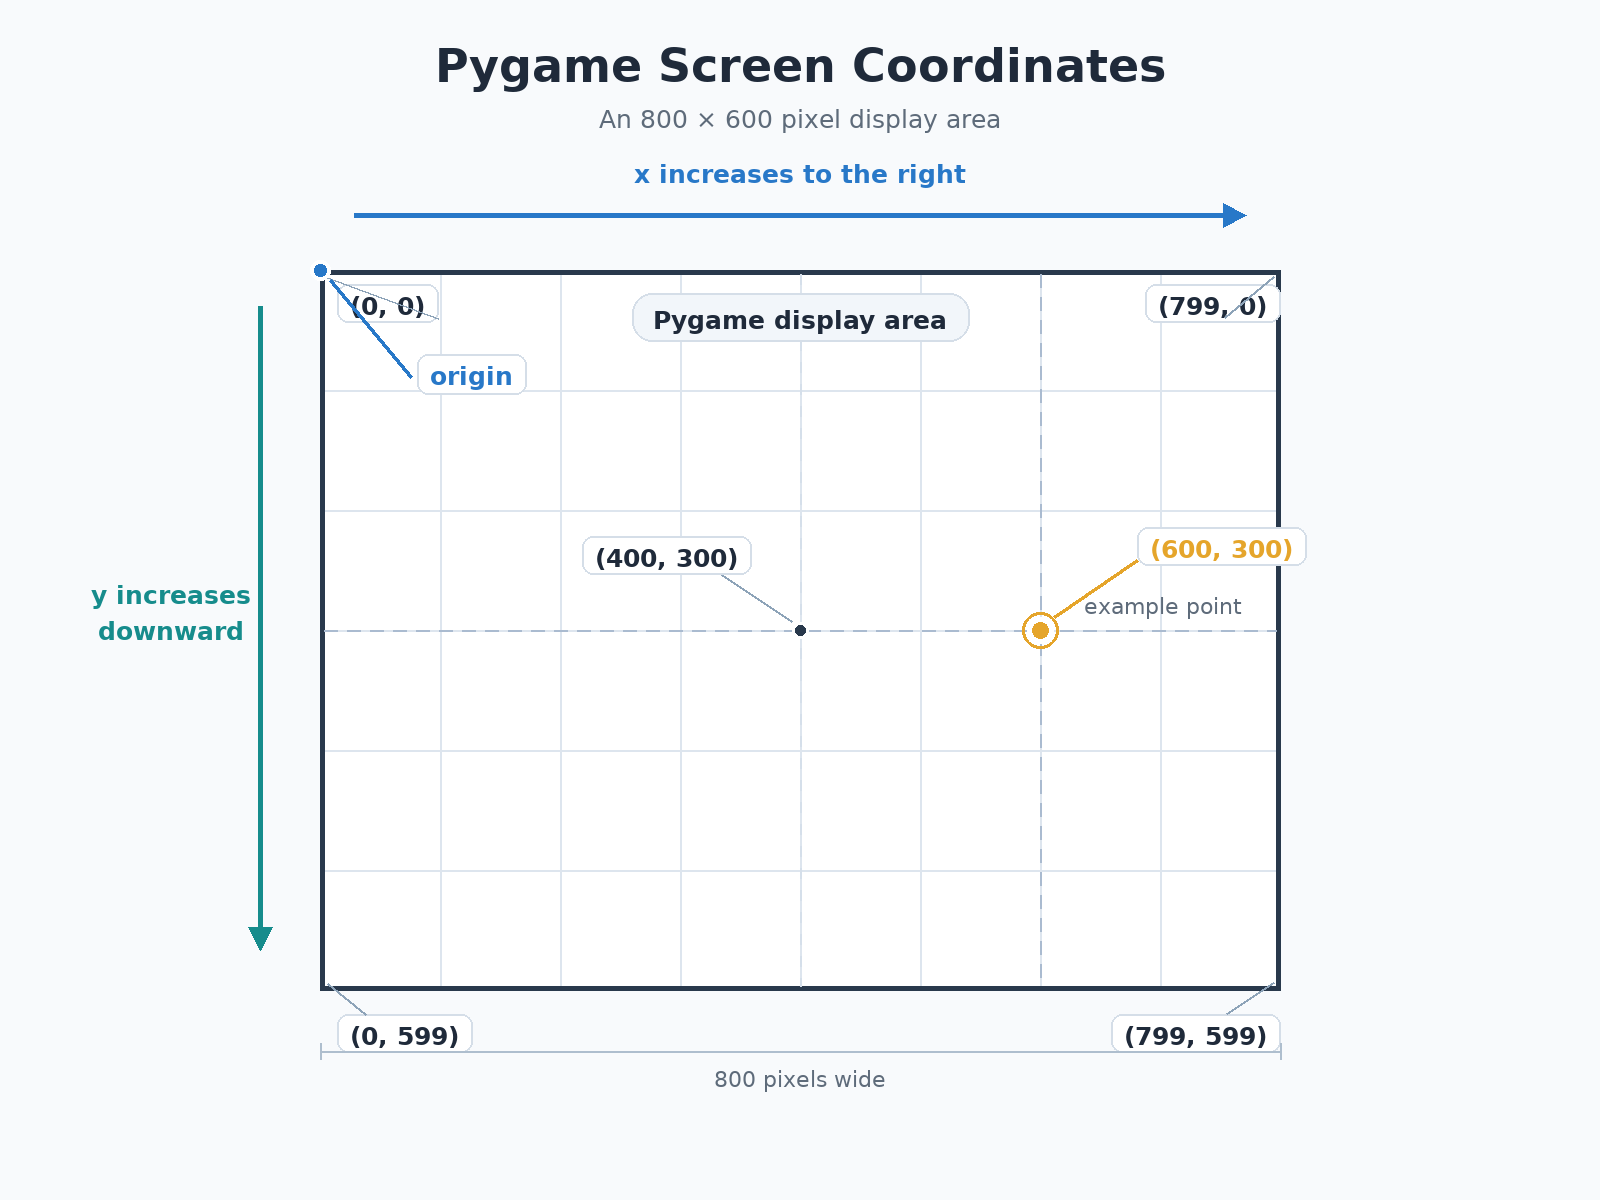
For instance, a point like (600, 300) is three-quarters of the way across the display and exactly halfway down: right of center and vertically centered. Every shape call for the rest of this course relies on this mental model, so it is worth pausing on the downward y-axis for a moment.
Drawing a Rectangle with pygame.draw.rect()
With colors and coordinates settled, we can begin painting. The pygame.draw module contains functions for simple shapes, and each one needs to know where to draw (a surface), what color to use, and what geometry to cover.
Reading the arguments from left to right:
screenis thesurfacewe draw on: thedisplay surfacereturned bypygame.display.set_mode()in the previous unit.GREENis the fill color, taken straight from ourconstant.(375, 540, 50, 40)is the geometry, in the order(x, y, width, height).
The important detail: (375, 540) is the rectangle's top-left corner, not its center. The shape extends 50 pixels to the right and 40 pixels down from that corner. Its right edge is x = 425 and its bottom edge is y = 580, but those boundary coordinates are not included in the rectangle's half-open area. The covered integer pixels therefore run from x = 375 through 424 and from y = 540 through 579. Since 375 is close to half of 800, and 540 is near the bottom of 600, this rectangle lands near the bottom center — exactly where a player character belongs.
Adding More Shapes: A Second Rectangle and a Circle
Drawing another shape is just another call. To place a second rectangle elsewhere, we keep the same size and change only the position numbers.
The red rectangle is a 40 × 40 square whose top-left corner sits at (200, 100): fairly high up and left of center. Nothing else has changed, which demonstrates how freely we can position identical shapes anywhere in the 2D space.
The pygame.draw.circle() call looks similar, but its geometry works differently, which often confuses beginners:
(600, 300)is the circle'scenterpoint, not a corner.25is theradiusin pixels, passed as a separate argument rather than inside thetuple.
This side-by-side diagram highlights the difference between the two geometry styles:
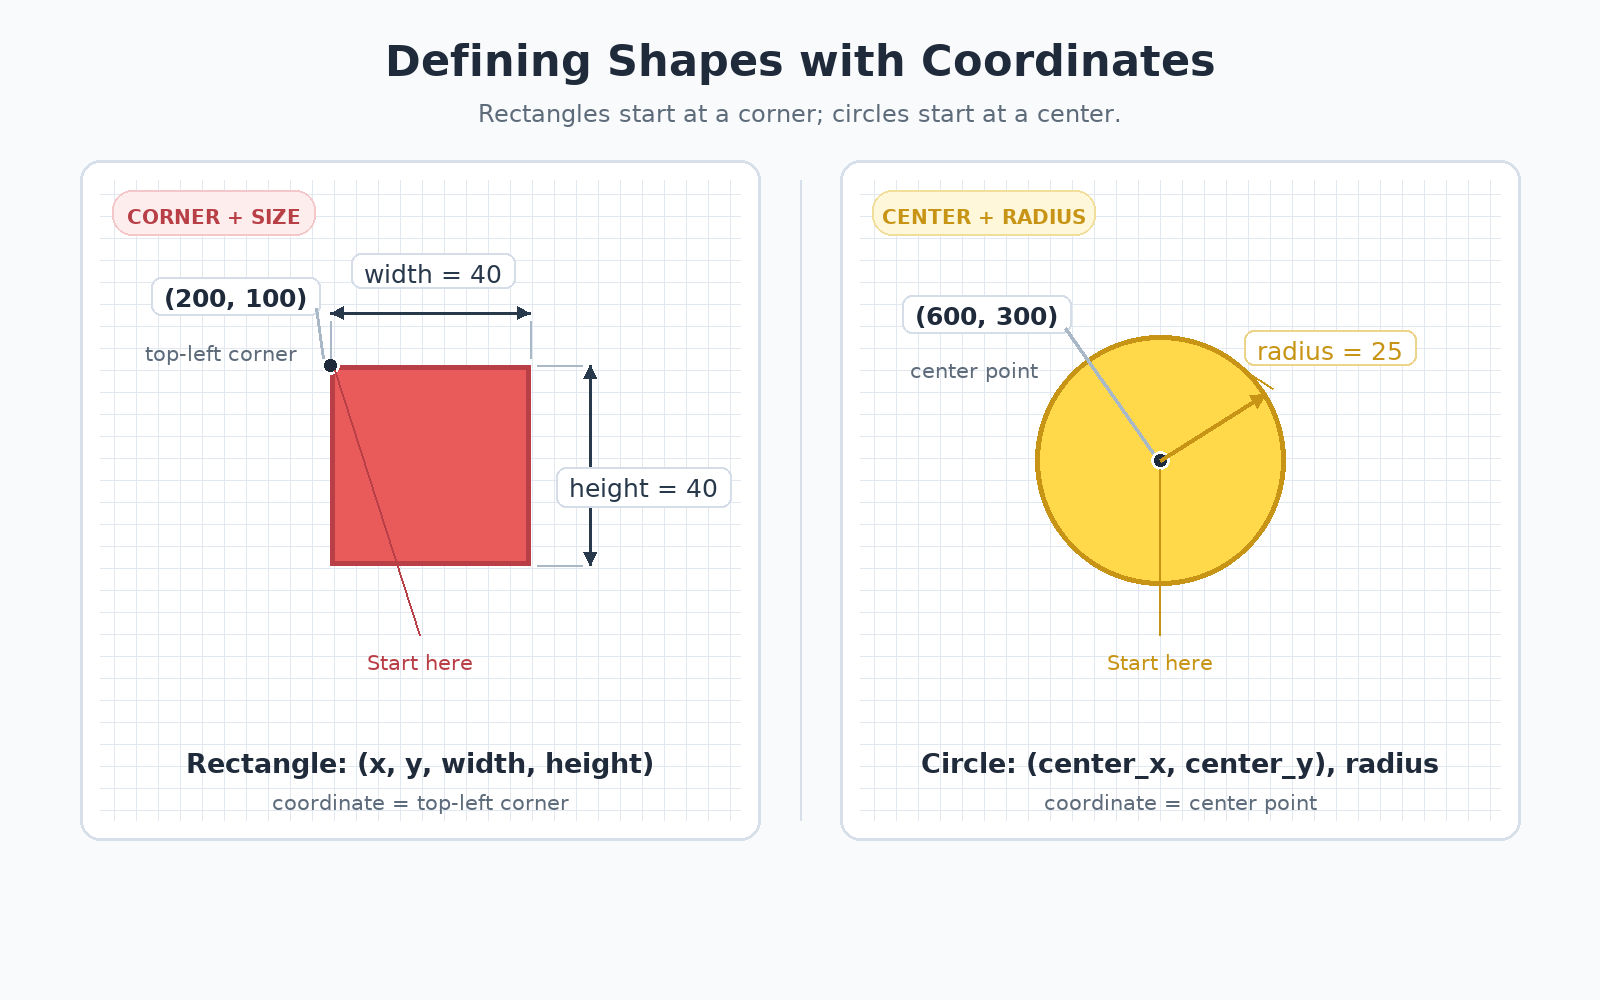
So the circle's geometric bounds extend from x = 575 to 625 and from y = 275 to 325. Rectangles use corner plus size; circles use center plus radius. Keeping that difference straight saves a lot of confused debugging.
Order Matters: Fill, Draw, Flip
These calls do not stand alone: they belong in a specific spot inside the loop, positioned between the fill and the flip.
Think of it as painting on a canvas that we reuse for every frame. screen.fill() covers everything with DARK_BLUE, erasing whatever was there before. The pygame.draw.* calls then paint on top in the order written, so a later shape will cover an earlier one if they overlap. Finally, pygame.display.flip() updates the full visible display with the finished canvas.
If you break this order, things will go wrong: without the fill, old frames remain and moving shapes leave smears; drawing after the flip means our work is not included in the display update that just occurred, so it will not be shown until a later update.
Why the Shapes Are Redrawn Every Frame
Here is the idea beginners most often miss: Pygame does not remember our shapes. pygame.draw.rect() does not create a rectangle object that lives on the screen; it simply colors in some pixels on the surface. The moment we call screen.fill() again, those pixels are gone.
That is why the three draw calls sit inside the while running loop rather than before it. The loop runs 60 times per second, so all three shapes are repainted 60 times per second. The picture looks stable because every frame is nearly identical to the last.
This apparent inefficiency is actually the engine of animation. If we repaint from scratch every frame, we are free to shift the coordinates slightly each time, and the shape appears to glide across the screen. That is exactly the trick we use in the next unit.
The Complete Program
Here is the full program with this unit's additions folded into the loop from the previous unit.
Only two regions changed: the constants block gained three colors, and the loop gained three draw calls between the fill and the flip. Everything else, including the async structure that keeps the browser responsive, remains exactly as we built it. Running this code displays a DARK_BLUE canvas with a GREEN rectangle near the bottom center, a small RED square in the upper-left area, and a YELLOW circle to the right of center.
Conclusion and Next Steps
In this unit, we turned an empty display into a scene. We defined colors as uppercase RGB constants, learned that the pixel grid starts at the top-left with y growing downward, drew rectangles with pygame.draw.rect() using (x, y, width, height) from the top-left corner, drew a circle with pygame.draw.circle() using a center point and a radius, and locked in the fill → draw → flip rhythm that every frame follows.
Next, we will replace these hard-coded number tuples with pygame.Rect objects, which store a shape's position and size in one tidy package and let us nudge that position every frame so our shapes finally move. Before that, it is your turn: in the exercises ahead, you will add each color and each shape yourself and watch the scene appear piece by piece on your own screen.
