Introduction

Embark on a journey into non-linear dimensionality reduction, with a specific focus on t-Distributed Stochastic Neighbor Embedding (t-SNE). Our goal is to understand the theory behind t-SNE and apply it using R's Rtsne package. This journey will take us through an understanding of the difference between linear and non-linear dimensionality reduction, a grasp of the core concepts of t-SNE, an implementation of t-SNE using the Rtsne package, and a discussion of potential pitfalls of t-SNE.

Linear vs. Non-Linear Dimensionality Reduction

Dimensionality reduction is a pragmatic exercise which seeks to condense the number of random variables under consideration, thus obtaining a set of principal variables. By familiarizing ourselves with the dimension, we can select the technique that best suits our needs.

Imagine having a dataset that contains a person's height in inches and centimeters. These two measurements convey the same information, so one can be removed. This is an example of linear dimensionality reduction. Unlike PCA, a popular linear technique, non-linear techniques like t-SNE adopt a different approach, capturing complex relationships by preserving distances and separations, irrespective of the dimension space.

Understanding t-SNE: High-dimensional Space Calculations
Understanding t-SNE: Low-dimensional Space Calculations
Implementing t-SNE: R Implementation

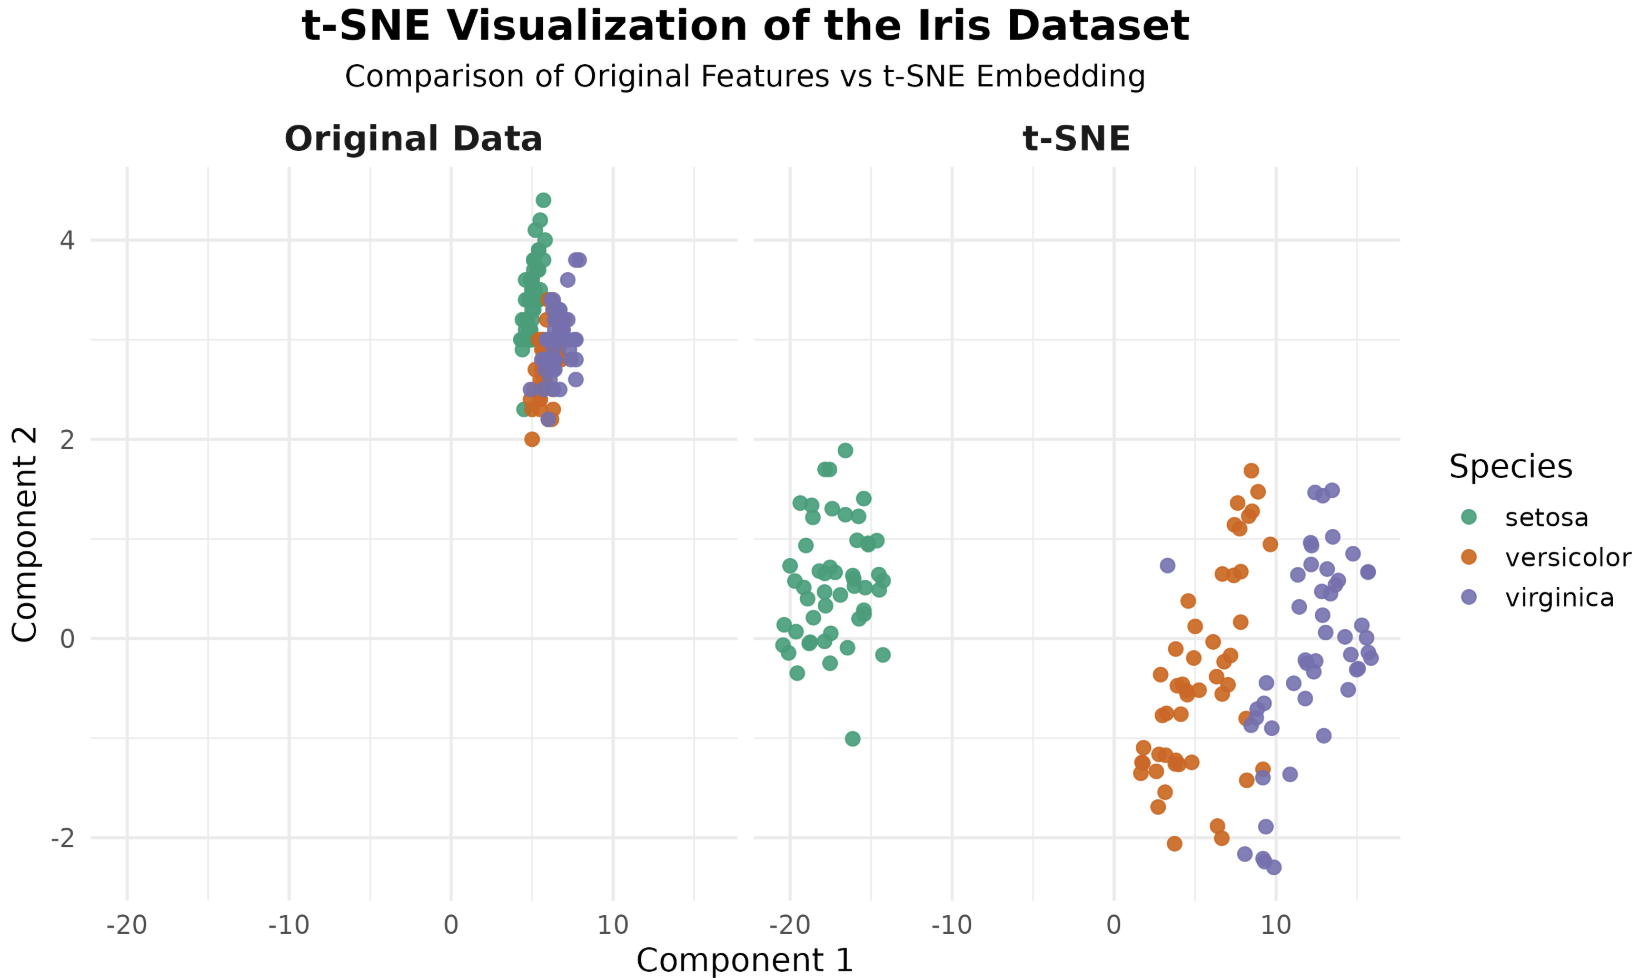
Now, let's see how to implement t-SNE in R using the Rtsne package, a popular tool for t-SNE in R. We'll use the classic Iris dataset, which contains measurements of iris flowers from three different species. We'll build a t-SNE model using Rtsne, apply it to our data, and visualize both the original and reduced data using ggplot2 with facets for a clear side-by-side comparison.

R Sample code for t-SNE and Analysis

Let's walk through the process step by step, starting with a look at the original dataset, then applying t-SNE, and finally visualizing and comparing the results. We'll also include print statements to help you understand how the data transforms at each stage.

library(Rtsne)
library(ggplot2)
library(datasets)
library(dplyr)

# Load the Iris dataset
data(iris)
data <- as.matrix(iris[, 1:4])
target <- iris$Species

# Show the first few rows of the original data
cat("First 5 rows of the original Iris data:\n")
print(head(iris, 5))

# Check for duplicate rows
num_duplicates <- sum(duplicated(data))
cat("\nNumber of duplicate rows in the data:", num_duplicates, "\n")

# Remove duplicate rows (required by Rtsne)
# Why is this important? Rtsne cannot handle duplicate rows because it can cause the algorithm to get stuck or produce misleading embeddings. Duplicates can lead to zero distances between points, which interferes with the probability calculations and optimization process.
unique_idx <- !duplicated(data)
data_unique <- data[unique_idx, ]
target_unique <- target[unique_idx]

cat("\nFirst 5 rows of the unique data (after removing duplicates):\n")
print(head(data_unique, 5))

# Run t-SNE
tsne <- Rtsne(data_unique, dims = 2, perplexity = 30, verbose = TRUE)

# Show the first few rows of the t-SNE output
cat("\nFirst 5 rows of the t-SNE embedding:\n")
print(head(tsne$Y, 5))

# Prepare data for plotting in the requested style
original_df <- data.frame(
  x = data_unique[, 1],
  y = data_unique[, 2],
  cluster = target_unique,
  method = "Original Data"
)

tsne_df <- data.frame(
  x = tsne$Y[, 1],
  y = tsne$Y[, 2],
  cluster = target_unique,
  method = "t-SNE"
)

all_data <- rbind(original_df, tsne_df)

# Set a color palette for the species
palette <- c(
  "setosa" = "#1b9e77",
  "versicolor" = "#d95f02",
  "virginica" = "#7570b3"
)

# Plot using facets in the requested style
plot <- ggplot(all_data, aes(x = x, y = y, color = cluster)) +
  geom_point(size = 2.5, alpha = 0.9) +
  facet_wrap(~ method, nrow = 1) +
  scale_color_manual(values = palette, name = "Species") +
  labs(
    title = "t-SNE Visualization of the Iris Dataset",
    subtitle = "Comparison of Original Features vs t-SNE Embedding",
    x = "Component 1", y = "Component 2"
  ) +
  theme_minimal(base_size = 14) +
  theme(
    panel.background = element_rect(fill = "white", color = NA),
    plot.background = element_rect(fill = "white", color = NA),
    strip.background = element_rect(fill = "white", color = NA),
    strip.text = element_text(face = "bold", size = 15),
    plot.title = element_text(face = "bold", size = 18, hjust = 0.5),
    plot.subtitle = element_text(size = 13, hjust = 0.5),
    legend.position = "right"
  )

In this code, we:

  • Load the Iris dataset and display the first few rows to remind you of its structure.
  • Check for and count duplicate rows.
  • Remove duplicate rows, which is required because Rtsne cannot handle duplicates. Duplicates can cause the algorithm to get stuck or produce misleading embeddings, as they result in zero distances between points, interfering with probability calculations and optimization.
  • Show the first few rows of the unique data.
  • Run t-SNE and display the first few rows of the resulting embedding to illustrate the transformation.
  • Prepare two data frames: one for the original data (using the first two features) and one for the t-SNE embedding.
  • Combine these into a single data frame and use ggplot2 with facet_wrap to visualize both the original and t-SNE-reduced data side by side, colored by species.

The output will look similar to this:

Pitfalls when Using t-SNE

Though modern and effective, t-SNE comes with its share of pitfalls. Firstly, interpreting the global structure can be challenging due to disagreements between the different preservation features in t-SNE. Secondly, reproducibility presents a challenge due to random initialization, which can lead to varied results across different t-SNE runs. Finally, t-SNE is sensitive to hyperparameters such as perplexity and learning_rate, whose tuning will be covered in later lessons.

Lesson Summary and Practice

Great job! We've distinguished between linear and non-linear dimensionality reduction and explored t-SNE. We've covered practical lessons in implementing t-SNE with R's Rtsne package and have had discussions on potential pitfalls that might arise. In future lessons, we will focus on visualizing t-SNE results, delving into t-SNE's parameter tuning, and exploring its application with real-world examples. Let's continue to deepen your understanding in the next stage of this educational journey!

Sign up
Join the 1M+ learners on CodeSignal
Be a part of our community of 1M+ users who develop and demonstrate their skills on CodeSignal