Welcome back to Measuring Space at Home! This is lesson four of five, which means we are almost at the finish line. So far, we have built a solid set of skills: reading tape measures and converting between feet-and-inches formats, computing rectangular area with material allowances, and splitting irregular rooms into simpler rectangles. Every one of those techniques assumed we were standing inside a room with a tape measure in hand.
In this lesson, we shift our perspective from the room itself to a floor plan, the bird's-eye drawing you see in real-estate listings, apartment brochures, and home-improvement guides. We will learn to recognize common floor plan symbols, read the dimension labels printed on a plan, and use a scale ratio to translate small measurements on paper into real-world distances. By the end, you will be able to pick up a listing sheet and confidently figure out how large each room actually is.
Why Floor Plans Matter
Before we can visit a property or pull out a tape measure, a floor plan is often the first piece of information we get about a space. Rental listings, furniture-delivery guides, and renovation permits all rely on these scaled drawings. Being able to read one means we can judge room sizes, plan furniture layouts, and compare apartments without setting foot inside.
A floor plan is essentially a map of a home viewed from above. Walls appear as thick lines, openings are shown with special symbols, and everything is drawn smaller than real life according to a fixed ratio. Learning to decode that ratio — along with the symbols and labels on the drawing — is what this lesson is all about.
Common Floor Plan Symbols
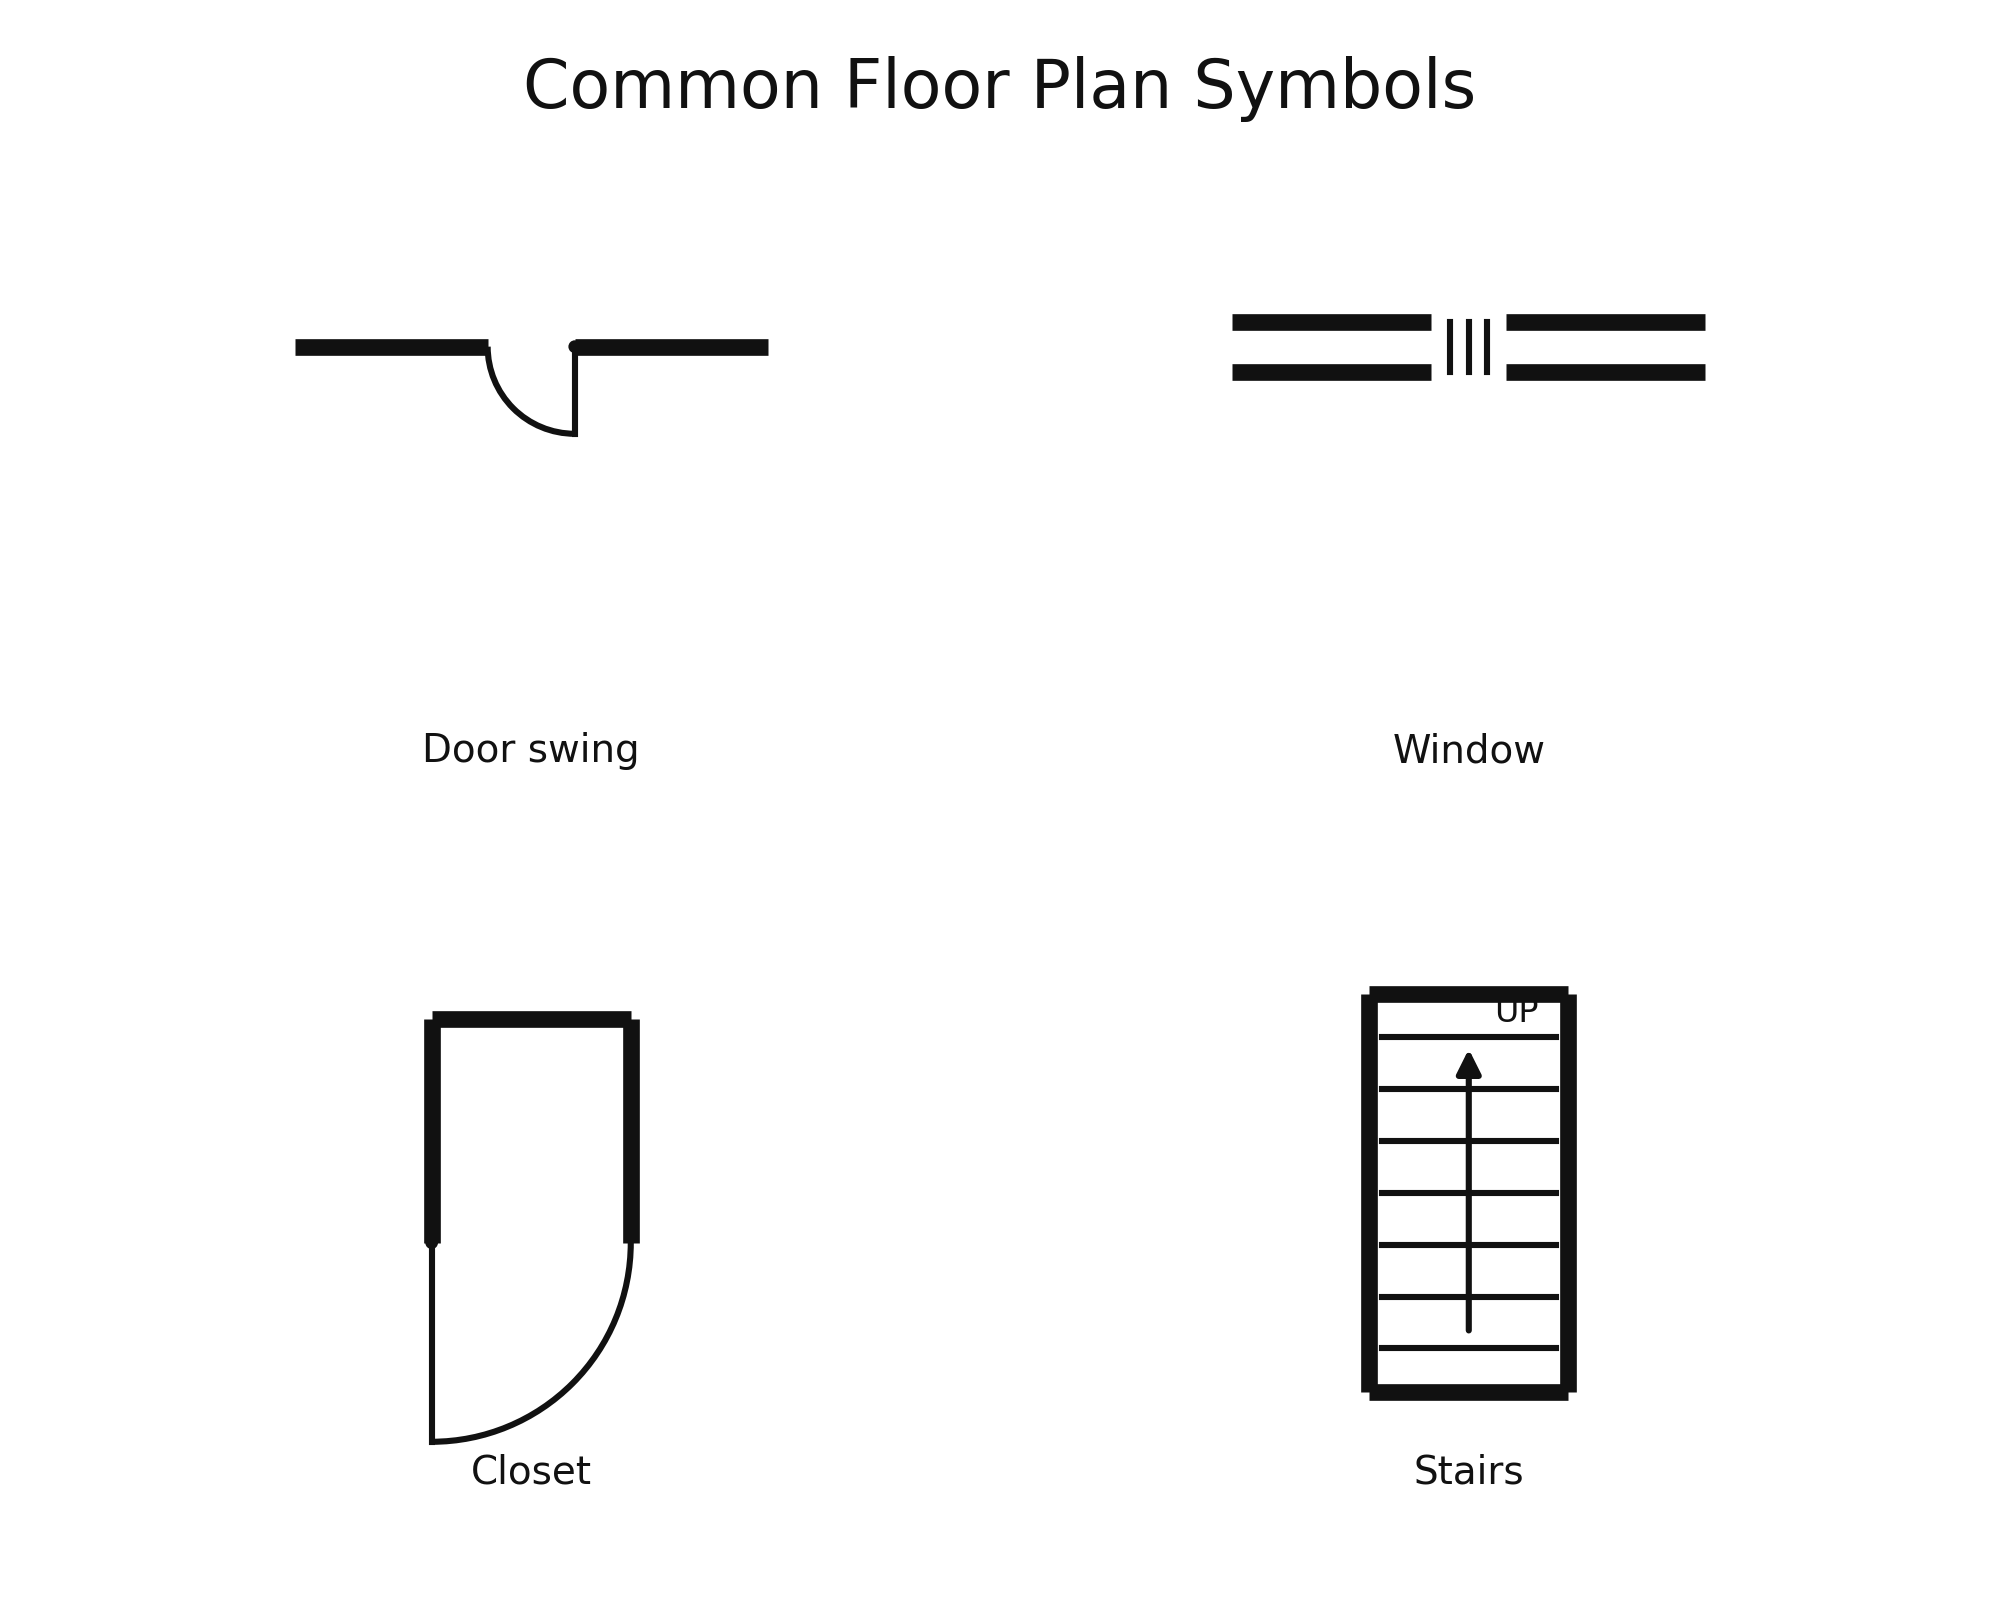
Floor plans use a handful of standard symbols to represent features that would be hard to show with plain lines alone. The table below lists the ones you will encounter most often:
Symbol
What It Represents
How It Looks on the Plan
Door swing
A hinged door and the arc it travels
A line (the door) with a quarter-circle arc showing the swing path
Window
A window opening in a wall
A thin break in the wall, often with three parallel lines
Closet
A storage area behind a door
A small rectangular space, usually with a door symbol across its opening
Stairs
A staircase going up or down
A set of parallel lines (the treads) with an arrow indicating direction
A quick visual reference can help connect these descriptions to what you will actually see on a plan:
When you spot a quarter-circle attached to a gap in a wall, that is a door. When you see a set of parallel lines filling a narrow rectangle, those are stairs. Recognizing these symbols at a glance will let you understand a layout before you even look at the numbers.
Reading Dimension Labels on a Plan
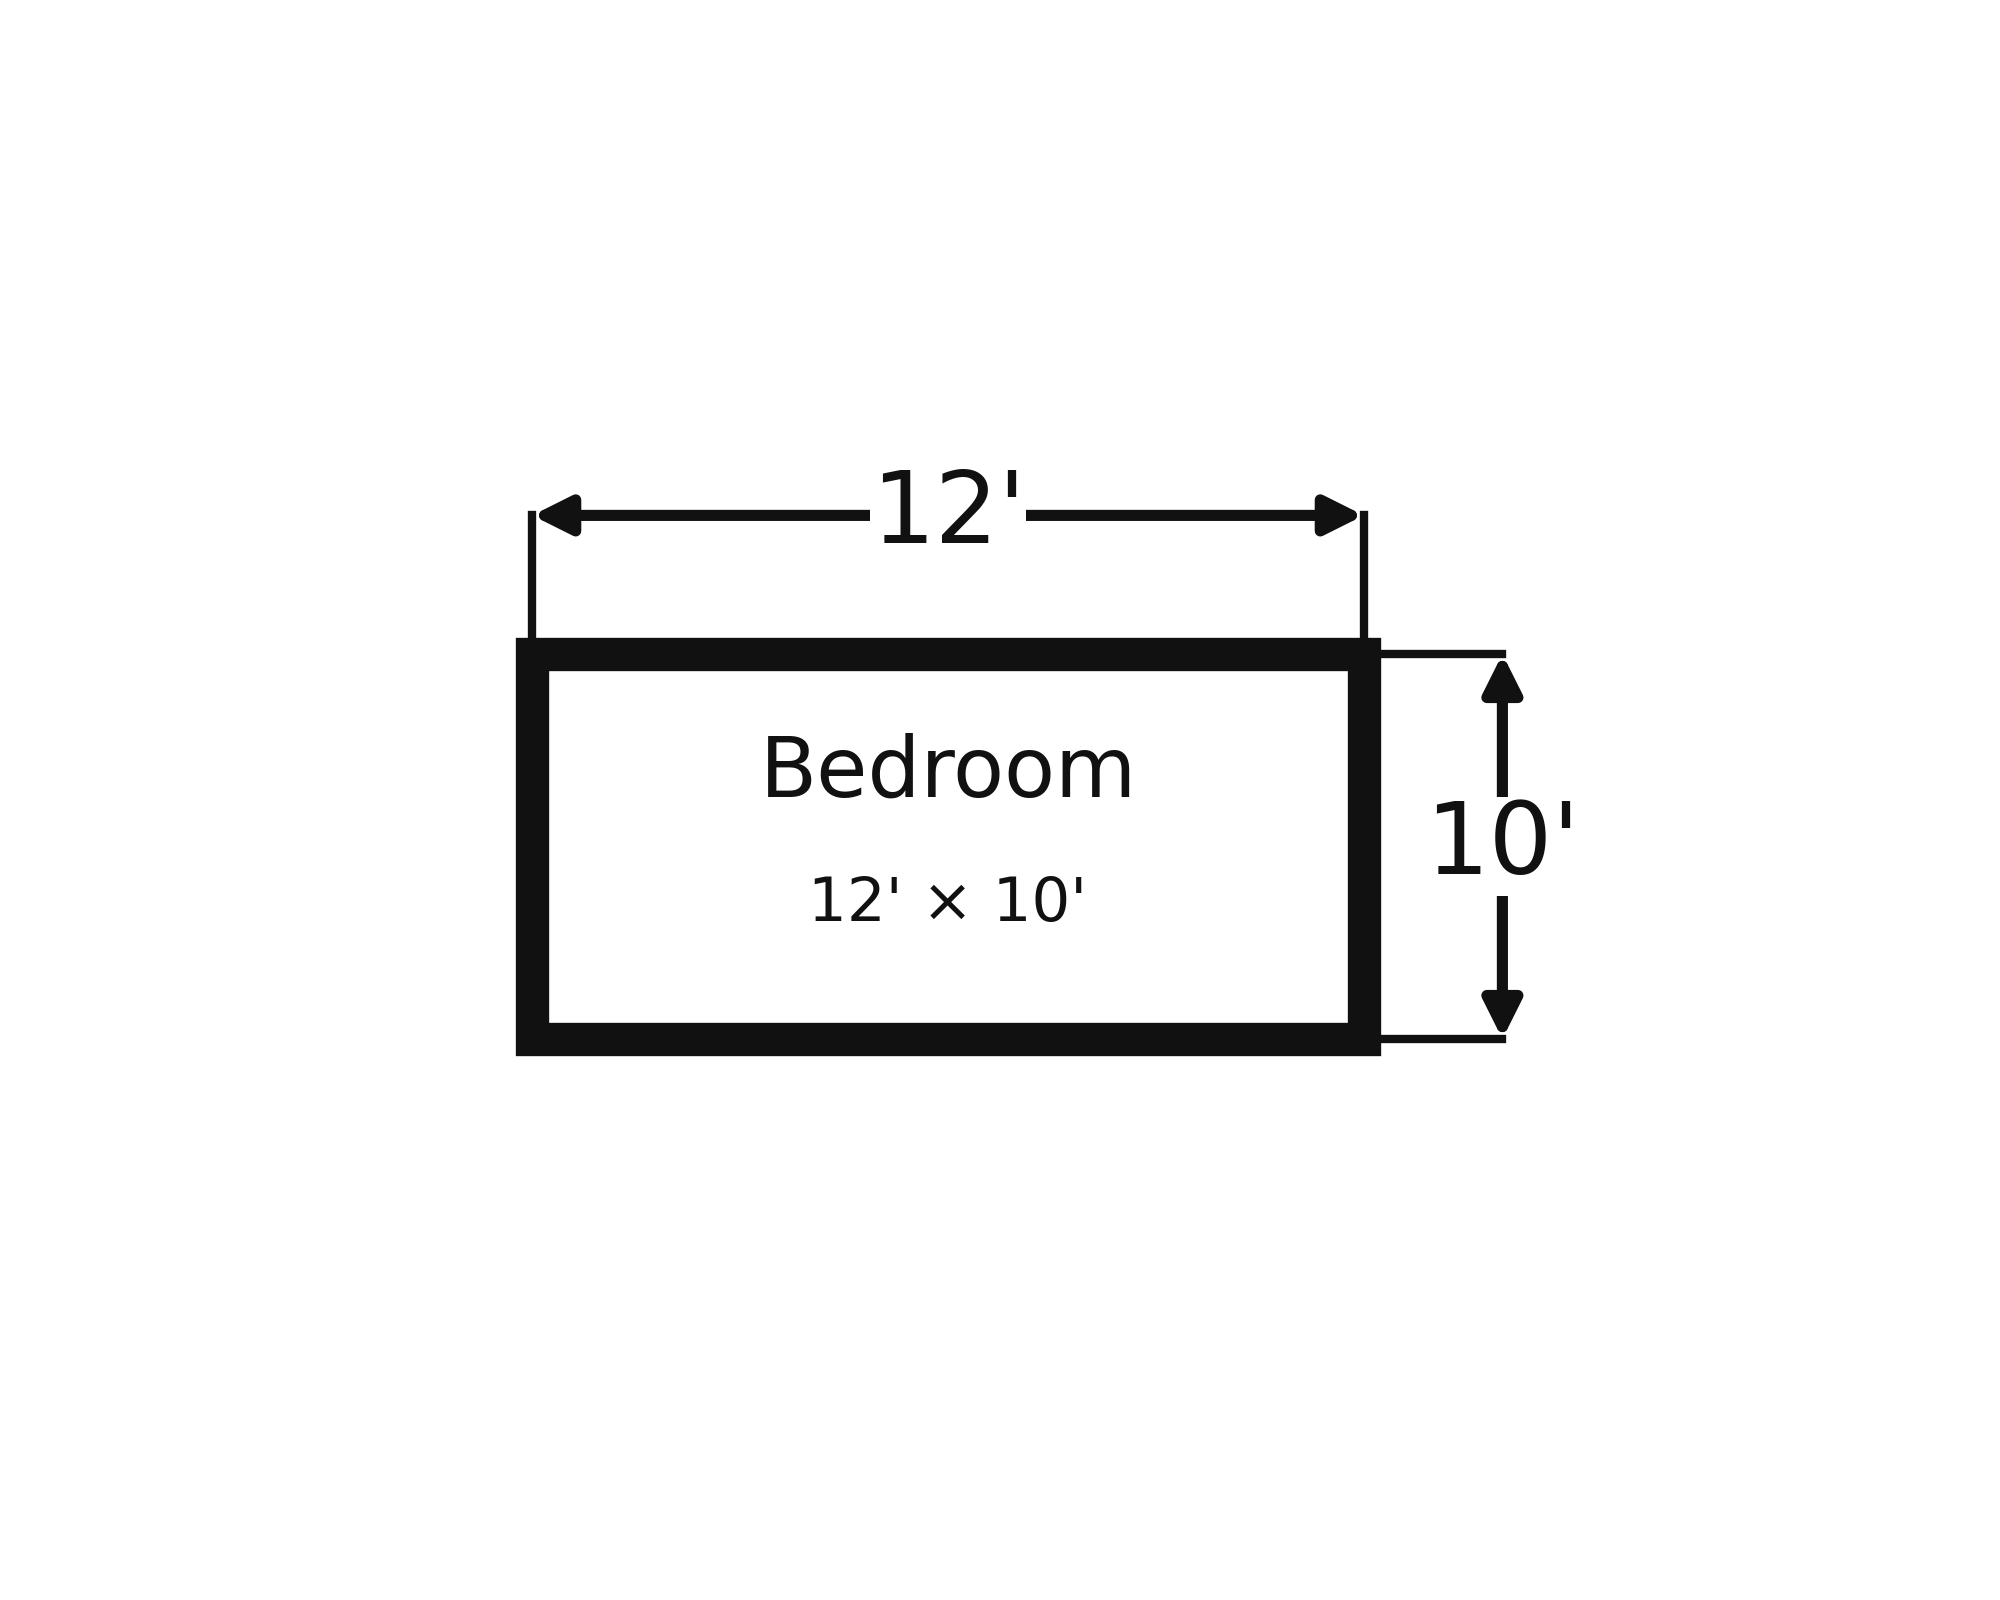
Once you can identify the symbols, the next step is reading the dimension labels that tell you how large each room or opening actually is. These labels typically appear as a number (or pair of numbers) placed inside or alongside a room, with thin lines and arrows pointing to the walls being measured.
A label like 12′ × 10′ means the room is 12 feet long and 10 feet wide. You may also see mixed notation such as 11′ 6″ × 9′ 4″, which — as we covered in Lesson 1 — means 11 feet 6 inches by 9 feet 4 inches. Door and window openings are usually labeled with a single width, like 3′ 0″ for a standard interior door.
Pay close attention to where each label's arrows point. A label sitting between two walls with arrows touching the left and right walls gives you the room's width; a second label with arrows touching the top and bottom walls gives the depth. Misreading which pair of walls a label refers to is one of the easiest mistakes to make.
Here is a simple example showing how arrows and dimensions correspond to the walls being measured:
Understanding Scale Ratios
Applying a Scale Ratio Step by Step
From Plan to Real World: A Listing Example
Common Mistakes to Avoid
Conclusion and Next Steps
In this lesson, we learned how to read a floor plan from start to finish: recognizing symbols for doors, windows, closets, and stairs; reading dimension labels and their arrow markers; and converting plan measurements into real-world distances using a scale ratio. The core conversion is straightforward — divide the plan measurement by the plan side of the ratio (or, equivalently, multiply by the reciprocal) and the result is the real-world distance in feet.
Combined with the area and irregular-room techniques from earlier lessons, you can now look at a floor plan and calculate actual room sizes without ever stepping inside the property. Up next, the practice exercises will have you identify symbols, read labeled dimensions, and work through scale conversions on your own. Time to grab a floor plan and see how well those numbers translate to the real world!
Be a part of our community of 1M+ users who develop and demonstrate their skills on CodeSignal
Many floor plans print the real-world dimensions right on the drawing, so you can read them directly. Other plans — especially smaller diagrams in listings or permit documents — show only the scale ratio and expect you to measure the drawing yourself. The scale ratio tells you how a measurement on paper relates to the real-world distance.
One of the most common residential scales is:
41 inch on the plan=1 foot in real life
This means every quarter-inch you measure on the printed plan corresponds to one actual foot. If a wall measures 43 inch on paper, the real wall is 3 feet long. If a room edge measures 3 inches on the plan, the real room edge is 12 feet.
Other scales you might see include 81 in=1 ft (used for larger buildings where rooms need to fit on one page) and 21 in=1 ft (used for detailed close-ups of a single room). The concept is always the same: one small unit on paper stands for a larger number of real-world units.
Converting a plan measurement into a real-world distance takes three short steps:
Measure the distance on the plan in inches (or read it from a label that gives plan-inches directly).
Divide that measurement by the plan side of the scale ratio.
Multiply by the real-world side of the ratio.
With the common 41 in=1 ft scale, steps 2 and 3 simplify into a single multiplication:
Real-world feet=Plan inches÷41=Plan inches×4
Quick example. A bedroom measures 3.5 inches wide on the plan. Using the 41 in=1 ft scale:
3.5×4=14 ft
The bedroom is 14 feet wide in real life.
Another example with a different scale. Suppose the scale is 81 in=1 ft and a hallway measures 1.25 inches on the plan:
1.25÷81=1.25×8=10 ft
Notice the pattern: dividing by a fraction is the same as multiplying by its reciprocal. The multiplier for 41 in=1 ft is 4; for 81 in=1 ft it is 8; and for 21 in=1 ft it is 2.
Let's put everything together with a realistic scenario. Imagine you are browsing an apartment listing online. The floor plan states:
Scale: ¼ in = 1 ft
You measure the following distances on the printed plan (or the plan provides these plan-inch labels):
Feature
Plan Measurement
Living room width
321 in
Living room depth
4 in
Bedroom width
3 in
Bedroom depth
243 in
Front door opening
43 in
We convert each measurement by multiplying by 4:
Living room width=3.5×4=14 ftLiving room depth=4×4=16 ftBedroom width=3×4=12 ftBedroom depth=2.75×4=11 ftFront door opening=0.75×4=3 ft
Now we know the living room is 14 ft×16 ft and the bedroom is 12 ft×11 ft. If we want the areas (using what we learned in Lesson 2), we simply multiply:
Living room area=14×16=224 sq ftBedroom area=12×11=132 sq ft
The 3 ft front door opening matches a standard door width, which is a quick sanity check that our scale work is on track. Results that line up with everyday experience give us confidence the conversion is correct.
Even with a straightforward conversion process, a few small errors can throw off your results:
Using the wrong scale direction. The scale tells you how to go from the plan to real life. Multiplying when you should divide (or vice versa) will produce absurd numbers. If a room comes out to 2 feet wide or 200 feet wide, revisit the scale step.
Mixing labeled dimensions with plan-inch dimensions. Some plans print the real-world dimensions right on the drawing. In that case, no scale conversion is needed for those numbers. Only apply the scale when you are measuring the drawing itself or reading plan-inch values.
Ignoring the stated unit. Most floor plans you encounter in a U.S. home context will use feet and inches, but it is always good practice to confirm the units in the plan's legend. Using a scale ratio without checking the units first can lead to significant calculation errors.