Welcome to the first lesson of our course on building your own Deep Researcher using Python and Streamlit. In this course, you will learn how to create an AI-powered research tool with a user-friendly web interface.
Before we dive into building the tool, let’s talk about why we need something like Streamlit.
Python is a great language for data science and research, but most Python scripts run in the terminal or a notebook. This can make it hard for others to use your work, especially if they are not comfortable with code. Wouldn’t it be nice if you could turn your Python script into a simple web app, where users can interact with your research tool using sliders, buttons, and text boxes? That’s exactly what Streamlit helps you do.
Streamlit is designed to make it easy for anyone to build interactive web apps for data science and research, all in pure Python. You don’t need to know HTML, CSS, or JavaScript. You just write Python code, and Streamlit takes care of the rest.
Let’s start by understanding how Streamlit works differently from a regular Python script.
In a normal Python script, the code runs from top to bottom once, and then it stops. If you want to change something, you have to run the script again.
Streamlit changes this by treating your script as an app. Every time a user interacts with your app (for example, by moving a slider or clicking a button), Streamlit re-runs your script from the top. This means your app always shows the latest results based on the user’s input.
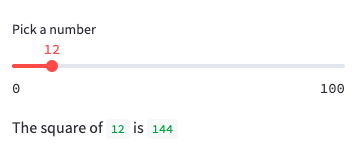
Let’s look at a simple example. Imagine you want to let the user pick a number and then display its square.
First, you import Streamlit:
Next, you add a slider widget for the user to pick a number:
Now, you calculate the square and display it:
When you put this all together, your script looks like this:
What happens when you run this?
- The app shows a slider from 0 to 100.
- When you move the slider, Streamlit re-runs the script, and the displayed square updates instantly.
Output Example:
This is the core idea: Streamlit apps are just Python scripts that re-run every time the user interacts with them.
Streamlit also provides caching tools (like @st.cache_data) to avoid repeating slow computations. We’ll cover caching in more detail later, but for now, just know that Streamlit is smart about not doing extra work when it doesn’t have to.
Now that you’ve seen what Streamlit code looks like, let’s talk about how to run a Streamlit app.
Suppose you have saved your script as app.py. To launch your app, use the command line:
- This command starts a local web server and opens your app in your browser at
http://localhost:3000. - You will see your widgets and outputs as a web page.
- Every time you change the code and save the file, Streamlit automatically updates the app in your browser.
What happens under the hood?
- Streamlit runs your script from top to bottom.
- It displays all widgets and outputs as a web page.
- When you interact with a widget, Streamlit re-runs the script and updates the page.
On CodeSignal, Streamlit is already installed, so you don’t need to worry about setup. On your own computer, you can install it with:
But for now, you can focus on writing and running Streamlit code right here.
In this lesson, you learned:
- Why Streamlit is useful for building interactive research tools in Python.
- How Streamlit treats your script as an app that re-runs on every user interaction.
- How to use simple widgets like sliders, text inputs, and buttons to make your app interactive.
- How to run a Streamlit app and see your work in the browser.
Next, you’ll get to practice these ideas by writing your own Streamlit code. You’ll see how easy it is to build interactive apps for your research projects. Let’s get started!
