Welcome back! In the last lesson, you learned what Streamlit is and how it helps you build interactive web apps using Python. Now, you are ready to take the next step and create the main page for your DeepResearcher tool.
In this lesson, you will learn how to:
- Add a title and helpful instructions to your app
- Collect user input using simple widgets
- Put everything together to create a clean, interactive page
By the end of this lesson, you will have a working starting point for your DeepResearcher frontend. This page will be the foundation for all the features you add in future lessons.
A good app starts with a clear title and some helpful instructions. In Streamlit, you can do this with st.title(), st.write(), and st.markdown().
Let’s start by setting up the page title.
st.title()displays a large, bold title at the top of your app. Here, we use an emoji and the name of our tool to make it stand out.
Next, let’s add a short description to tell users what the app does. You can use st.write() or st.markdown() for this. Both work for simple text, but st.markdown() lets you use Markdown formatting if you want.
- This line adds a short, clear description under the title.
What you see in your app:

Now, let’s make the page interactive by adding widgets. Widgets are elements like text boxes, sliders, and buttons that let users provide input to your app.
To let users enter their research topic, use st.text_input():
- The first argument is the label shown above the input box.
- The
placeholdershows a hint inside the box until the user types something. - The value the user enters is stored in the
user_queryvariable.
Suppose you want users to choose how many research iterations the tool should run. You can use st.slider():
- The first argument is the label.
- The next two numbers are the minimum and maximum values (1 to 10).
- The last number is the default value (3).
To let users start the research process, add a button:
- The label on the button is "Run Research."
- When the user clicks the button,
buttonbecomesTruefor that run.
Let’s combine everything into a single app page. Here’s how the code looks when you put all the pieces together:
What happens in this code:
- The page is given a title and a description.
- The user can type in a research topic.
- The user can choose the number of research iterations.
- The user can click a button to start the research.
What you see in your app:
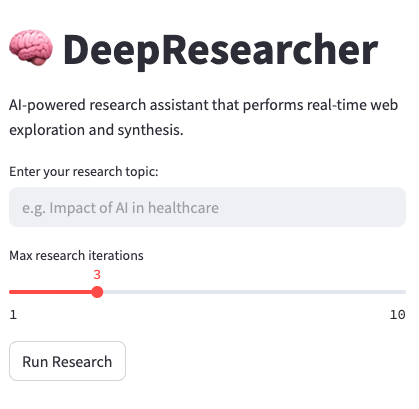
This simple layout is the starting point for your DeepResearcher frontend.
In this lesson, you learned how to:
- Add a title and description to your Streamlit app
- Collect user input with text boxes, sliders, and buttons
- Combine these elements to create a clean, interactive page
This basic page is the foundation for your DeepResearcher tool. In the next practice exercises, you’ll get hands-on experience building and customizing this page. Soon, you’ll be ready to add more advanced features and make your research assistant even smarter!
