In the previous lesson, you successfully generated your first image: a solid red square. To create that image, you used three separate integer variables for each pixel's color components: ired for red, igreen for green, and iblue for blue. This approach worked perfectly for a simple solid color, but let's think about what happens as our ray tracer becomes more sophisticated.
Imagine you're calculating the color of a pixel based on where a ray hits a sphere. You need to track the ray's starting position (three coordinates: x, y, z), the ray's direction (another three coordinates), the point where it hits the sphere (three more coordinates), and the surface normal at that point (yet another three coordinates). If you tried to manage all of these with separate variables, you'd quickly end up with code that looks like this:
This becomes unmanageable very quickly. You'd need to pass nine separate parameters to functions, perform operations on three variables at a time, and keep track of which x goes with which y and z. The code would be verbose, error-prone, and difficult to read.
This is where vectors come in. A vector is a mathematical object that naturally groups related values together. Instead of managing three separate variables, you work with a single entity that represents a point in 3D space, a direction, or even a color. In this lesson, you'll learn about the vec3 class, which will become one of your most important tools throughout this course.
The vec3 class provides a clean, organized way to work with three-component values. It handles all the common operations you need: adding vectors together, scaling them, measuring angles between them, and more. By the end of this lesson, you'll understand how vectors work, why they're essential for ray tracing, and how to use them in your code. You'll also discover something elegant: the same vec3 class that represents 3D positions and directions can also represent RGB colors, unifying your code in a beautiful way.
Before we dive into code, let's build a solid understanding of what vectors actually are and why they're so useful in 3D graphics. A vector is fundamentally a mathematical object that has both magnitude (size) and direction. Think of it as an arrow in space: the arrow points in a specific direction, and it has a specific length.
In 3D graphics, we typically work with vectors in three-dimensional space, which means each vector has three components. We usually call these components x, y, and z. For example, a vector might be written as (3, 4, 5), where 3 is the x-component, 4 is the y-component, and 5 is the z-component. These three numbers completely describe the vector.
Vectors can represent different things depending on the context. One common use is to represent a position or point in 3D space. If you think of a 3D coordinate system with an origin at (0, 0, 0), then the vector (3, 4, 5) represents a point that's 3 units along the x-axis, 4 units along the y-axis, and 5 units along the z-axis from the origin.
Vectors can also represent directions. Imagine you're standing at the origin and you want to describe which way to walk. The vector (1, 0, 0) means "walk in the positive x direction." The vector (0, 1, 0) means "walk in the positive y direction." The vector (1, 1, 0) means "walk diagonally, equally in the x and y directions." The magnitude of the vector tells you how far to walk, and the direction tells you which way.
Here's a real-world analogy that might help. Imagine you're giving someone directions to walk from one location to another. You might say, "Walk 3 blocks east, 4 blocks north, and go up 5 floors." That instruction is essentially a vector: where east is x, north is y, and up is z. The vector captures both the direction (northeast and upward) and the distance (the total length of the path).
Now let's look at how we implement vectors in C++ with the vec3 class. This class will encapsulate all the functionality we need for working with three-component vectors. Let's start by examining the basic structure of the class:
At the heart of the vec3 class is a simple array: double e[3]. This array stores the three components of our vector. We use double (double-precision floating-point numbers) rather than int because vectors in 3D graphics often need to represent fractional values. A direction vector might be (0.707, 0.707, 0), which represents a 45-degree angle. A position might be (1.5, 2.3, 4.7). Using double gives us the precision we need for accurate calculations.
The class provides two constructors. The first, vec3(), is a default constructor that initializes all three components to zero. The syntax e{0,0,0} is called a member initializer list, and it's an efficient way to initialize the array. The second constructor, vec3(double e0, double e1, double e2), lets you create a vector with specific values. For example, vec3(3, 4, 5) creates a vector with components 3, 4, and 5.
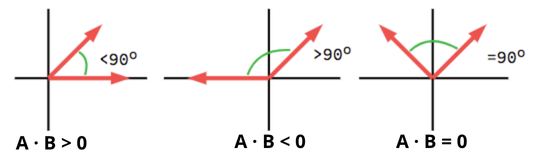
Beyond addition and scaling, there's another vector operation that's absolutely crucial for ray tracing: the dot product. The dot product takes two vectors and produces a single number (a scalar) that tells you something important about the relationship between those vectors.
The mathematical formula for the dot product is straightforward. If you have vectors u = (u₀, u₁, u₂) and v = (v₀, v₁, v₂), their dot product is u · v = u₀v₀ + u₁v₁ + u₂v₂. You multiply corresponding components and add up the results. Here's the implementation:
This function takes two vectors by const reference and returns a double. It's a simple calculation, but what does it mean geometrically? The dot product measures how much two vectors point in the same direction. Let's explore this with some examples.

Consider two vectors that point in exactly the same direction: u = (1, 0, 0) and v = (2, 0, 0). Both point along the positive x-axis; v is just twice as long. Their dot product is 1*2 + 0*0 + 0*0 = 2. The result is positive, which tells us the vectors point in generally the same direction.
Now consider two vectors that are perpendicular: u = (1, 0, 0) and v = (0, 1, 0). One points along the x-axis, the other along the y-axis. Their dot product is . When the dot product is zero, the vectors are perpendicular (orthogonal). This is an incredibly useful property.
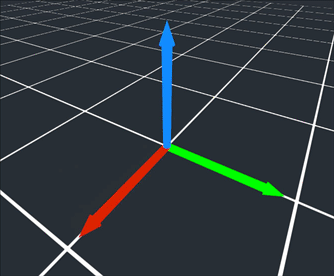
Another essential vector operation in 3D graphics is the cross product. While the dot product measures how much two vectors point in the same direction, the cross product produces a new vector that is perpendicular (at a right angle) to both input vectors. This is especially useful in ray tracing for calculating surface normals, which are needed for lighting and reflection calculations.
Here is an example, where the blue vector is the result of the cross product between A (red) and B (green)
Mathematically, if you have vectors u = (u₀, u₁, u₂) and v = (v₀, v₁, v₂), their cross product is:
Here's how we implement the cross product in code:
The resulting vector is perpendicular to both u and v, and its length is proportional to the area of the parallelogram formed by the two vectors. In ray tracing, the cross product is often used to compute the normal vector to a surface, which is critical for determining how light interacts with that surface.
For example, if you have two vectors lying on a surface, their cross product gives you the direction that is perpendicular to that surface—exactly what you need for lighting calculations.
In many ray tracing calculations, you need a vector that points in a certain direction but has a length (magnitude) of exactly 1. Such a vector is called a unit vector. Normalizing a vector means scaling it so that its length is 1, while keeping its direction the same.
The length (or magnitude) of a vector v = (x, y, z) is calculated using the Pythagorean theorem:
To normalize a vector, you divide each component by its length:
Here's how we implement this in code:
The length function computes the magnitude of the vector, and unit_vector returns a new vector pointing in the same direction but with a length of 1. Unit vectors are crucial in ray tracing for representing directions, such as the direction a ray travels or the direction of a surface normal. Using unit vectors ensures that calculations like lighting and reflection behave correctly and consistently.
Now we come to one of the most elegant aspects of the vec3 class: it can represent both geometric quantities (positions, directions) and colors (RGB values). This might seem surprising at first, but it makes perfect sense when you think about it mathematically.
Remember from the previous lesson that colors are represented as RGB triplets: three numbers for red, green, and blue. A vector is also three numbers: x, y, and z. Mathematically, they're identical structures. The operations we perform on them are also similar. When you add two colors, you add their components. When you scale a color (to make it brighter or dimmer), you multiply each component by a scalar. These are exactly the same operations we perform on geometric vectors.
To make this dual purpose explicit and to make our code more readable, we use type aliases. At the end of the vec3 header file, you'll see these lines:
The using keyword creates an alias: point3 is just another name for vec3, and color is also just another name for vec3. They're all the same type under the hood, but using different names in different contexts makes the code's intent much clearer.
When you write point3 camera_position(0, 0, 0);, it's immediately obvious that you're talking about a position in 3D space. When you write color pixel_color(1.0, 0.0, 0.0);, it's clear you're talking about a red color. Both are vec3 objects, but the names document what they represent.
In this lesson, you learned that vectors are mathematical objects with both magnitude and direction, represented by three components: x, y, and z. The vec3 class in C++ provides a clean way to work with these three-component values, supporting essential operations like addition, scalar multiplication, the dot product (measuring alignment), and the cross product (finding perpendicular vectors). You also saw how to normalize vectors to unit length, which is important for consistent calculations.
Importantly, the same vec3 class can represent both geometric quantities (like positions and directions) and colors (RGB values), thanks to type aliases (point3 and color). This unifies your code and makes it more readable.
You don’t need to memorize every detail now—what matters is understanding how vectors work and why they’re essential for ray tracing. In the next practice exercises, you’ll use the vec3 class hands-on to solidify these concepts. Let's continue building your ray tracer!