Welcome back! In the last lesson, you built the main HTML template for the LLM Prediction Game. That gave us the structure of the page, but right now, it probably looks very plain — just black text on a white background, with no special layout or colors.
In this lesson, you will learn how to use CSS (Cascading Style Sheets) to make your game look more attractive and easier to use. CSS is a language that controls how HTML elements appear on the page. With just a few lines of CSS, you can change colors, fonts, spacing, and even the layout of your game.
By the end of this lesson, you’ll know how to add a CSS file to your Flask project, understand what the provided CSS code does, and make simple changes to customize your game’s appearance.
Let’s quickly remind ourselves what we have so far. In the previous lesson, you created an HTML file (usually called index.html) that defines the structure of your game page. This file includes elements like headings, containers, input fields, and buttons.
Right now, if you open your game in a browser, it might look something like this:
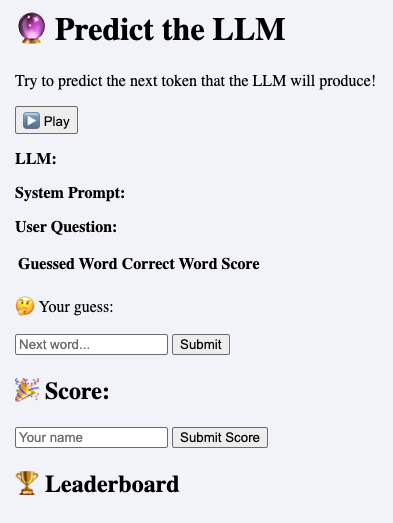
Everything is stacked vertically, with no colors or special formatting. This is because, by default, HTML does not include any styling. That’s where CSS comes in!
To style your game, you need to add a CSS file to your project and tell your HTML to use it. In Flask, static files like CSS are usually placed in a folder called static.
To start, create a file named style.css inside a folder called static in your project directory. The path should look like this:
Remember, in the last unit we already linked this file inside the index.html file using a <link> tag:
Now, let’s look at some of the CSS rules you will write in your style.css file. We’ll go through them step by step to see how they change the look of your game.
1. Styling the Body
font-family: sans-serif;changes the default font to something cleaner and easier to read.background: #f4f4f8;gives the whole page a light gray background.margin: 0; padding: 0;removes the default space around the page edges.
2. Centering and Styling the Main Container
max-width: 800px;keeps the game from stretching too wide.margin: 2rem auto;centers the container on the page and adds space above and below.background: white;makes the game area stand out from the gray background.border-radius: 10px;rounds the corners for a softer look.box-shadow: ...;adds a subtle shadow for depth.
3. Styling Headings and Descriptions
- This centers the main heading and description text.
4. Making the Game Output Stand Out
display: flex; flex-wrap: wrap;arranges the output words nicely, even if there are many.background: gainsboro;gives the output area a light gray background.padding: 1em;adds space inside the box.
5. Styling Tables and Inputs
- Tables are made to look clean and spaced out.
- Input fields are larger and easier to use.
6. Buttons and Hidden Elements
- Buttons are styled to be more clickable and visually appealing.
- The
.hiddenclass can be used to hide elements when needed.
How does this look in the browser?
With these styles, your game will have a modern, clean look. The main area is centered, the background is soft, and all elements are spaced out and easy to read.
Now that you have a working CSS file, you can easily make small changes to personalize your game.
Change the Background Color
Find this line in your CSS:
Try changing it to a different color, like light blue:
Change the Font
In the body rule, you can try a different font:
Adjust Button Colors
You can add a background color to your buttons:
How to Preview Changes
- Save your CSS file after making changes.
- Refresh the preview browser to see the new styles.
Experiment with small changes to see how they affect your game. This is a great way to learn!
In this lesson, you learned how to add and connect a CSS file to your Flask project, and you explored how the provided CSS styles make your game look more polished and user-friendly. You also saw how to make simple changes to customize your game’s appearance.
Next, you’ll get a chance to practice these skills by working through hands-on exercises. You’ll try editing the CSS yourself and see how your changes appear in the game. This will help you get comfortable with styling and prepare you for building even more interactive features in the future.
