Drawing Histogram Conclusions
Introduction
You have spent three lessons building a powerful set of skills, and now it is time to see what they can do together. Welcome to the final lesson of Analyzing Data with Histograms! So far, you can read bar heights to extract counts, classify the overall shape of a distribution, and spot clusters, gaps, and peaks hiding inside the data. Each of those skills answers a specific question about a histogram — but the most valuable question is the big one: What does this histogram actually tell us about the real world? That is exactly what this lesson is about. We will learn how to combine every observation into meaningful, evidence-based conclusions that go beyond describing and into genuine understanding.
From Observations to Conclusions
Think about the skills we have built so far as individual instruments in an orchestra. Reading bar heights is one instrument, identifying shape is another, and spotting clusters, gaps, and peaks adds a few more. Each one sounds fine on its own, but the real music happens when they all play together.
Drawing conclusions from a histogram means weaving everything we see in the display into a clear, supported statement about the data. Rather than just labeling a shape or pointing to a gap, we now ask, "So what does all of this mean for the real-world situation?" That question is the heart of this lesson, and answering it well is what separates someone who can read a histogram from someone who can truly analyze one.
Identifying Typical Values
One of the most practical conclusions we can draw from a histogram is an estimate of what values are typical in the dataset. We do this by looking at where most of the data is concentrated. The tallest bars and the densest clusters point us toward the range where a "common" observation is likely to fall.
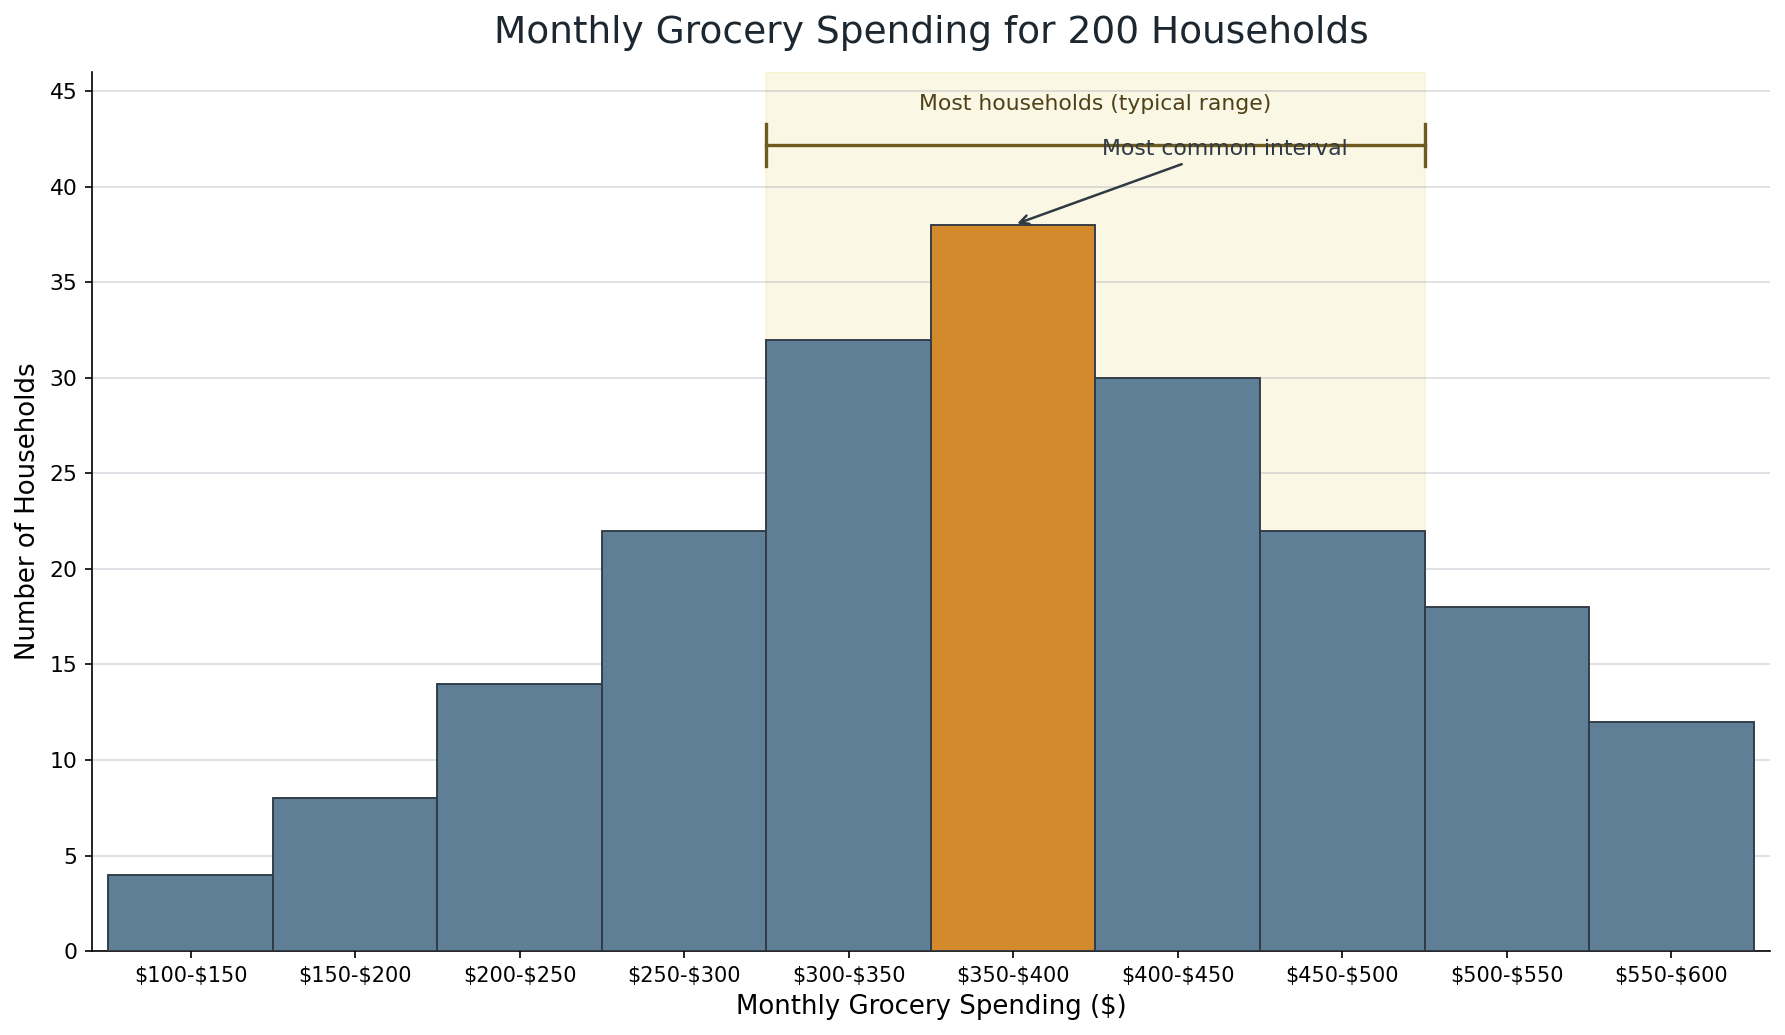
For example, suppose we have a histogram of monthly grocery spending for households, and the tallest bars sit between $300 and $500, with the peak in the $350–$400 bin. A reasonable conclusion would be: Most households in this sample spend roughly $300 to $500 per month on groceries, with the most common amount falling in the $350–$400 range. Notice that we are not calculating a precise mean or median here. Instead, we are using the visual information to approximate where the center of the data lies and what range covers the bulk of observations.
A helpful habit is to ask two questions:
- Where is the peak? This gives us the single most common interval.
- Where does most of the data cluster? This gives us a broader sense of the typical range.
Describing the Spread
After identifying typical values, the next step is to describe how spread out the data are. Earlier in the learning path, we explored formal measures of spread like range and IQR. A histogram gives us a visual way to assess the same idea: we look at how many bins contain meaningful bars and how far those bars extend from the center.
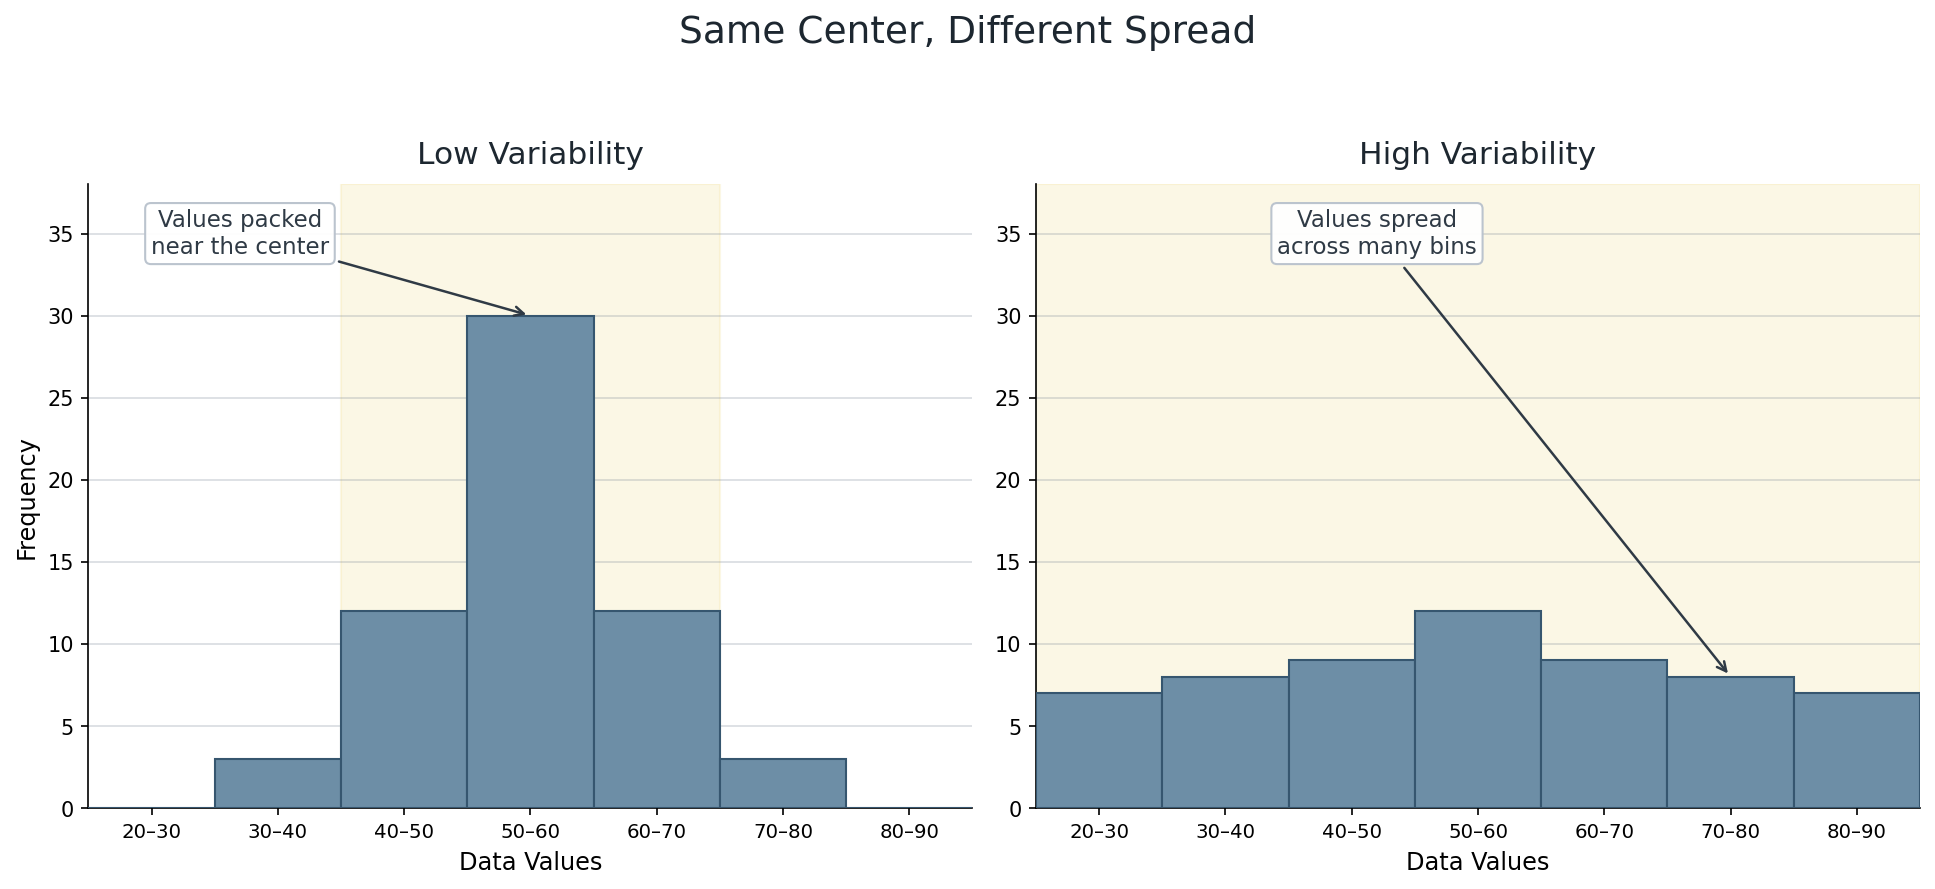
A histogram where most bars are concentrated in just a few bins indicates low variability — the data values are fairly similar. A histogram whose bars stretch across many bins, with no single region dominating, signals high variability. We can also note the overall range by reading the leftmost and rightmost bins that contain data.
The comparison below shows two datasets with about the same center but very different spreads. In the low-variability histogram, most values are packed tightly into the middle bins. In the high-variability histogram, values are spread across many bins, so individual observations differ much more from one another.
For instance, if a histogram of doctor's office wait times shows bars from minutes all the way out to minutes, but most of the tall bars fall between and minutes, we might conclude: Wait times range widely, from about to minutes, but the majority of patients wait between and minutes. That single sentence captures both the total span and the typical spread.
Using Shape to Tell the Story
The shape of a distribution often points toward a real-world explanation. Here is a quick reference for connecting what we see to what we can conclude:
| What We Observe | What It Suggests |
|---|---|
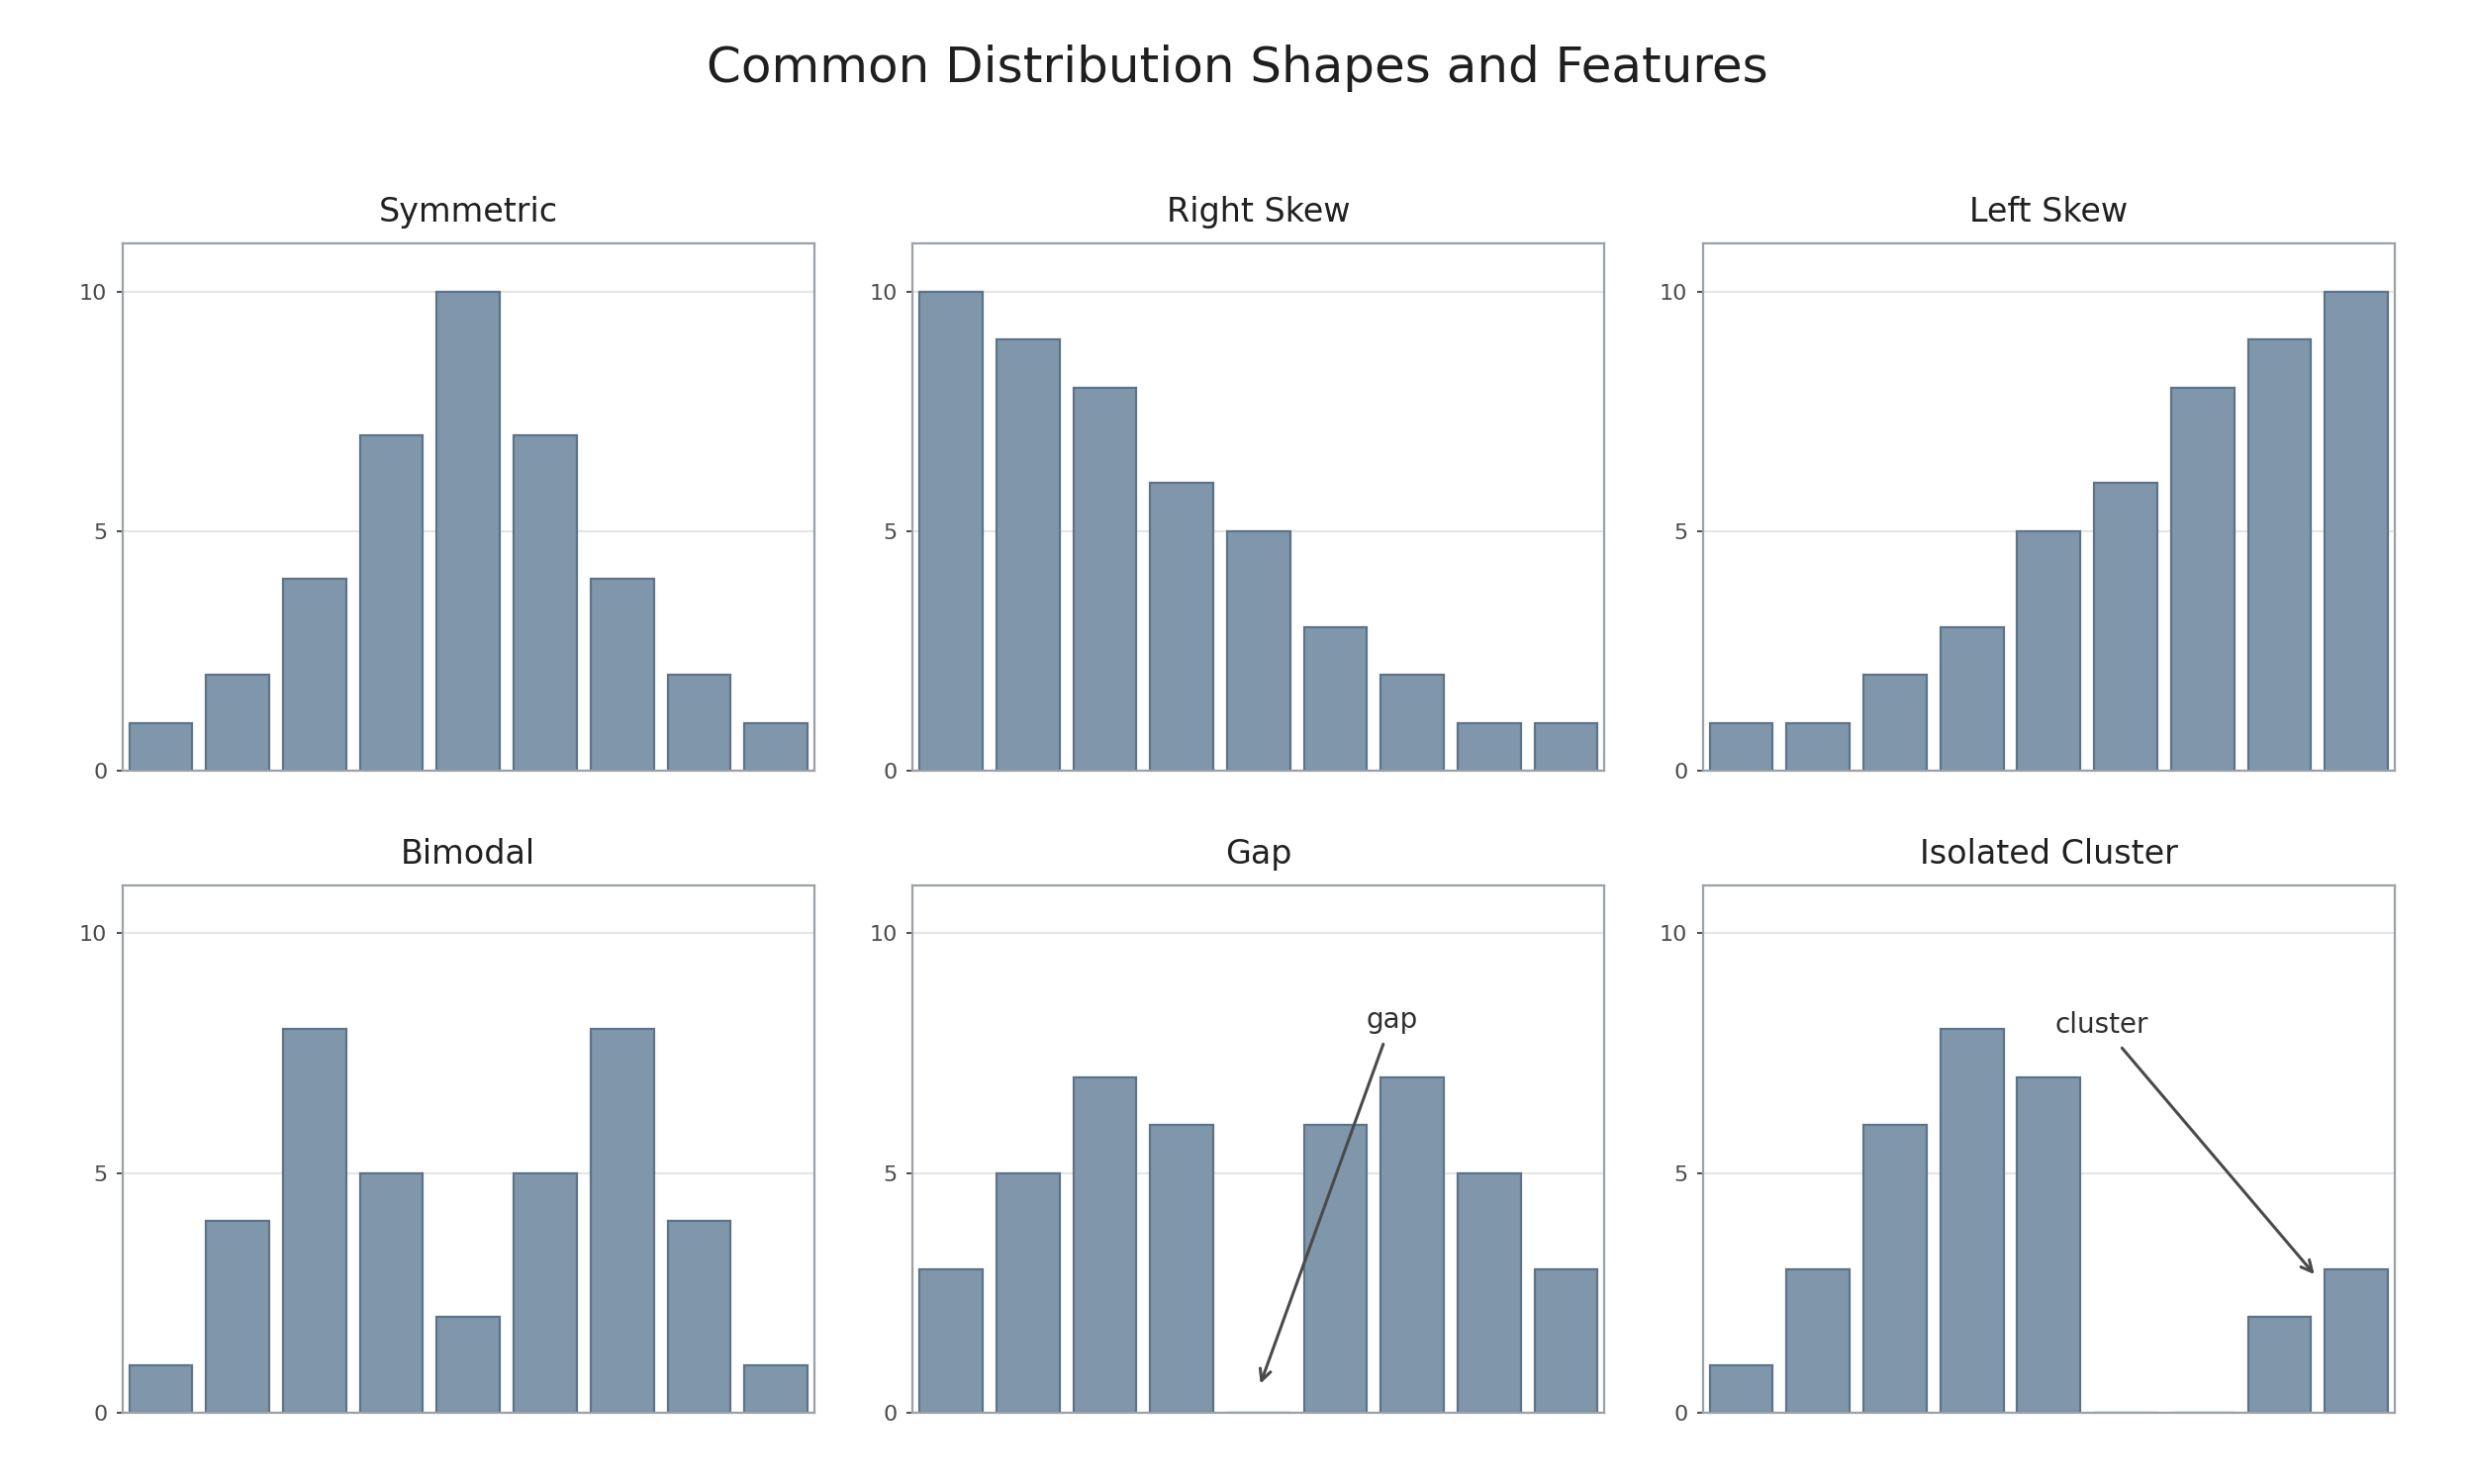
| Symmetric shape | Values are evenly balanced around the center; the mean and median are close together. |
| Right skew | A few unusually high values pull the tail to the right; the mean is likely above the median. |
| Left skew | A few unusually low values pull the tail to the left; the mean is likely below the median. |
| Bimodal shape | There may be two distinct subgroups in the data. |
Using Features to Tell the Story
Specific features inside a histogram, such as gaps, peaks, and isolated clusters, can also help explain what is happening in the data.
| What We Observe | What It Suggests |
|---|---|
| Peak | The most common interval, or where values occur most often. |
| Gap | A range of values is rare or absent, possibly separating subgroups. |
| Isolated cluster | A subgroup shares a common characteristic that sets it apart. |
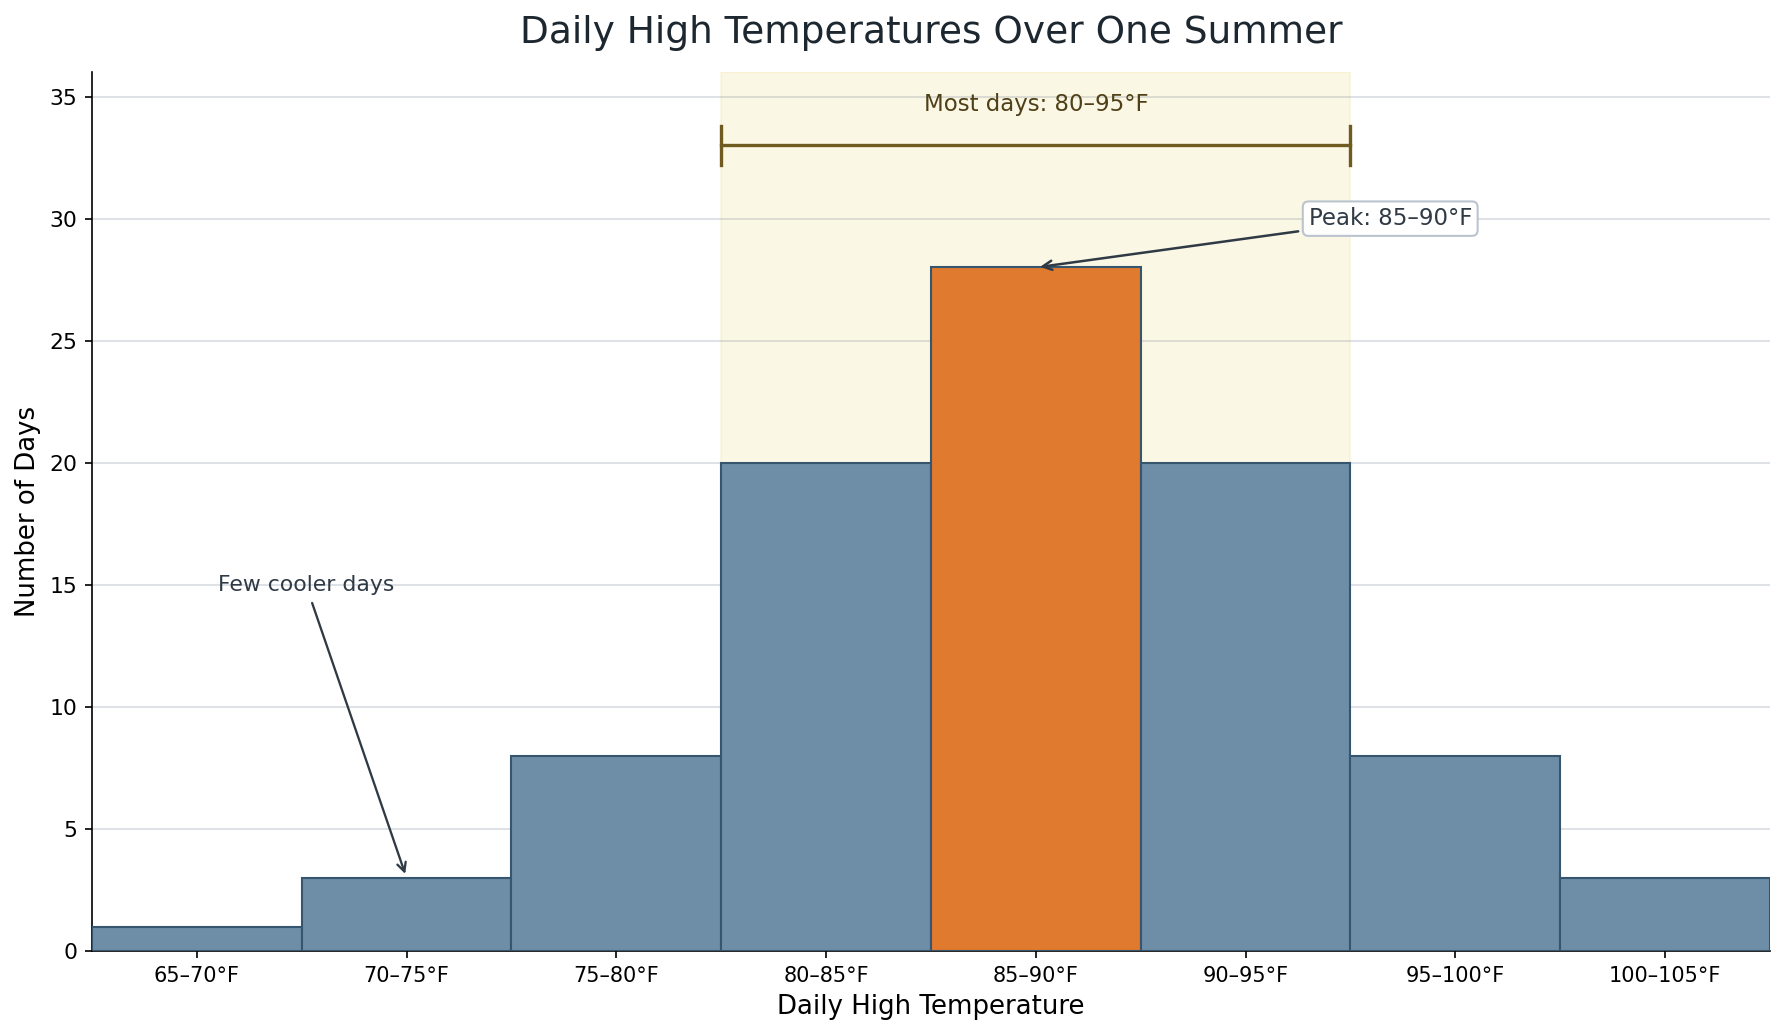
When we combine shape and features, a fuller story emerges. Imagine a histogram of daily high temperatures recorded over an entire summer in a city. If the shape is roughly symmetric with a peak near –°F, a tight cluster from –°F, and very short bars below °F, we might conclude: Summer temperatures in this city are fairly consistent, centering around the mid-to-upper 80s, with only a handful of cooler days. The symmetric shape suggests the climate is stable rather than prone to extreme swings.
The histogram below matches that kind of situation: most days fall between °F and °F, the peak is near –°F, and only a few days are much cooler or much hotter.
Supported Conclusions vs. Overreach
One of the most important skills in data analysis is knowing the boundary between what the data supports and what it does not. A histogram shows us counts within intervals for the observations we have. It does not tell us why something happened or what will happen in the future unless we add outside reasoning.
Here are three guidelines to keep conclusions honest:
- Stick to the data shown. We can say "most values fall between and " because the bars confirm it. We should avoid saying "all people do this" when the histogram only covers a sample.
- Use hedging language. Phrases like "the data suggest," "it appears that," or "roughly" signal that we are interpreting a visual display, not stating a proven fact.
- Do not invent causes. We can speculate about why a pattern exists, especially when the context makes it obvious, but we should label it as a possible explanation rather than a certainty.
For example, if a histogram of commute distances shows a gap between and miles, saying "No one in this sample commutes 25 to 35 miles" is supported. Saying "People refuse to commute that far because of gas prices" is an unsupported leap. A safer version would be: "The gap may suggest that few people live in that distance range relative to the workplace."
Walkthrough: Analyzing Clinic Wait Times
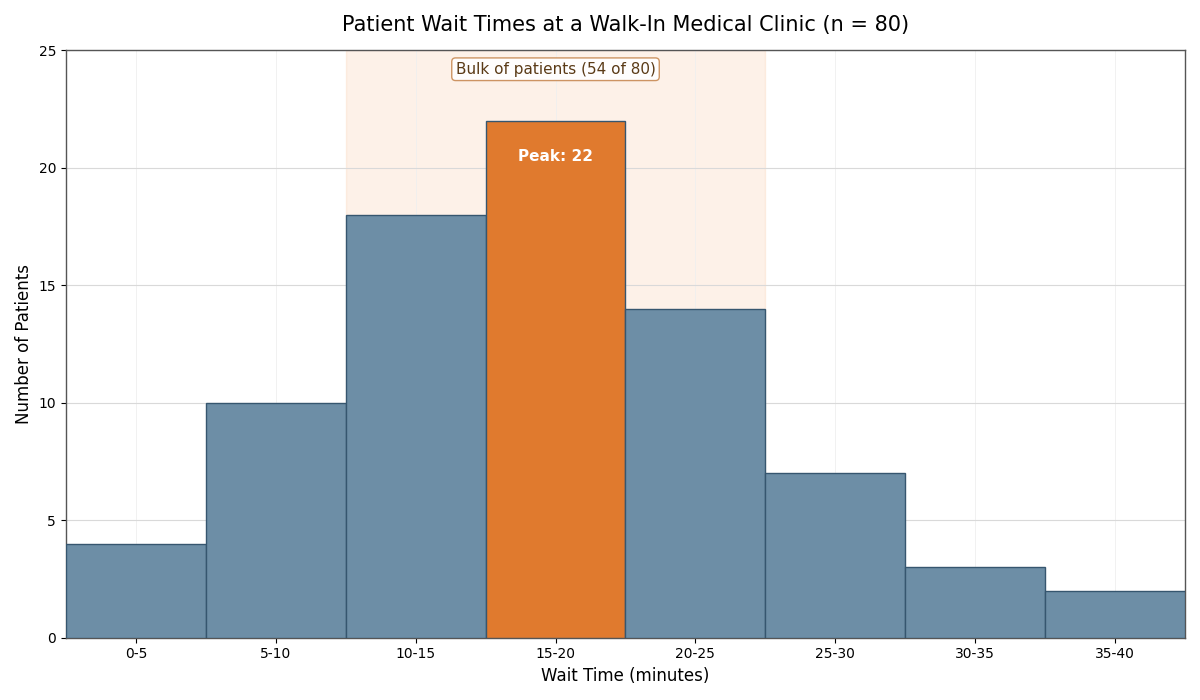
Let us walk through a complete example to see every skill in action. Imagine a histogram of wait times (in minutes) at a walk-in medical clinic, with bins of width minutes:
| Bin (minutes) | Frequency |
|---|---|
| 0–5 | 4 |
| 5–10 | 10 |
| 10–15 | 18 |
| 15–20 | 22 |
| 20–25 | 14 |
| 25–30 | 7 |
| 30–35 | 3 |
| 35–40 | 2 |
Here is how we can analyze this step by step:
- Typical values: The tallest bar is – minutes with a frequency of , and the bars from to minutes account for of the total observations. So most patients wait somewhere between and minutes, with – minutes being the single most common interval.
- Spread: Wait times range from to minutes, but the bulk of the data sits within a -minute window (–). There is moderate spread, with a few patients waiting considerably longer.
- Shape and features: The distribution is right-skewed because the tail extends toward higher wait times. There is a clear peak at – minutes and no noticeable gaps.
- Conclusion: Wait times at this clinic typically fall between and minutes, with the most common wait being to minutes. The right skew indicates that while most visits are relatively quick, a small number of patients experience noticeably longer waits of minutes or more.
Notice how each claim ties directly back to something visible in the histogram. That is the standard we want to aim for every time we draw a conclusion.
Conclusion and Next Steps
In this lesson, we learned how to combine every skill from this course — reading bars, classifying shape, and spotting features — into clear, evidence-based conclusions about real-world data. We practiced identifying typical values from peaks and clusters, describing spread by examining how far bars extend, connecting shape to meaning using a handy reference table, and keeping our statements honest by avoiding overreach. These are the skills that turn a histogram from a simple picture into a powerful analytical tool.
Up next, you will put all of this into practice with a set of exercises featuring grocery spending, doctor's office wait times, and summer temperatures. You will read histograms, identify key patterns, and write conclusions entirely on your own. Time to see what stories the data have waiting for you!
