In previous lessons, we've been working exclusively with emptyDir volumes. These volumes are incredibly useful for temporary data, caching, and sharing information between containers in the same Pod. However, they have one critical limitation: they're tied to the Pod's lifecycle. When you delete a Pod, the emptyDir volume and all its data disappear with it. For many real-world applications — databases, user uploads, application state — this simply won't work.
You need storage that survives Pod deletions, restarts, and even migrations to different nodes. In this lesson, we'll introduce PersistentVolumeClaims (PVCs), which allow you to request durable storage that exists independently of any Pod. You'll learn how to create a storage request, connect it to a Pod, and verify that your data truly persists even when Pods come and go.
Imagine you're running a blog application in Kubernetes. Users upload images, write posts, and build up content over time. If you store all that data in an emptyDir volume, what happens when you need to update your application? You'd create a new Pod with the updated code, delete the old Pod, and suddenly all your users' content is gone. That's obviously unacceptable for a production system. The fundamental problem is that emptyDir couples storage to the Pod lifecycle. The storage lives and dies with the Pod, which makes sense for temporary scratch space but not for valuable data.
What we need is a way to decouple storage from Pods. Instead of defining storage as part of the Pod specification, we want to request storage separately and then connect Pods to that storage. This separation means the storage can exist before any Pod uses it, and it continues to exist after Pods are deleted. You can delete a Pod, create a new one, and have it pick up exactly where the old one left off because the data is still there. This is the core idea behind PersistentVolumeClaims.
A PersistentVolumeClaim is essentially a request for storage. You're telling Kubernetes, "I need 5GB of storage that one Pod can write to at a time," and Kubernetes finds or creates storage that meets those requirements. The Pod doesn't need to know whether that storage is backed by a local disk, a network file system, or a cloud provider's block storage service. The Pod just says, "I want to use the storage from this claim," and Kubernetes handles the rest. This abstraction is powerful because it lets you write Pod specifications that work across different environments without worrying about the underlying storage infrastructure.
Let's look at how to actually create a PersistentVolumeClaim. Here's a complete example that requests 1GB of storage:
The structure should look familiar if you've worked with other Kubernetes resources. We have the standard apiVersion, kind, and metadata fields. The kind is PersistentVolumeClaim, which tells Kubernetes this is a storage request. The metadata.name field gives this claim a name — app-data-claim in this case — which we'll use later to reference it from a Pod.
The interesting part is the spec section, which describes what kind of storage we're requesting. Let's break down each field:
The accessModes field specifies how the storage can be accessed. ReadWriteOnce means the volume can be mounted as read-write by a single node at a time. This is the most common access mode and works well for most applications. Other options include ReadWriteMany (multiple nodes can mount it for reading and writing simultaneously) and ReadOnlyMany (multiple nodes can mount it, but only for reading). For now, is what you'll use in most scenarios — it allows Pods on a single node to read and write to the storage.
Now that we have a PersistentVolumeClaim, let's create a Pod that uses it. Here's a Pod specification that mounts our claim:
The container and volumeMounts sections should look familiar from previous lessons. We're running an Nginx container and mounting a volume named data-vol at /usr/share/nginx/html, which is the default directory where Nginx serves web content from. The key difference is in the volumes section at the bottom:
Instead of defining an emptyDir volume, we're defining a persistentVolumeClaim volume. This type of volume references an existing PVC by name using the claimName field. We're telling Kubernetes, "For this volume named data-vol, use the storage from the PersistentVolumeClaim called app-data-claim." Notice that the Pod specification doesn't say anything about how much storage there is, what type of storage it is, or where it's located. The Pod simply references the claim, and Kubernetes handles connecting it to the actual storage.
When you create a PersistentVolumeClaim, Kubernetes needs to find or create actual storage to fulfill your request. This process is called binding, and it involves multiple layers of abstraction working together. Here's how the components relate to each other:
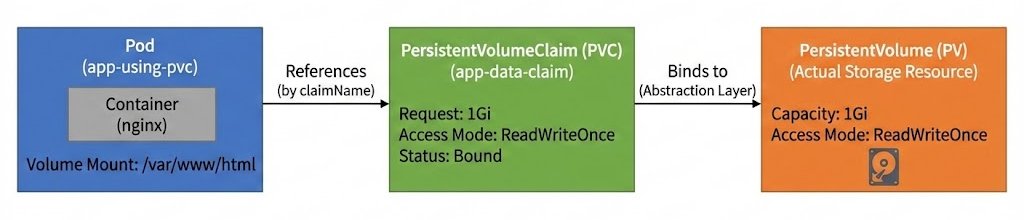
As the diagram shows, Pods reference PVCs by name, not the underlying storage directly. When you create a PVC, Kubernetes finds or creates a PersistentVolume (PV) that matches your request and binds the PVC to that PV. The PV then connects to the actual physical storage, whether that's a local disk, network filesystem, or cloud storage. This three-layer architecture is what enables the decoupling we've been discussing — Pods don't need to know about PVs or physical storage details, they only need to know the PVC name.
You can observe the binding process by checking the status of your PVC. Right after creating the claim, run:
You'll likely see output like this:
The STATUS column shows Pending, which means the PVC is waiting for storage to be provisioned. In many production environments, especially with cloud providers, the Pending status will persist until you actually create a Pod that uses the PVC. This is due to a feature called Volume Binding Mode.
Volume Binding Modes determine when a PVC gets bound to actual storage:
- Immediate: Storage is provisioned as soon as you create the PVC, even without a Pod
- WaitForFirstConsumer: Storage provisioning waits until a Pod that uses the PVC is scheduled
The WaitForFirstConsumer mode is common in production because it ensures volumes are created in the same availability zone or region as the Pod that will use them. This is more efficient and avoids cross-zone data transfer costs. If your PVC stays , don't worry — this is normal behavior with . The storage will be provisioned once you create a Pod that references the PVC.
The whole point of using a PersistentVolumeClaim is that data should survive Pod deletions. Let's prove this works by writing some data, deleting the Pod, creating a new Pod with the same PVC, and verifying the data is still there. First, let's write a simple HTML file to the persistent volume:
This command runs inside the app-using-pvc Pod and writes an HTML file to /usr/share/nginx/html/index.html. Since /usr/share/nginx/html is mounted from our PVC, this data is being written to persistent storage. Let's verify the file exists:
You should see:
Good — the data is there. Now comes the critical test. Let's completely delete the Pod:
You'll see:
The Pod is gone. If we were using an emptyDir volume, the data would be gone too. But because we're using a PVC, the storage exists independently. Let's prove it by creating a new Pod that uses the same PVC. You can use the exact same pod-with-pvc.yaml file:
A new Pod named app-using-pvc is created. Wait a few seconds for it to start, then check if our data is still there:
PersistentVolumeClaims solve the fundamental problem of data persistence in Kubernetes by decoupling storage from Pod lifecycles. Instead of defining storage as part of a Pod, you create a separate storage request (the PVC) that specifies how much storage you need and how it should be accessed. Pods then reference that claim by name, and Kubernetes handles connecting them to the actual storage. The Bound status indicates that storage has been successfully provisioned, often through Dynamic Provisioning, which automatically creates the underlying storage resources.
Most importantly, data written to a PVC survives Pod deletions and recreations, making PVCs essential for any application that needs to maintain state. In the upcoming practice exercises, you'll create your own PVCs, connect them to Pods, and verify that data truly persists across Pod lifecycle events, giving you hands-on experience with this critical Kubernetes storage pattern.
