In the previous lesson, you built a three-tier shop application using ClusterIP Services. You learned that ClusterIP provides stable, internal-only endpoints for communication between Pods inside your cluster. Your frontend could talk to your backend, and your backend could talk to your database — all using simple DNS names like backend-svc and database-svc.
But there's a problem: ClusterIP Services are only accessible from inside the cluster. If you want actual users on the internet to access your frontend application, ClusterIP won't work. You need a way to expose your application externally, and that's where NodePort Services come in. In this lesson, you'll learn how NodePort builds on top of ClusterIP to provide external access, understand the three-port system that makes it work, and discover when NodePort is the right choice for your application.
Here's the key insight about NodePort Services: they don't replace ClusterIP — they extend it. When you create a NodePort Service, you still get all the ClusterIP functionality you learned about in the previous lesson. The Service still gets a stable Cluster IP address, a DNS name, and internal load balancing. NodePort simply adds an additional capability on top: it opens a specific port on every node in your cluster, allowing external traffic to reach your Pods.
Think of it like adding a front door to a building. The internal hallways (ClusterIP) still work exactly the same way — employees can move between rooms using internal doors. But now there's also a front entrance (NodePort) that lets people from outside come in. Both access methods lead to the same rooms (Pods), but they serve different purposes.
Here is how the traffic flow works:
When you create a NodePort Service, Kubernetes opens the same port on every single node in your cluster. This means you can reach your application by connecting to any node's IP address on that port. For example, if your NodePort is 30080, you can reach your application at NodeA:30080, NodeB:30080, or NodeC:30080. Kubernetes will automatically route that traffic to the correct backend Pods.
There is an important constraint to remember:
By default, NodePort Services use ports in the range . This is the standard range configured on most Kubernetes clusters and what you'll encounter in practice. You cannot use standard ports like 80 or 443 directly because those might conflict with system services running on the host machine. The 30000-32767 range is high enough to avoid most common conflicts. (Note: While this range is configurable via the API server's flag, changing it is rare and not recommended unless you have specific infrastructure requirements.)
NodePort Services introduce a three-port configuration that can be confusing at first, but once you understand what each port does, it becomes clear. Every NodePort Service has three different port numbers, and each one serves a specific purpose in the traffic flow.
Let's break them down one by one:
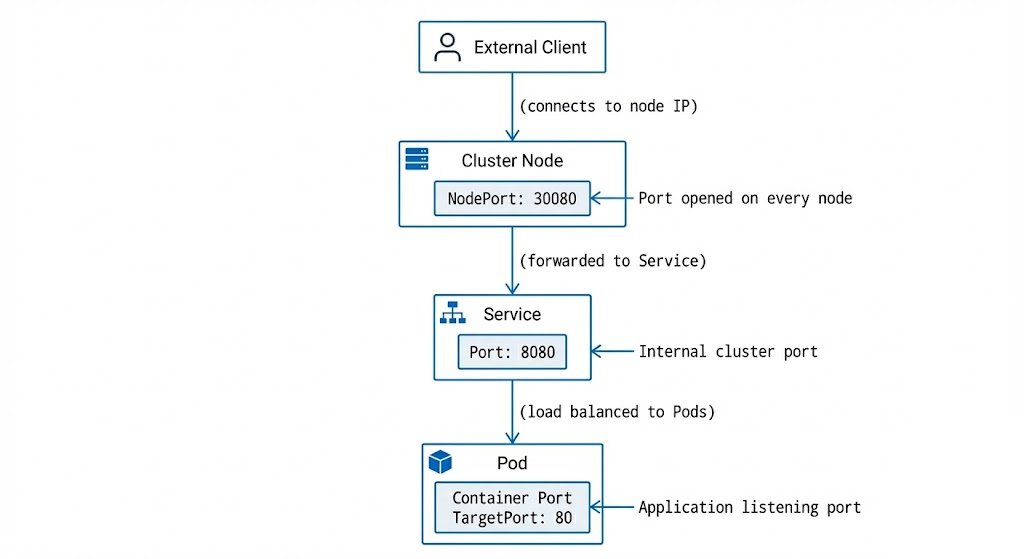
targetPort: This is the port where your application is actually listening inside the Pod's container. This is the port your application code opens when it starts up (e.g., port 80 for nginx or 3000 for Node.js). ThetargetPortis always about your application—it's the port your container exposes.port: This is the port that the Service listens on for internal cluster traffic. Other Pods use this port when they connect to your Service using its DNS name (e.g.,http://backend-svc:8080). This port doesn't have to match thetargetPort, giving you the flexibility to standardize your internal API contracts even if different applications use different ports.nodePort: This is the new piece thatNodePortServices add. This is the port that gets opened on every node in your cluster for external access. ThenodePortis typically in the 30000-32767 range (the default configured on most clusters). You can either specify it explicitly or let Kubernetes automatically assign one.
Let's visualize the complete traffic flow.
Now let's create an actual deployment that we'll expose with NodePort Services. We'll start by creating a simple web application using nginx. Save this as deployment-web.yaml:
We're creating three replicas for redundancy. Notice the Pod labels: app: demo and tier: web. These are the labels our Service will use to find these Pods. The container runs nginx on port 80, which will become our targetPort in the Service definition.
Let's apply this Deployment:
You should see:
Let's verify the Pods are running:
Perfect! Now we have a running Deployment with three nginx Pods that we can expose externally.
With our Deployment running, let's create a NodePort Service to expose these Pods externally. Save this as service-nodeport-basic.yaml:
Here's the critical difference from ClusterIP: type: NodePort. The selector matches our Pod labels (app: demo and tier: web), so this Service will route traffic to our nginx Pods. Now we see all three ports in action: port: 80 for internal cluster access, targetPort: 80 where nginx is listening, and nodePort: 30080 for external access. We're explicitly setting nodePort: 30080 so we know exactly which port to use.
Let's apply this Service:
Now let's examine the Service to see what Kubernetes created:
Now that we have NodePort Services created, let's talk about how external traffic actually reaches them. In a real Kubernetes cluster, you would connect to any node's IP address on the nodePort. For example, if your cluster has nodes at 192.168.1.10, 192.168.1.11, and 192.168.1.12, and your nodePort is 30080, you could access your application at http://192.168.1.10:30080, http://192.168.1.11:30080, or http://192.168.1.12:30080. All three addresses would work identically because Kubernetes opens the same port on every node.
However, in a learning environment like CodeSignal, you typically don't have direct access to node IP addresses. To work around this limitation, we'll use kubectl port-forward to simulate external access. It's crucial to understand that kubectl port-forward does not actually use the NodePort mechanism — it creates a direct tunnel from your local machine to the Service, completely bypassing the node ports. Think of it as a debugging tool that lets you test Service connectivity without needing real external network access.
In production, real external clients would connect directly to node IPs on the nodePort, not through a port-forward tunnel. The tunnel simply helps us verify that the Service is correctly configured and can route traffic to backend Pods.
Let's test our web-nodeport Service using kubectl port-forward. We'll forward local port 30080 to the Service's port 80:
This command is now running in the foreground. The syntax 30080:80 means "forward local port 30080 to the Service's port 80." Notice we're using the Service's internal port (80), not the nodePort (30080), because kubectl port-forward connects directly to the Service, bypassing the node port mechanism entirely.
Leave this command running and open a new terminal. In the new terminal, let's test connectivity using curl:
Success! You're seeing the default nginx welcome page. This confirms that the Service can route traffic to your Pods. The simulated traffic flow was: your curl command → localhost:30080 → kubectl port-forward tunnel → Service:80 → one of the nginx Pods:80. In a real cluster, the traffic flow would be: external client → node IP:30080 → Service:80 → Pod:80.
Let's test the Service multiple times to see load balancing in action. With your kubectl port-forward still running, execute this command several times:
Each request might be routed to a different Pod, though you won't see a difference in the output because all three Pods are running identical nginx containers. The Service is load-balancing your requests across all three backend Pods automatically.
One important thing to understand: when you connect to a NodePort Service through any node in a real cluster, Kubernetes can route the traffic to a Pod on any node, not just the node you connected to. For example, if you connect to node A on port 30080, the traffic might be routed to a Pod running on node B or node C. This is called cluster-wide load balancing — you don't need to know which node your Pods are running on; you can connect to any node and reach any Pod.
When you looked at the kubectl describe output for your NodePort Service earlier, you might have noticed a line that said External Traffic Policy: Cluster. This field controls a crucial aspect of how NodePort Services route traffic, but it's subtle enough that many Kubernetes users overlook it. Understanding externalTrafficPolicy is essential for making informed decisions about load balancing, source IP preservation, and network efficiency.
External Traffic Policy has two possible values: Cluster and Local.
Cluster (the default): When set to Cluster, traffic coming in on any node's nodePort can be routed to Pods on any node in the cluster. This is the cluster-wide load balancing behavior we discussed earlier. For example, if you have three nodes (A, B, C) and your Pods are running on nodes B and C, you can still connect to node A on the nodePort, and Kubernetes will forward that traffic to a Pod on node B or C. This provides maximum availability and even load distribution.
Local: When set to Local, traffic coming in on a node's nodePort will be routed to Pods running on that . If a node doesn't have any Pods matching the Service's selector, connecting to that node's will fail. Using our three-node example: if Pods are only running on nodes B and C, connecting to node A on the won't work — the connection will be refused because node A has no local Pods to route to.
So far, you've learned how to expose Pods externally using NodePort Services. But what if you want to restrict which Pods can communicate with each other? This is where NetworkPolicies come in.
By default, Kubernetes allows all Pods to communicate with each other. This open communication is convenient for development, but it's a security risk in production. NetworkPolicies let you implement the principle of least privilege — each Pod should only be able to communicate with the minimum set of other Pods it needs.
The most important NetworkPolicy pattern is default-deny. This means you create a policy that blocks all traffic to a Pod by default, then create additional policies to explicitly allow only the traffic you need. Here's an example of a default-deny policy for Pods with the label app: backend:
This policy says: "For all Pods with the label app: backend, deny all incoming traffic." Because there are no ingress rules specified, all incoming traffic is blocked.
To allow specific traffic, you create additional NetworkPolicies with ingress rules. Here's the key concept: NetworkPolicies are additive. If multiple policies select the same Pod, their rules combine with OR logic. If any policy allows a particular connection, that connection is permitted.
For example, to allow traffic from Pods labeled app: frontend:
Now you have two policies selecting the backend Pods: one blocks all traffic, and one allows traffic from frontend Pods. Because policies combine with OR logic, the result is: traffic from frontend Pods is allowed, and all other traffic is blocked. You can create multiple allow policies to gradually open up the exact communication paths your application needs.
Now that you understand how NodePort Services work and how to secure them with NetworkPolicies, let's talk about when you should use them. NodePort Services are powerful, but they're not the right solution for every situation.
The best use cases for NodePort include:
- Development and testing environments: When you're building an application locally or in a development cluster,
NodePortgives you quick external access without needing to set up load balancers or ingress controllers. The port range (30000-32767) isn't a problem here because you control the environment. - On-premises clusters: In bare-metal Kubernetes clusters running in your own data center, you might not have the infrastructure to automatically provision external cloud load balancers.
NodePortlets you expose services externally, allowing you to put your own load balancer (like HAProxy or nginx) in front of your cluster nodes. - Non-HTTP services: If you're running a database, message queue, or custom TCP/UDP service that needs external access,
NodePortis a straightforward solution. Since Ingress controllers are designed primarily for HTTP/HTTPS,NodePortoffers the flexibility to handle any TCP or UDP traffic.
However, NodePort has significant limitations that often make it unsuitable for direct production web traffic:
- Awkward port range: The required range (30000-32767) is not user-friendly. Users expect standard ports like 80 or 443, not
http://yourapp.com:30080. - Node IP management: You need to know the IP addresses of your nodes. If a node fails or is replaced, its IP changes, breaking external connections unless you have additional infrastructure to handle it.
You've now learned how NodePort Services extend ClusterIP functionality to provide external access to your applications. You understand the three-port system: targetPort is where your container listens, port is for internal cluster access, and nodePort is for external access on cluster nodes. You've created NodePort Services with both explicit and auto-assigned ports, tested external connectivity using kubectl port-forward (understanding that it's a simulation tool, not the actual NodePort path), and learned when NodePort is appropriate versus other Service types.
You also learned about NetworkPolicies, which let you control Pod-to-Pod communication. You understand default-deny behavior (block all traffic by default) and how allow policies combine with OR logic to gradually open up the exact communication paths your application needs.
In the upcoming practice exercises, you'll create your own NodePort Services, experiment with different port configurations, implement NetworkPolicies to secure your applications, and troubleshoot common issues like port conflicts and incorrect selectors. This hands-on experience will solidify your understanding of external service exposure and prepare you for LoadBalancer Services and Ingress in future lessons.
