Welcome to the "enabling & customizing cors in your ASP.NET Core REST API" course! Whether you're building a modern web application with a separate frontend and backend, or developing APIs consumed by third-party clients, understanding cors is essential. In this first lesson, we'll explore what cors is, why browsers enforce it, and how to set up basic cors support in your API with practical examples you can test immediately.
Let's start with a common scenario you've likely encountered: you're building a web application where your frontend (running on https://myapp.com) needs to make API requests to your backend server (running on https://api.myapp.com). When you try to fetch data, the browser blocks these requests with an error like:
This happens because of the same-origin policy — a fundamental security feature built into browsers that prevents scripts from one website from accessing resources from a different domain. While this protects users from malicious websites, it also blocks legitimate cross-origin requests that you control. This is where cors comes in.
Cross-origin resource sharing (cors) is a mechanism that allows your server to indicate which origins (domains) should be permitted to access its resources. It's important to understand that cors is not a security feature itself, but rather a controlled way to relax the same-origin policy when you explicitly allow it.
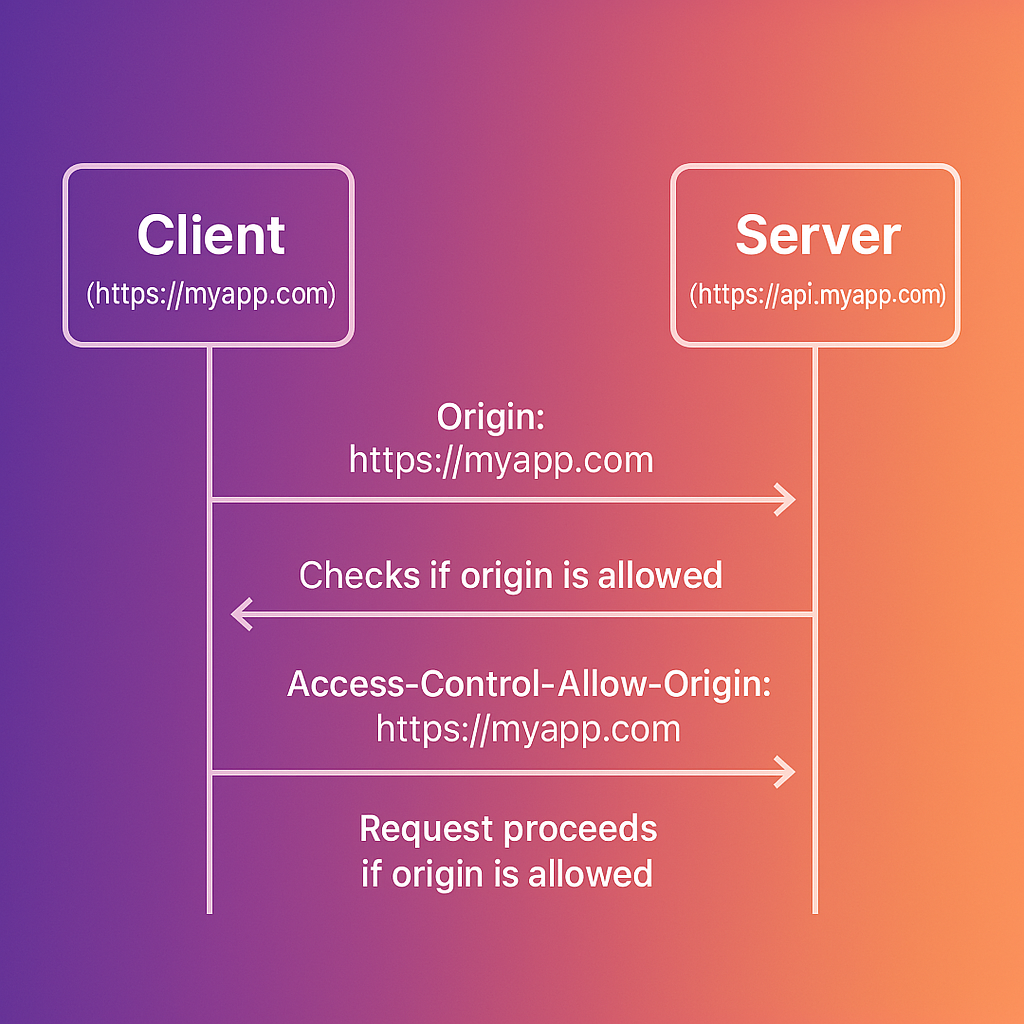
cors operates through a series of HTTP headers exchanged between the browser and the server. When a browser makes a cross-origin request, it automatically adds an Origin header containing the requesting page's origin. The server then responds with specific cors headers that tell the browser whether to allow the request.
The key response headers that control cors behavior include:
Access-Control-Allow-Origin: Specifies which origins can access the resource. This can be a specific origin likehttps://myapp.com, or the wildcard*to allow all origins.Access-Control-Allow-Methods: Lists the permitted HTTP methods such asGET,POST,PUT, orDELETE.Access-Control-Allow-Headers: Indicates which headers can be used in the actual request, beyond the standard headers browsers send automatically.Access-Control-Allow-Credentials: A boolean flag that tells the browser whether to include credentials like cookies or authorization headers with the request.
Here's a visualization showing the request-response flow:
cors treats cross-origin requests differently based on their characteristics. Understanding this distinction is crucial for properly configuring your API.
Simple requests are those that meet specific criteria: they must use GET, POST, or HEAD methods, and they can only include standard headers that browsers send automatically. For these requests, the browser sends the request immediately and checks the cors headers in the response.
Complex requests are everything else — requests using methods like PUT or DELETE, or requests that include custom headers like X-Custom-Header. For these requests, the browser first sends a preflight request using the OPTIONS method to ask the server if the actual request is allowed.
Here's what a preflight exchange looks like:
The server must respond with appropriate cors headers:
Only if the preflight succeeds will the browser send the actual PUT request. We'll explore preflight requests in depth in upcoming lessons, including how to handle them efficiently in ASP.NET Core.
One of the most common cors configuration mistakes is setting Access-Control-Allow-Origin: *, which allows any website to make requests to your API. While this might seem convenient during development, it requires careful handling when your application involves authentication.
Consider an API for a banking application that relies on session cookies for authentication. You might be tempted to use the wildcard origin * to allow access. However, if browsers permitted Access-Control-Allow-Origin: * to be combined with Access-Control-Allow-Credentials: true, a malicious site could make authenticated requests using the victim's cookies to access sensitive data.
To prevent this exact vulnerability, browsers enforce a strict security rule: you cannot use the wildcard * origin when credentials are enabled.
If your server responds with this overly permissive configuration:
The browser will reject the request—protecting the user from the potential attack—and fail with an error:
This means that while the configuration is dangerous in theory, modern browsers technically block the vulnerability by invalidating the request. However, this also means your legitimate application will fail to work until properly configured.
The correct approach is to specifically allow only trusted origins:
This ensures that only your legitimate frontend application can access sensitive user data.
Now that we understand why cors matters and how it works, let's implement it in an ASP.NET Core application. ASP.NET Core provides built-in middleware for handling cors, making it straightforward to configure.
The first step is to register the cors services with the dependency injection container:
This registers the necessary services that ASP.NET Core uses to process cors requests. Without this registration, the cors middleware won't function.
With the services registered, we can now configure a cors policy. The simplest approach is to configure the policy inline when applying the middleware:
This configuration uses AllowAnyOrigin(), AllowAnyMethod(), and AllowAnyHeader(), which means any website can access this endpoint using any HTTP method and headers. While this is useful for public APIs, it's too permissive for most applications.
For applications that need more control, ASP.NET Core supports named policies. This approach is more maintainable and allows you to define multiple policies for different scenarios:
Now let's add an endpoint that returns user-specific data:
With this configuration, only requests from https://myapp.com can access the /api/user-data endpoint, and only GET and POST methods are allowed. The AllowCredentials() method permits the browser to include cookies or authorization headers with the requests.
While applying cors globally with app.UseCors() works for many applications, Minimal APIs provide the .RequireCors() extension method to apply specific policies to individual endpoints. This gives you fine-grained control over which endpoints allow cross-origin requests.
Important: When using .RequireCors() on individual endpoints, you must still call app.UseCors() (without specifying a policy name) to add the cors middleware to the pipeline. The .RequireCors() method only works if the cors middleware is present. Without app.UseCors(), the .RequireCors() calls will have no effect, and cors headers won't be added to responses.
Here's the correct pattern:
When you have multiple endpoints that share the same cors policy, using app.MapGroup() keeps your code organized and reduces repetition. Route groups let you apply cors policies to all endpoints within the group:
This approach has several benefits: it keeps related endpoints together, ensures consistent cors policy application, and makes it easy to see which policies apply to which routes at a glance.
The CorsPolicyBuilder class provides several methods for fine-tuning your cors configuration:
WithOrigins(params string[] origins): Specify one or more allowed origins. Use this for production environments with known client applications.AllowAnyOrigin(): Allow requests from any origin. Use cautiously, typically only for public APIs.WithMethods(params string[] methods): Specify allowed HTTP methods like"GET","POST","PUT","DELETE".AllowAnyMethod(): Allow all HTTP methods. Convenient during development but consider restricting in production.WithHeaders(params string[] headers): Specify allowed request headers beyond the standard browser headers.AllowAnyHeader(): Allow all headers. LikeAllowAnyMethod(), this is convenient but less secure.AllowCredentials(): Allow credentials like cookies or authorization headers. Cannot be combined withAllowAnyOrigin().
To verify your cors configuration works correctly, you can create a simple test client. Here's a complete example with both the API and a test client:
Now create a test client to verify the cors policy:
When you run this test client, you should see output similar to:
This confirms that the API is correctly configured to allow requests from https://localhost:5002. If the cors configuration was incorrect, you would see a status code but no header in the response.
Understanding the difference that cors configuration makes is crucial for debugging issues in your applications.
Before CORS configuration: When attempting a cross-origin request from https://myapp.com to an API at https://api.myapp.com without cors enabled, the request technically reaches the server and the server processes it. However, the server doesn't include the necessary cors headers in its response. When the browser receives the response without the Access-Control-Allow-Origin header, it blocks your JavaScript code from accessing the response data and logs an error:
After CORS configuration: With proper cors configuration in ASP.NET Core, the same request succeeds because the server now responds with the appropriate headers:
The browser sees the Access-Control-Allow-Origin header matching the requesting origin and allows your JavaScript code to access the response data.
As you work with cors, keep these key points in mind to avoid common pitfalls:
CORS is not a security feature — it relaxes security restrictions rather than adding them. Think of it as giving explicit permission for cross-origin access rather than blocking unwanted access. This means you should configure it carefully based on your security requirements.
AllowAnyOrigin() is rarely appropriate for production — setting AllowAnyOrigin() allows any website to access your API. This might be acceptable for truly public APIs with no sensitive data, but it's risky for APIs handling user-specific or confidential information.
You cannot combine AllowAnyOrigin() with AllowCredentials() — if your API uses cookies or authentication tokens, you must specify exact origins using WithOrigins(). Browsers enforce this restriction and will reject attempts to combine a wildcard origin with credentials.
CORS is only enforced by browsers — API requests from server-side code, mobile apps, or tools like Postman will not be blocked by cors. This is why cors is not a security feature; it only controls what browsers allow. Don't rely on cors to protect your API from unauthorized access.
Order matters in middleware pipeline — always call app.UseCors() before other middleware that handles requests, especially before app.UseRouting() and app.UseAuthorization(). If cors middleware runs too late in the pipeline, the cors headers might not be added to the response.
Remember to call app.UseCors() when using .RequireCors() — even when applying cors to individual endpoints with .RequireCors(), you must still add the to the pipeline by calling . Without the , the extension method has no effect.
In this lesson, we've built a solid foundation for understanding cors in ASP.NET Core applications. You now know that cors is a mechanism for browsers to safely allow cross-origin requests by checking specific HTTP headers sent by your server. We've explored the difference between simple and complex requests, examined the security implications of permissive cors policies, and learned how to implement both basic and named cors policies in ASP.NET Core.
You've also learned how to apply cors policies at different levels: globally with app.UseCors("PolicyName"), on individual endpoints with .RequireCors(), and on route groups with app.MapGroup().RequireCors(). This flexibility allows you to tailor your cors configuration to match your application's security requirements.
You've also learned how to test your cors configuration using C# code, which is invaluable for debugging cors issues during development. The ability to inspect cors headers programmatically helps you verify that your policies are configured correctly before deploying to production.
In the upcoming lessons, we'll dive deeper into advanced cors configurations. You'll learn how to apply different cors settings to different routes, implement dynamic origin validation based on runtime conditions, optimize preflight request handling for better performance, and manage cors in complex application architectures with multiple clients. These advanced techniques will give you complete control over cross-origin access to your APIs.
