Welcome to the final lesson of our "Developing a Personal Tutor Web Application With FastAPI" course! In the previous lesson, you enhanced your personal tutor application by adding query suggestions, making it more user-friendly and efficient for students. Today, we will complete our application by focusing on styling the interface to make it visually appealing and professional. Styling is crucial in educational web applications as it enhances the learning experience by providing a clean and intuitive interface. We will use CSS to achieve this, ensuring that our tutor application not only functions well but also looks great.
To style our personal tutor interface, we first need to create a directory for our static files, such as CSS. This directory will be mounted in our FastAPI application to serve these files.
-
Create the Static Directory: Within the
appdirectory, create a folder namedstatic. This is where we'll store our CSS file. -
Mount the Static Directory in FastAPI: Update your main FastAPI application file to serve static files by mounting the
staticdirectory.
Here's a simplified example of how you can do it:
This code snippet demonstrates how to mount the static directory to serve static files. The app.mount method specifies the directory and the URL path where the static files will be accessible.
With the static directory set up, the next step is to create a CSS file and link it to your HTML template.
-
Create the CSS File: In the
app/staticdirectory, create a file namedstyle.css. This file will contain all the styles for your application. -
Link the CSS File in HTML: Open your
tutor.htmlfile and add a<link>tag within the<head>section to link the CSS file:
The <link> tag uses the url_for function to generate the correct URL for the CSS file, ensuring that the styles are applied to the HTML elements. This setup allows your personal tutor interface to be styled effectively using the CSS rules defined in style.css.
Now that we have our CSS file linked, let's start by styling the basic structure of our HTML elements. We'll focus on the html, body, and main container elements to set the foundation for our design.
In your style.css file, add the following styles:
These styles ensure that the html and body elements take up the full viewport height, with no margin or padding. The body is set to a flex container, allowing us to easily arrange its child elements in a column. The font-family property sets a clean and modern font for the entire application.
Next, let's style the header and suggestions section to make them visually appealing and easy to interact with. In your style.css file, add the following styles:
The .header class centers the text and adds padding for spacing. The .suggestions class uses flexbox to center the suggestion buttons and adds a gap between them for better spacing. The .suggestion-btn class styles the buttons with a vibrant background color, white text, and padding for a comfortable click area. This creates an inviting educational interface that encourages students to interact with the suggested queries.
Let's style the chat container and messages to ensure they are responsive and user-friendly. Add the following styles to your style.css file:
The #chat-container is styled as a flex container that fills the available space, with a maximum width to ensure it is centered and responsive. The #messages element is styled to fill the available space in the chat container and allows scrolling when messages overflow, with a border and padding for a neat appearance. The .message class adds spacing and padding to individual messages, while the .user and .assistant classes align messages to the right and left, respectively, for clear differentiation between student questions and tutor responses.
Finally, let's style the input section to ensure it is functional and visually consistent with the rest of the interface. Add the following styles to your style.css file:
The .input-container class uses flexbox to arrange input elements with a gap for spacing. The .input-wrapper class allows the input field to expand and fill available space. The #message-input ID styles the input field with full width, padding, and a border. The button selector styles all buttons with padding, text color, background color, and cursor properties. The #new-session-btn ID provides a specific green background color for the new session button, making it visually distinct from the send button.
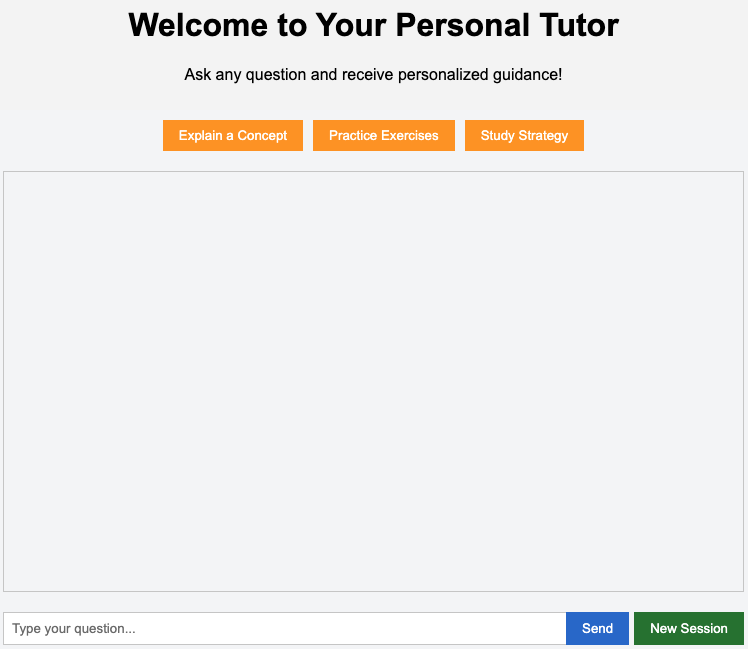
To appreciate the impact of styling, let's compare the personal tutor interface before and after applying CSS.
When no CSS is applied, the interface appears plain and unstructured. All elements—headers, buttons, chat messages, and input fields—use default browser styles. This results in a basic layout with minimal spacing, inconsistent fonts, and no visual hierarchy. Buttons and input fields look generic, and the overall experience feels less engaging and less professional. Let's visualize an example:

After applying CSS, the interface transforms into a visually appealing and user-friendly environment. The header is centered and stands out, suggestion buttons are vibrant and inviting, and the chat container is neatly organized with clear separation between user and assistant messages. The input section is well-aligned and easy to use, and the entire application adopts a consistent font and color scheme. These enhancements not only make the application look modern and professional but also improve usability and the overall learning experience. Here's how it looks now:
In this lesson, you learned how to style your personal tutor interface using CSS. We set up a static directory in FastAPI to serve static files and linked a CSS file to your HTML template. We then styled the basic structure, including the header, suggestions, chat container, messages, and input section, to create a visually appealing and user-friendly educational interface.
As you move on to the practice exercises, focus on experimenting with different styles to achieve your desired look and feel. This hands-on practice will deepen your understanding and help you create a professional-looking interface that enhances the tutoring experience for students. Keep learning!
