Computing Posteriors Fluently
Introduction
Welcome to the final lesson of Bayes' Theorem from the Ground Up! Over the past four lessons you built up every skill you need: translating rates into natural-frequency counts, writing out the Bayes' theorem formula, spotting priors and likelihoods inside word problems, and computing the total probability of the evidence by summing every path. Each lesson handed you one essential tool. Now it is time to use them all together.
In this lesson, we will work through complete posterior calculations from start to finish. We will begin with a clear, repeatable procedure, apply it to a friendly scenario, and then push into a case where the numbers are far less intuitive. By the end, you will have the confidence to pick up any standard Bayesian problem and carry it all the way to a finished answer.
Why Procedural Fluency Matters
Knowing the individual parts of a calculation is not the same as being able to perform them smoothly on demand. Think of the difference between knowing the rules of chess and actually playing a full game — every move draws on the same rules, but stringing them together requires practice and rhythm.
The same is true for Bayes' theorem. You already understand each piece: priors set your starting belief, likelihoods capture how the evidence behaves under each hypothesis, and the total probability of the evidence keeps the denominator honest. What changes today is that we stop practicing one piece at a time and instead run the entire calculation end to end. The goal is procedural fluency — the ability to move from a problem statement to a posterior quickly, correctly, and with a clear understanding of every intermediate result.
The Four-Step Posterior Procedure
Every posterior calculation follows the same four steps. Treat this as a checklist you can return to whenever you face a new problem.
- State the prior. Write down and compute its complement .
- State the likelihoods. Identify and from the problem.
- Compute the total probability of the evidence. Sum both paths:
- Apply Bayes' theorem. Divide the true-positive path by the total:
That is the entire recipe. Four steps, always in the same order. Let us now walk through two complete examples — one with comfortable numbers and one that will test your intuition.
Worked Example: A Weather App's Rain Forecast
Suppose a weather app predicts rain for tomorrow morning. Here is what we know about our city and the app's track record:
| Quantity | Value |
|---|---|
| It rains on about 20% of mornings | |
| The app correctly predicts 90% of rainy mornings | |
| The app falsely predicts rain on 15% of dry mornings |
We want : the probability it will actually rain given the app's prediction. Let us follow our four-step checklist.
Step 1 — Prior: , so .
Step 2 — Likelihoods: and .
Step 3 — Total probability of the evidence:
Step 4 — Posterior:
There is a 60% chance it actually rains when the app says it will. Notice how the prior of 20% jumped up considerably once we received the app's prediction, but it did not leap to 90%. The false-positive path — dry mornings that still get a rain prediction — pulled the posterior back down. This balancing act between the true-positive and false-positive paths is exactly what Bayes' theorem captures.
Worked Example: Screening for a Rare Condition
Now let us tackle a case where the base rate is much smaller. A blood test screens for a condition that affects 2 out of every 1,000 people.
| Quantity | Value |
|---|---|
| The condition is quite rare | |
| The test catches 98% of true cases | |
| The test falsely flags 4% of healthy people |
A patient receives a positive result. What is the probability they actually have the condition?
Step 1 — Prior: , so .
Step 2 — Likelihoods: and .
Step 3 — Total probability of the evidence:
Step 4 — Posterior:
The posterior is roughly 4.7%. A frequency picture helps show where that small number comes from:
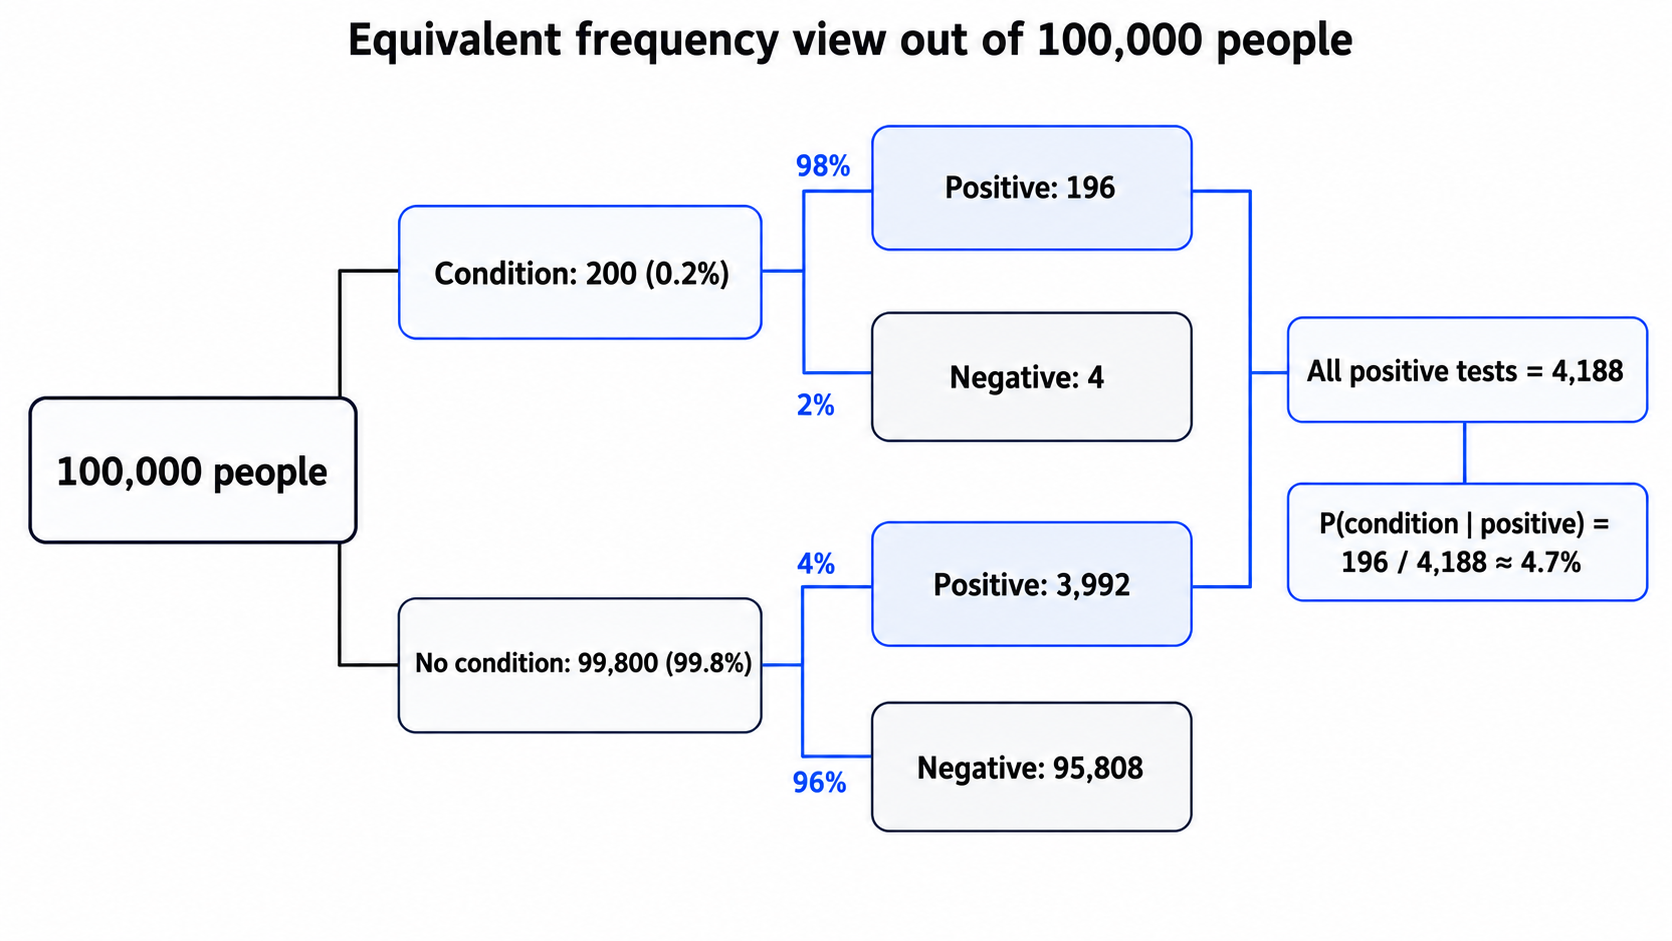
Even after testing positive with a highly accurate test, the probability of actually having the condition is below 5%. The false-positive path () is about 20 times larger than the true-positive path (), which drags the posterior way down. In this example, the prior is very small and the false-positive path is large relative to the true-positive path, so the posterior stays modest — a healthy skepticism that protects against over-reacting to a single test result.
Tips for Staying Accurate
As you start computing posteriors independently, a few practical habits will keep errors at bay.
- Write out every intermediate value. Jumping straight from the given numbers to the final answer is tempting but risky. Recording on its own line makes arithmetic mistakes easy to catch before they cascade into the posterior.
- Keep extra decimal places until the last step. Rounding too early can shift your answer noticeably, especially when the prior is small and the two terms in the denominator are close in size.
- Sanity-check the direction of the update. If the evidence is more likely under than under , the posterior should be higher than the prior. If the reverse is true, the posterior should be lower. A quick directional check catches division or labeling errors immediately.
These habits matter most when the numbers are not round. Problems with values like or demand careful bookkeeping, but the four-step procedure stays exactly the same. Trust the checklist, write down your work, and the arithmetic will take care of itself.
Conclusion and Next Steps
In this lesson we brought every skill from the course together into a single, repeatable four-step procedure: state the prior, state the likelihoods, compute the total probability of the evidence, and apply Bayes' theorem. We practiced on a comfortable scenario where the posterior landed at 60%, and then pushed into a low-base-rate case where even an excellent test produced a surprisingly small posterior of about 4.7%.
Now it is your turn. The practice tasks ahead will walk you from a scaffolded warm-up through increasingly challenging calculations, finishing with a problem where you write out every step of your reasoning in your own words. Trust the four-step checklist, keep your intermediate work visible, and you will do great.
