Sketch the Impact Effort Matrix
Sketch the Impact Effort Matrix 📊
A clock and a bar close one decision, but they only work when there's a single call on the table. The other shape of stall is different: four things competing for the same morning and no way to rank them. This lesson gives you a 2×2 impact-effort matrix, drawn in ten seconds on whatever paper is nearest — not to rank everything, but to force one task to start and one to die before the plotting energy fades.
After this lesson, you will have learned how to:
- Sketch a 2×2 grid with impact low→high vertically and effort low→high left to right, and label all four quadrants before plotting anything
- Plot four competing tasks in under two minutes using one sentence of justification per placement
- Commit to the top-left task immediately and kill the bottom-right one out loud in unambiguous words
📐 Sketch a 2×2 Impact Effort Grid and Label All Four Quadrants
The impact effort matrix plots tasks by how much impact they'll have against how much effort they require. It takes two lines, so any surface works — napkin, envelope, back of a receipt.
A grid only saves time if you build it the same way every time, so the shape becomes automatic and your attention goes to the tasks instead of the drawing. Draw a cross on the paper. Two axes:
- Vertical = impact, high at the top, low at the bottom.
- Horizontal = effort, low on the left, high on the right.
That gives you four boxes, and the one you want is the top-left: high impact for low effort. Everything you plot gets measured against that corner.
Now label all four quadrants before you plot a single task:
| Low Effort | High Effort | |
|---|---|---|
| High Impact | Sweet Spot — Do Now | Important — Schedule |
| Low Impact | Easy — Fill-in | Avoid — Drop |
Each label contains your immediate instruction:
- Sweet Spot — Do Now (high impact, low effort)
- Important — Schedule (high impact, high effort)
- Easy — Fill-in (low impact, low effort)
- Avoid — Drop (low impact, high effort)
Write those words on the paper. Not in your head. Unlabeled quadrants get argued over again the moment a task lands somewhere you don't like, because there's nothing on the page holding you to a decision you already made.
Plot Four Competing Tasks in Under Two Minutes ⏲️
Now comes the fun part: placing your tasks. Write each option in its proper quadrant based on your gut assessment. Don't overthink the exact placement. The goal is quick categorization, not perfect precision. Place all four items in two minutes with a hard stop — the point is to force a decision, not to study the options.
Two traps show up almost every time. The first is urgency masquerading as impact: the noisy inbox feels top-left because it's making noise, but noise is not impact. The second is the reverse: genuinely valuable work gets shoved into "do now" when it's actually high effort, which makes it top-right, scheduled. Both traps distort the same axis, so you test both the same way.
The test is one question: what changes if this gets done? If the honest answer is "nothing anyone would notice," it's low impact regardless of how loud it is.
Let's see how that plays out. Meredith is plotting her morning and reaching for the wrong quadrant. Chris doesn't argue about importance. He just runs the test.
- Chris: Where are you putting the inbox?
- Meredith: Top-right. It has been screaming at me for attention since I sat down.
- Chris: In one sentence, what actually changes once it’s cleared?
- Meredith: Honestly? Nothing anyone would notice. It’s low impact, just high volume.
- Chris: Low impact puts it in the bottom half. How much effort will clearing it take?
- Meredith: Ten minutes of quick replies and archiving. Low effort.
- Chris: That's bottom-left then: easy — fill-in. What's the next item?
Notice Chris never debates whether email matters. Debating importance is how two minutes becomes twenty. He asks what changes, accepts the one-sentence answer, and moves the pen. This is the only impact test that survives at speed.
🧁 Commit to the Sweet Spot and Discard the Bottom-Right
Once everything is plotted, the decision makes itself. Start with high impact, low effort items first. These give you the biggest bang for your buck. The window between finishing the grid and starting the work is where good sorting quietly turns into no action at all, so make the first move small enough to begin immediately: open the file, send the one message, book the room.
Then kill the bottom-right task out loud, in words. Say dropped. Not "deprioritized," not "parked," not "revisit next sprint." Soft language keeps a task alive, and it will reappear next week having cost you nothing but attention every time you looked at it.
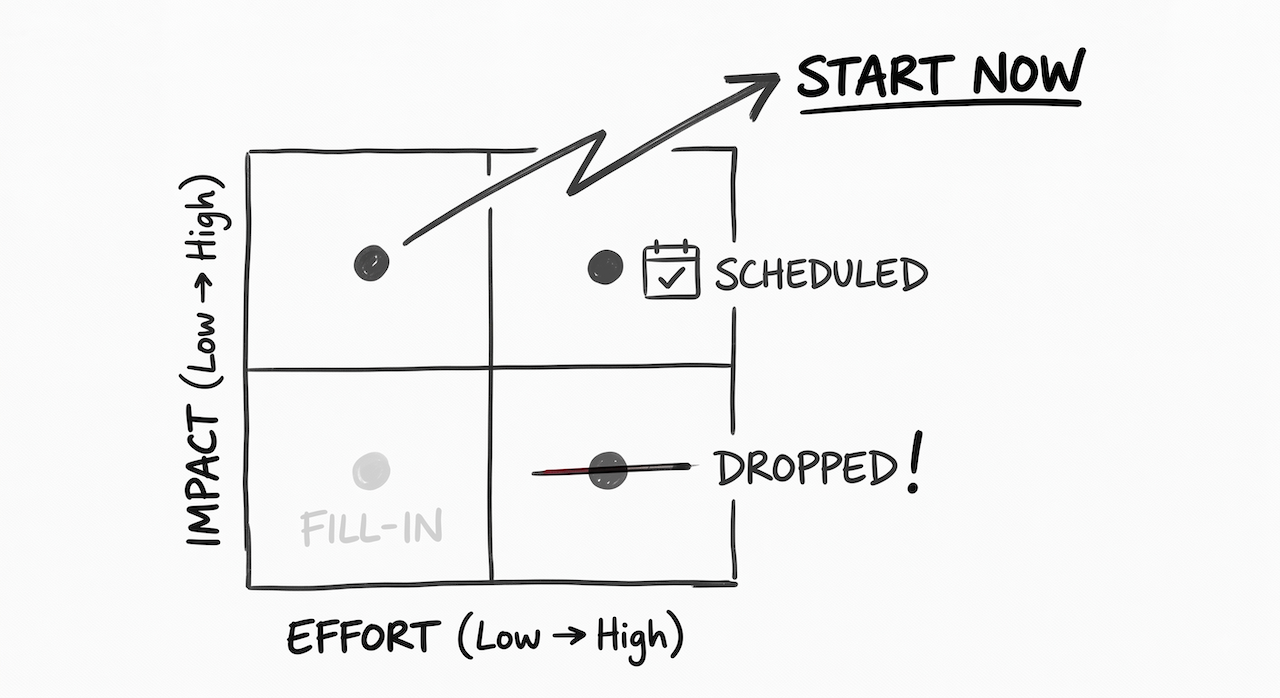
Say the trade aloud too: high impact for low effort beats high effort for low impact. That single line is your entire defense if someone reopens the decision later. The top-right items aren't rejected, they're scheduled: they need a calendar slot, not a spare morning. The bottom-left ones stay on the page as fill-in work for the gaps between everything else.
The grid does not need one task in each quadrant. Use these rules without reopening the whole decision:
- Multiple tasks in the top-left: Start the one with the greatest impact. If tied, choose the lower-effort task; if still tied, choose the first one you wrote.
- Multiple tasks in the bottom-right: Drop the one with the least impact. If tied, choose the higher-effort task; if still tied, choose the first one you wrote. The others remain marked drop, not scheduled.
- No top-left task: Schedule a high-impact, high-effort task and book its first work session now. If there are no high-impact tasks, use a genuinely useful fill-in task or stop—don't invent a sweet spot.
- No bottom-right task: Say “Nothing to drop from this set” and move on. Don't discard a useful task just to complete the ritual.
The takeaway is that the matrix doesn't rank your tasks. Ranking four things is easy and useless. It forces one to start and one to die, which is the part you'd otherwise avoid. Next, you'll run a quick matching check on quadrant positions and their action labels, then plot a live grid against a timer. Draw the cross now, on paper, before the clock starts.
