Matching Decisions to Constraints
Matching Decisions to Constraints 🛠️
You now have several distinct tools in your kit, but speed depends entirely on selection. This lesson focuses on the "meta-decision": picking the right framework in under ten seconds. You’ll learn to stop forcing data-heavy scorecards onto data-poor situations and how to pivot to a high-speed loop when the clock is actually running.
By the end of this lesson, you’ll be able to:
- Differentiate between "delayed" data and "unavailable" data based on your specific decision window
- Rule out inappropriate frameworks using three parameters: time, stakes, and data availability
- Construct a "Framework Selector Guide" to triage any decision into the correct tool in seconds
🔄 Execute a Live OODA Loop When Data Is Incomplete
The OODA Loop is a framework for making decisions when the clock is running and key facts are missing. Here’s how it works: Observe what’s actually in front of you, Orient those facts against your goal and constraints, Decide on one option, and Act on it.
Picture this: you’re lost in a huge mall with no map. Your phone is dead, the stores are closing in 20 minutes, and you need to find an exit. Here’s how you might apply OODA:
- Observe: Look for signs, directories, staff, escalators, and the layout around you.
- Orient: You’re on Level 2, and the signs suggest the main exits are on Level 1.
- Decide: Head toward the escalator near the food court.
- Act: Start walking there now.
The key is to move quickly and keep cycling. Don’t spend forever on any one step. Gather enough information to orient yourself, make a reasonable decision, and act. If the escalator is blocked or the signs point elsewhere, that new information starts your next OODA cycle.
To use the loop effectively, avoid two common failure modes:
- Collapsing Observe into Orient: Observe is raw information: "The specialist is unavailable for nine days." Orient is what that information means for your decision: "A nine-day delay puts my fixed-price budget at risk." Blur the two, and you may smuggle an assumption into your evidence.
- Treating OODA as one-and-done: Every Act produces a new Observation. Before you act, name the trigger that will start your next loop — for example, “I’ll reassess when I reach the escalator or see a new exit sign.”
Let’s see how this distinction works in practice. Ryan is deciding whether to buy a house, but the surveyor couldn’t determine the roof’s age. A specialist is available in nine days, while the vendor needs an answer within twenty-four hours. Because Ryan has no contingency budget for repairs, Simone pushes him to separate facts from assumptions.
- Simone: So, based on the survey, you’ve observed that the roof is a problem?
- Ryan: Not exactly. I’ve observed that the surveyor couldn’t establish its age. It becomes a problem during Orient because I have no contingency budget.
- Simone: Couldn’t you wait for the specialist’s inspection so you know for sure?
- Ryan: The vendor needs an answer in twenty-four hours, so data arriving in nine days is unavailable for this decision.
- Simone: What will you do, and when will you start the next loop?
- Ryan: I’ll make a lower offer that accounts for the uncertainty. The vendor’s response will trigger my next loop.
Notice Ryan’s discipline: he separates observation from interpretation and refuses to build a tally scorecard from numbers that don’t exist. He uses OODA because it lets him act on limited information, then update his decision when new information arrives.
Evaluate the Decision Against Time, Stakes, and Data ⚖️
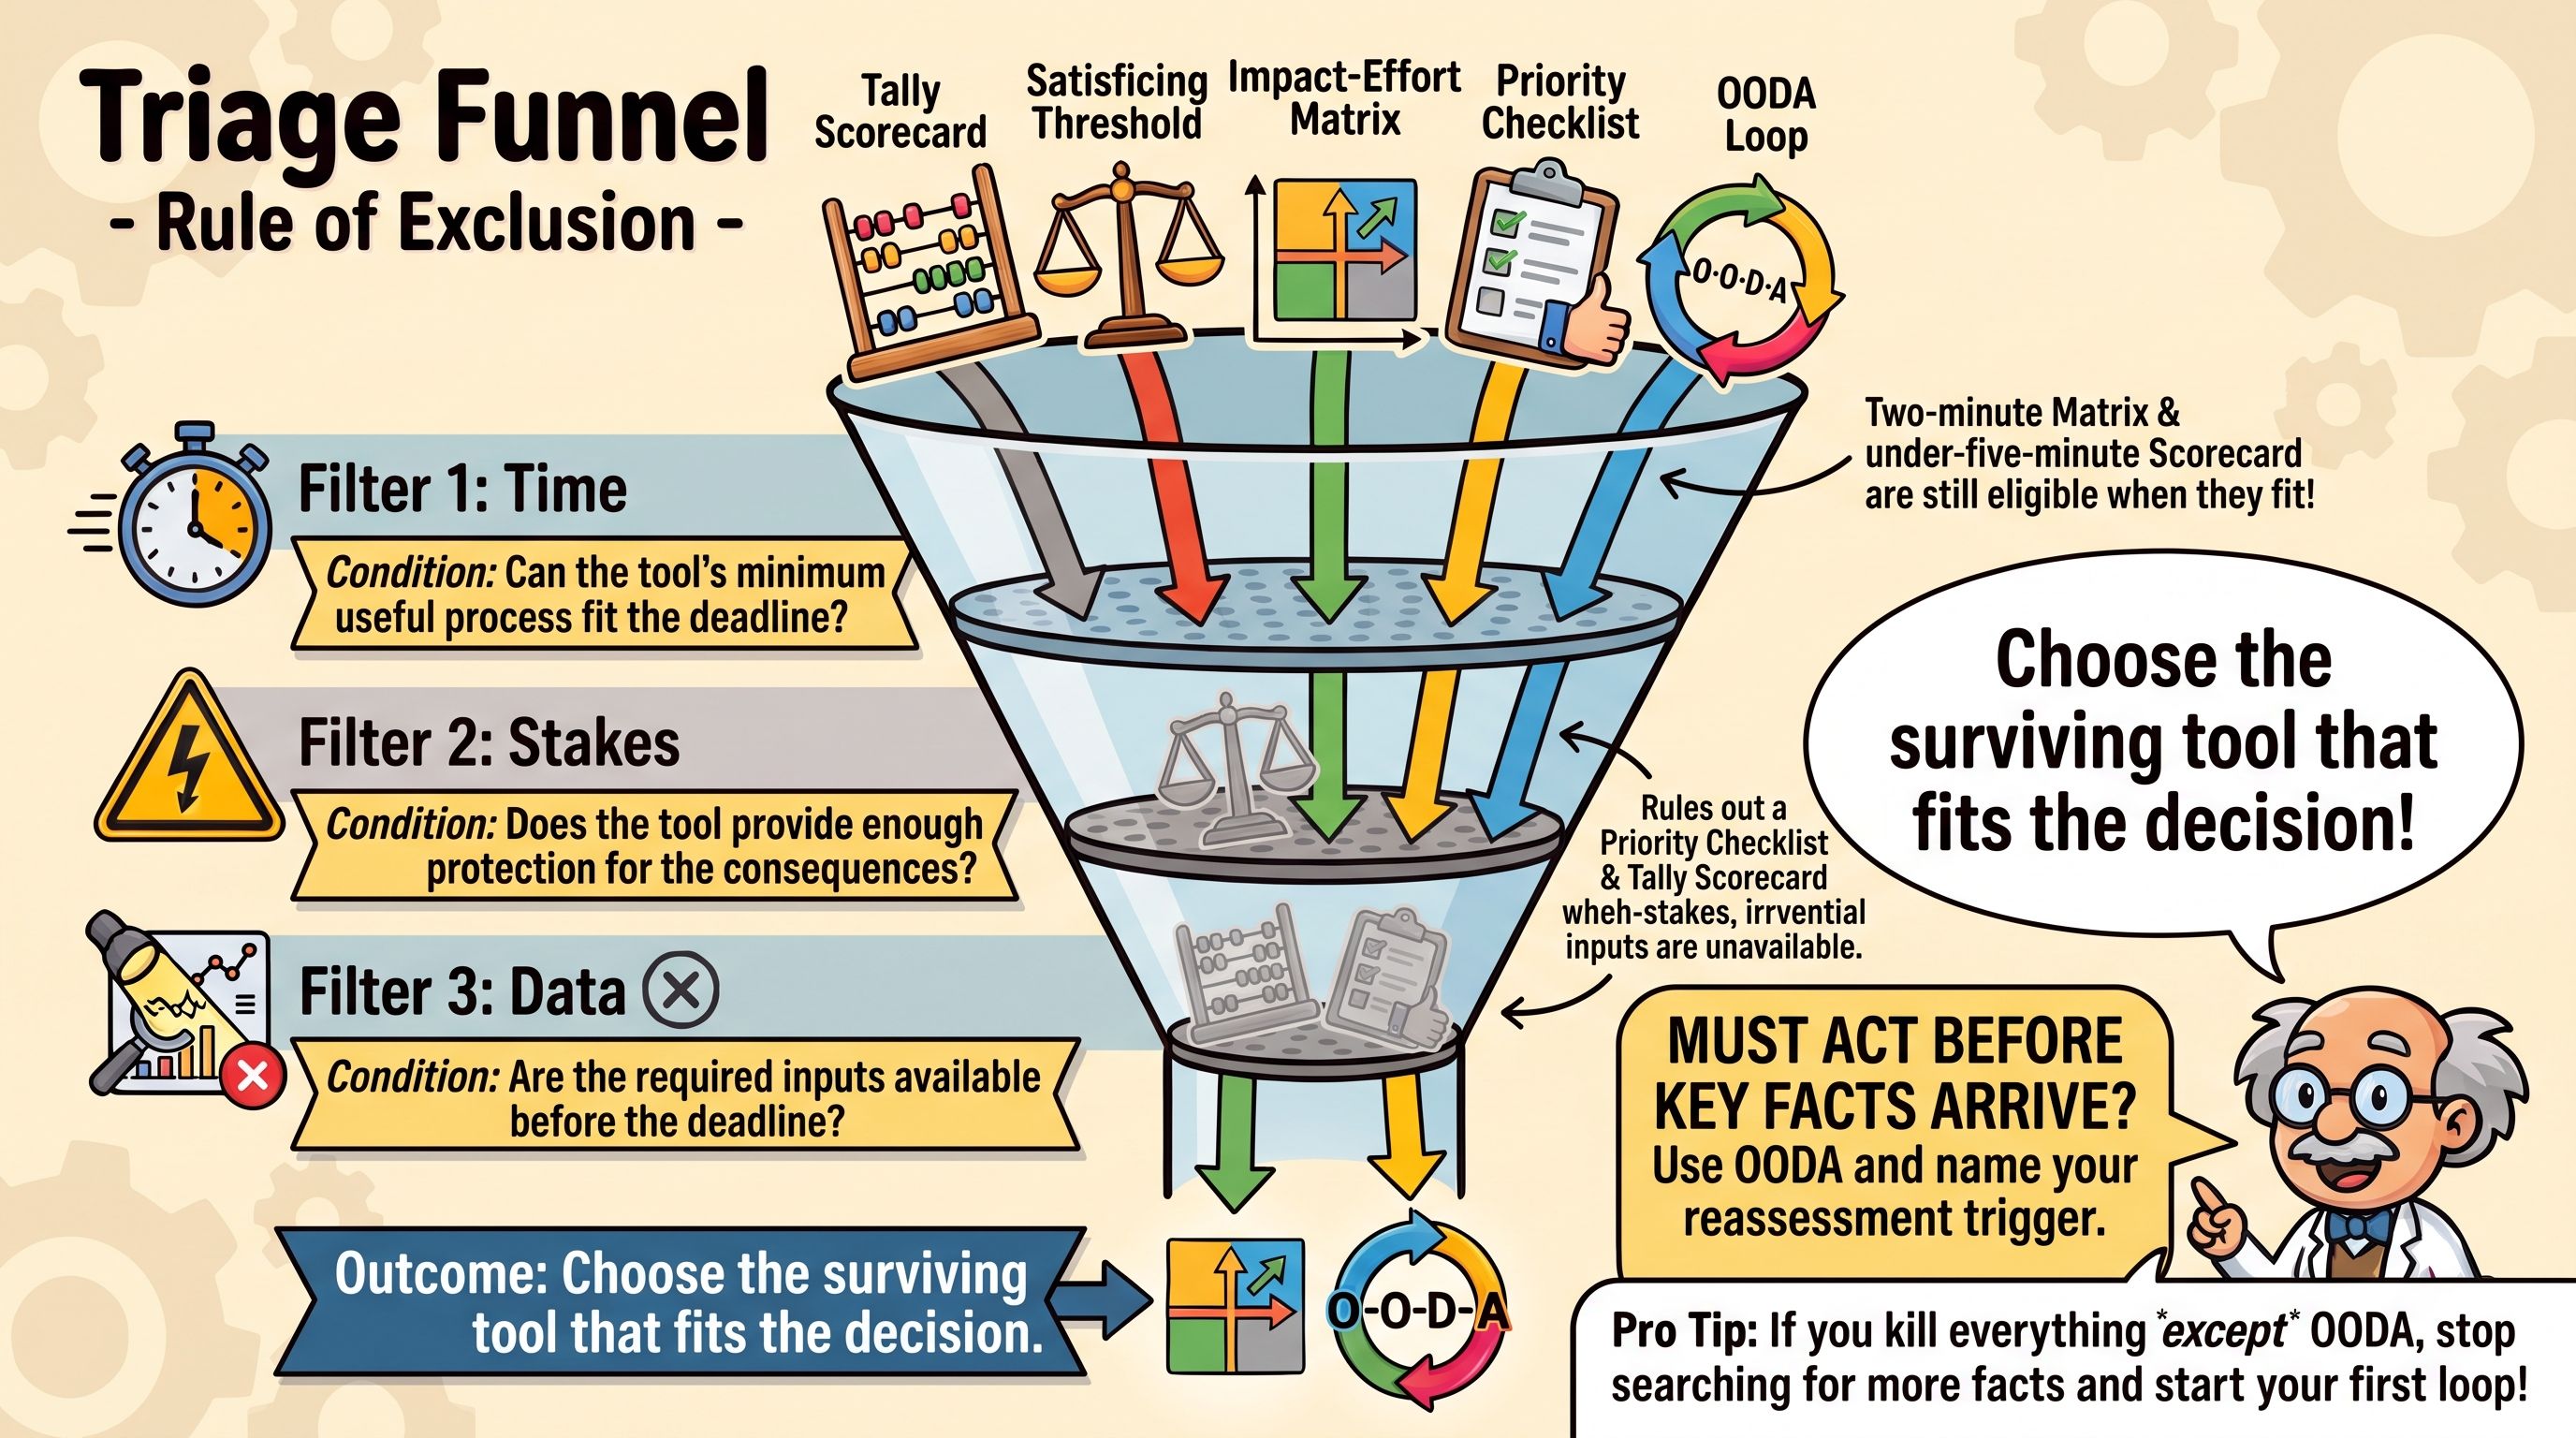
You've learned five powerful decision frameworks! But which one should you use when? Having multiple tools is great, but choosing the wrong one wastes time. Three key factors determine your best framework choice:
- Available Time: Exactly how long until the window shuts, hard?
- Stakes: Is this decision irreversible (Type 1) or reversible (Type 2)? Type 1 decisions are one-way doors where you cannot easily go back (like resigning from a job or signing a year-long lease). Type 2 decisions are two-way doors that can be undone with minimal cost (like picking a lunch order or drafting an initial proposal). Label your stakes clearly to understand the true weight of the choice.
- Available Data: Is the missing information obtainable inside the window, or merely obtainable later?
That last distinction is the "overthinker's trap." Data you could get in nine days, when you have a twenty-four-hour window, is not data you have. Overthinkers treat "delayed" as "pending" and stall for information that will never arrive in time.
The Rule of Exclusion: Each parameter must rule a framework out. Naming a tool without rejecting its rivals is just decoration. This process forces you to acknowledge the reality of your constraints rather than your preferences. For instance, no usable data rules out the Tally Scorecard because you can't score a void. High, irreversible stakes rule out a simple Satisficing Threshold because "good enough" is a dangerous standard for a permanent move. By explicitly naming what you are rejecting, you prevent your brain from stalling for a more comfortable, data-heavy method that simply doesn't fit the situation. If you can’t state exactly what you’re not using and why, you haven’t made a meta-decision — you’ve just made a guess.
A short deadline does not automatically rule out a tool. The Impact-Effort Matrix has a two-minute version, and the Tally Scorecard can take under five minutes when the criteria and data are ready. Rule out a framework only when its minimum useful process—including any necessary data gathering—cannot fit your actual decision window. OODA fits when you need to act before key facts can be obtained and update as new information arrives.
🌳 Design a Pocket Decision Tree for Tool Selection
A Framework Selector Guide routes your situation to one of five tools. The goal is to select a tool in under ten seconds—not to finish the decision in that time. Read these questions in order and stop at the first “yes.” This precedence resolves situations that match more than one branch.
-
Are there hard must-haves or safety/compliance requirements to verify?
→ Priority Checklist. Check eligibility before comparing options. An unknown requirement is not a pass. If several options pass and still need comparison, run those options through the remaining questions. -
Must I act before I can obtain key facts or complete another suitable tool’s minimum useful process?
→ OODA Loop. Choose a safe next action and name the observation that will trigger reassessment. Missing data is not permission to make an unsafe, irreversible commitment. -
Am I prioritizing competing tasks under limited time or energy?
→ 2×2 Impact-Effort Matrix. Use the two-minute version when needed. -
Is this a low-stakes, recurring choice where the first option meeting a clear threshold is enough?
→ Satisficing Threshold. -
Do I need to compare options across multiple criteria, with usable data and enough time to score them?
→ Tally Scorecard. Use the under-five-minute version when the criteria and data are ready.
If every answer is “no,” use a brief OODA cycle to clarify the goal, options, or missing information, then rerun the selector. Do not force an unclear decision into a scorecard.
Give each branch a Time Box for the decision itself. Finally, define your “Break Glass” clause: one narrow, specific trigger where you would deliberately override the routing order — not a safety or compliance requirement. A broad exception is just a license to procrastinate.
The main takeaway is that you must match your tool to your specific constraints. When you are squeezed by a hard clock and missing data, OODA is the fit, not a compromise. You have learned to use time, stakes, and data to exclude the wrong frameworks and identify the right one quickly. Next you will pressure test your OODA staging and defend a live triage out loud before pinning up your own pocket selector guide.
