Building Reusable Prompt Templates
Introduction
Most prompts in this course have been written as one fixed set of instructions, then evaluated across many cases. But sometimes part of the prompt itself needs to change from case to case.
Take a support-response job. The core instructions stay the same, but one case might need an empathetic agent replying in a short paragraph, while another needs technical support giving numbered steps.
Rather than rewriting the whole prompt each time, you can build one reusable prompt template.
In this lesson you'll separate a template into shared instructions, named variables, and the case input; give those variables different values per case; preview the final prompt the model receives; and evaluate the outputs using metrics you already know.
Parts of a Reusable Prompt Template
A template separates what stays fixed from what can change. Consider this support-response template:
You are a {{role}} responding in a {{tone}} tone. Format your reply as {{format}}.
Customer message:
{{input}}
It has three kinds of content:
- Shared instructions — text that stays the same across cases, like
You are a,responding in a, andCustomer message:. - Named variables — placeholders like
{{role}},{{tone}}, and{{format}}whose values can differ for each case. - The input placeholder —
{{input}}, replaced with that case's actual input.
The diagram below separates those three parts.
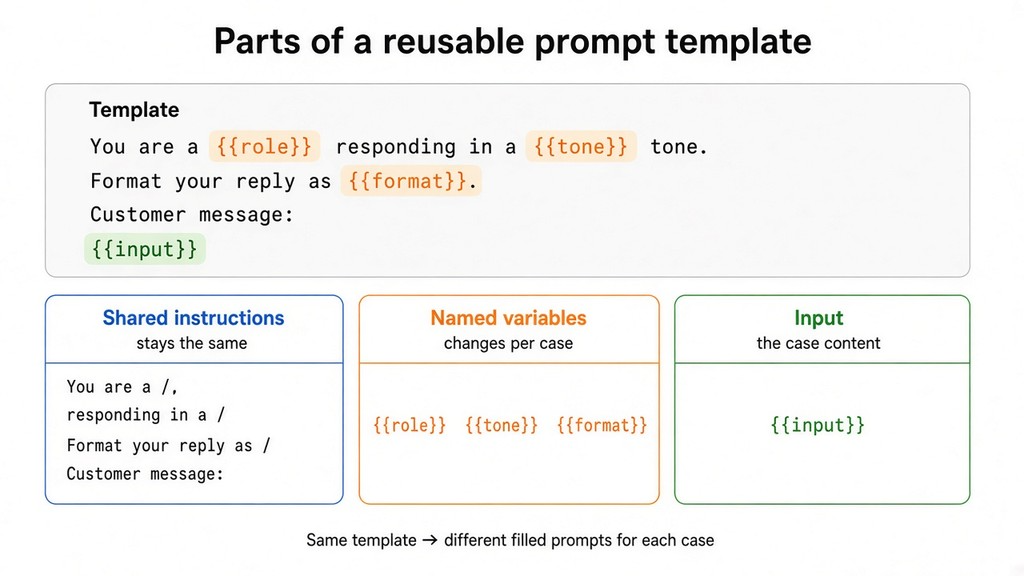
The key distinction: named variables describe configurable parts of the prompt, while {{input}} holds the actual case content. So {{tone}} might be empathetic in one case and neutral in another, while {{input}} might be a refund question in one case and a password-reset question in another.
From Template to Rendered Prompt
The template still contains placeholders. Before the model sees it, the simulator replaces those placeholders with the current case's values.
Take a simpler version:
You are a {{role}}.
Respond in a {{tone}} tone.
Customer message: {{input}}
Suppose this case supplies:
role=support agenttone=warm- input =
My order arrived late.
The simulator substitutes each value in place and produces the rendered prompt:
This rendered prompt is what's sent to the model. The template stays reusable; the case values decide what gets inserted.
Filling In Values Across Cases
Each case supplies values for the variables plus its input. And templates aren't just for support replies. Here's a product-description template built the same way:
Write a {{length}} product description aimed at {{audience}}. Emphasize the {{focus}}.
Product details:
{{input}}
Three cases might look like this:
- Case 1:
length=two-sentence,audience=first-time buyers,focus=ease of use, input =A stainless steel water bottle that keeps drinks cold for 24 hours. - Case 2:
length=one-paragraph,audience=outdoor enthusiasts,focus=durability, input =A lightweight tent that sets up in under two minutes. - Case 3:
length=bulleted,audience=budget shoppers,focus=value for money, input =A wireless mouse with a six-month battery life.
The template never changes. Only the per-case values do. That's what makes it reusable: one design produces many rendered prompts with no manual rewriting.
Previewing the Rendered Prompt
Before running an evaluation, you can preview how the template renders for a given case.
For Case 1:
Write a two-sentence product description aimed at first-time buyers. Emphasize the ease of use.
Product details:
A stainless steel water bottle that keeps drinks cold for 24 hours.
Switch to Case 2 and the shared wording holds, but the substituted values change:
Write a one-paragraph product description aimed at outdoor enthusiasts. Emphasize the durability.
Product details:
A lightweight tent that sets up in under two minutes.
Previewing lets you confirm each placeholder got the value you expected before the prompt reaches the model.
One important boundary: Expected Answer is not inserted into the rendered prompt. It exists only for evaluation, giving certain metrics something to compare the output against. For reference-based metrics like LLM Judge, it should be a concrete reference response (for example, “This stainless steel bottle keeps your drinks ice-cold for a full 24 hours. It's simple enough to grab and go, with no setup required.”) — not a descriptive rubric of ideal behavior.
Evaluating Outputs from a Template
Templating changes how the prompt is assembled, not how you evaluate it. Once the rendered prompt produces an output, you use the same metrics as always, chosen by what the requirement actually asks for:
- Exact Match or Contains when literal text matters.
- Regex Match when the output must follow a pattern.
- Valid JSON when the output must parse as JSON.
- String Similarity or Word-overlap F1 when surface-text similarity is useful evidence.
- LLM Judge when meaning should agree with an Expected Answer even if wording differs.
Using variables doesn't decide the metric. A rendered prompt that asks for JSON might call for Valid JSON; one asking for a naturally worded answer that should match a reference might call for LLM Judge. The principle is unchanged:
Choose the metric based on what you actually need to verify.
Tracing a Rendered Prompt Back to Its Source
You should also be able to look at a rendered prompt and see where each piece came from. Consider this output of an explanation template Explain {{concept}} to a {{level}} learner using a {{style}} example.:
Explain recursion to a beginner learner using a real-world example.
Question:
Why does my function keep calling itself?
Tracing it back:
Explain,to a,learner using a,example., andQuestion:— shared instructions.recursion,beginner, andreal-world— named variable values.Why does my function keep calling itself?—{{input}}.
When something looks off, this lets you ask whether the wording came from the shared template, a named variable, or the case input — making template-based prompts far easier to inspect and debug.
Conclusion
A reusable prompt template lets you write shared instructions once and swap in case-specific values through named variables and {{input}}, so you never rewrite the whole prompt when only part of it changes.
Key points to carry forward:
- Previewing confirms each placeholder got the value you expected before the prompt reaches the model.
- Expected Answer is for evaluation only — never inserted into the rendered prompt.
- Metric choice doesn't change just because a prompt uses variables.
- Tracing a rendered prompt back to its shared instructions, variables, or input makes it easier to debug.
Templating changes how the prompt is assembled, not how you evaluate it.
