Introduction: Making Your Application Accessible

In the previous lesson, you successfully deployed your application, but it remains isolated within the cluster, inaccessible to the outside world. This isolation is a default security feature in Kubernetes, but it means you can't visit your web application in a browser or share it with users. To make your application reachable, you need to explicitly expose it to external traffic.

This lesson teaches you how to solve this problem using a Kubernetes Service. A Service is a resource that provides a stable network endpoint for your application's pods. You will focus on the LoadBalancer Service type, which is the standard way to expose applications publicly on cloud platforms like AWS. By the end of this lesson, you will have created a Service that provisions an AWS load balancer, giving your application a public hostname that anyone on the internet can use to access it.

The Problem That Services Solve

Before diving into how Services work, you need to understand the fundamental problem they solve. When you created your deployment, Kubernetes created pods, and each pod received its own internal IP address. Relying on these pod IP addresses to access your application is impractical for several critical reasons.

These challenges make direct pod access unsuitable for any real-world application. Let's break down the specific problems:

  • Pods are ephemeral. Pods are designed to be temporary and replaceable. They are destroyed and recreated with new IP addresses during scaling events, updates, restarts, or node failures. Any system trying to connect directly to a pod IP would constantly break.
  • Pod IPs are not externally routable. Pod IP addresses exist on an internal, private network within the cluster. They cannot be reached from outside the cluster, such as from your local machine or by your users' browsers.
  • Managing multiple pods is complex. A deployment with multiple replicas has multiple pods, each with a different IP address. You would need to implement your own client-side load balancing to distribute traffic among them, which is complex and brittle.

Services solve all three of these problems by providing a stable abstraction layer in front of your pods. A Service gets its own stable IP address and automatically discovers and load-balances traffic to the correct pods using label selectors, ensuring reliable access regardless of how often your pods change.

Understanding Service Types in Kubernetes

Kubernetes provides several different types of Services, each designed for a different use case and level of accessibility. The type you choose depends on whether you need your application to be accessible only within the cluster, from the cluster nodes, or from the public internet.

Understanding these types is key to configuring your application's networking correctly. Here are the three most common Service types:

  • ClusterIP: This is the default Service type. It exposes the Service on an internal IP address that is only reachable from within the cluster. This is ideal for backend services, like databases or internal APIs, that should not be exposed to the public internet.
  • NodePort: This type exposes the Service on a static port on each worker node's IP address. External traffic can access the Service by connecting to <NodeIP>:<NodePort>. While useful for development or specific use cases, it's less common in production on cloud platforms because it requires managing node IPs and firewall rules manually.
  • LoadBalancer: This type builds on NodePort and is the standard way to expose a service to the internet on cloud providers. It automatically provisions an external load balancer (like an AWS Elastic Load Balancer) that routes external traffic to the NodePort on your worker nodes.

For this lesson, you'll focus exclusively on the LoadBalancer type because it's the most straightforward way to make your application publicly accessible on EKS. A fourth type, ExternalName, exists for creating an alias to an external service but is used less frequently.

How LoadBalancer Services Work on AWS

When you create a LoadBalancer Service on Amazon EKS, several things happen behind the scenes to integrate Kubernetes with AWS infrastructure. Understanding this process helps you know what to expect when you create your Service and why certain steps take time. The integration between Kubernetes and AWS is one of the key benefits of using a managed Kubernetes service like EKS rather than running Kubernetes yourself.

Important: EKS supports two different controllers for managing LoadBalancer Services. The default in-tree cloud controller (built into Kubernetes) creates Classic Load Balancers or Network Load Balancers and is what we'll use in this lesson. There's also an optional AWS Load Balancer Controller add-on that provides more advanced features and can create Application Load Balancers. For basic use cases like this lesson, the in-tree controller is sufficient and requires no additional setup. The AWS Load Balancer Controller is typically used for more advanced scenarios and requires separate installation.

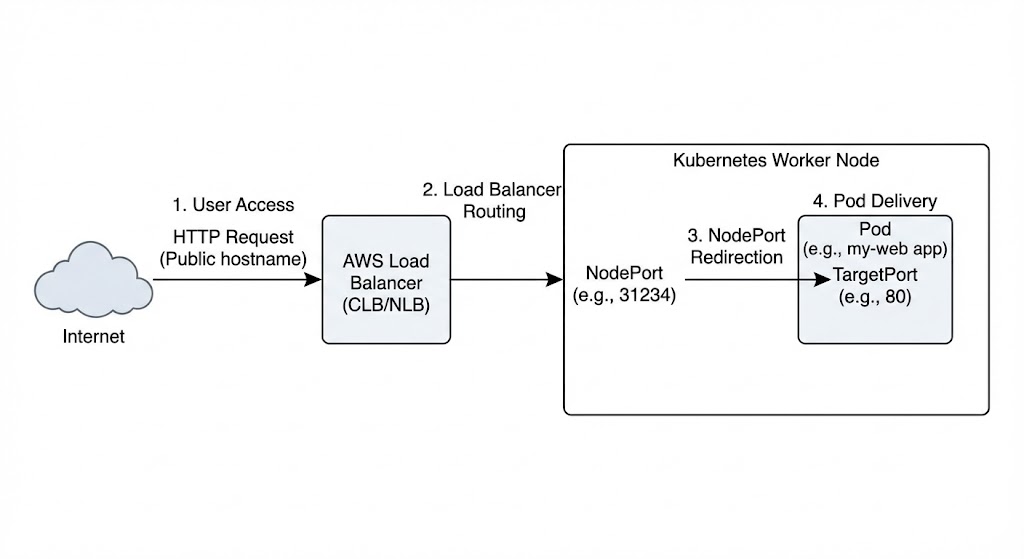
A diagram that traces external traffic from the internet through an AWS Load Balancer to a specific NodePort on a worker node, which finally directs the request to the application Pod. It clarifies how the LoadBalancer service type uses the NodePort as an intermediary hop to bridge cloud infrastructure and internal Kubernetes networking.

The process starts when you apply a Service manifest with type: LoadBalancer to your cluster. Kubernetes receives this manifest and creates the Service resource in its internal database. The in-tree cloud controller, which is a component running in your cluster's control plane, sees that a new LoadBalancer Service was created and needs to provision external infrastructure. On EKS, this controller is integrated with AWS and knows how to communicate with AWS APIs to create the necessary resources.

Understanding the AWS Provisioning Process

The cloud controller makes API calls to AWS Elastic Load Balancing to create a new load balancer. By default, EKS creates an AWS-managed load balancer (Classic ELB or NLB depending on cluster configuration). You can explicitly request an NLB using the service.beta.kubernetes.io/aws-load-balancer-type annotation. The load balancer is created in the same VPC as your EKS cluster and is configured to route traffic to your cluster's worker nodes. AWS creates the load balancer in multiple availability zones for high availability, registers your worker nodes as targets, and configures health checks to ensure traffic only goes to healthy nodes.

Note: You can control the type of AWS load balancer created by the in-tree controller by adding annotations to your Service manifest. For example, to create a Network Load Balancer instead of a Classic Load Balancer, add service.beta.kubernetes.io/aws-load-balancer-type: "nlb" to the metadata.annotations section. For more details on available annotations and load balancer configuration options, see the Kubernetes documentation on cloud providers.

This provisioning process takes several minutes because AWS needs to allocate resources, configure networking, and perform health checks before the load balancer is ready to serve traffic. During this time, your Service exists in Kubernetes, but it doesn't have an external endpoint yet. You'll see this reflected in the Service status, where the external IP or hostname field will show as <pending> until AWS completes the provisioning. This is normal and expected, and you just need to wait for the process to complete.

Accessing and Managing Your Load Balancer

Once AWS finishes provisioning the load balancer, it returns the load balancer's DNS hostname to Kubernetes. The cloud controller updates the Service resource with this information, and the hostname becomes visible when you check the Service status. This hostname is what you'll use to access your application from outside the cluster. The hostname looks something like a1b2c3d4e5f6g7h8-1234567890.us-east-1.elb.amazonaws.com and is publicly resolvable through DNS. Anyone who knows this hostname can access your application, assuming your security groups and network ACLs allow the traffic.

The load balancer continuously monitors the health of your worker nodes and only sends traffic to nodes that pass health checks. When traffic arrives at the load balancer, it's distributed across your healthy nodes. Each node then routes the traffic to one of the pods running your application, using the NodePort that was automatically created as part of the LoadBalancer Service. This multi-layer routing ensures that your application is highly available and can handle traffic even if some nodes or pods fail.

It's important to understand that the load balancer is a real AWS resource that exists outside of Kubernetes and incurs costs. When you delete the Service, Kubernetes tells AWS to delete the load balancer, cleaning up the resources automatically. However, if you delete your cluster without first deleting LoadBalancer Services, the load balancers might not be cleaned up automatically, and you'd need to delete them manually through the AWS console or CLI. This is why proper cleanup is important when you're done with resources.

Writing Your Service Manifest

Now you're ready to write the manifest that will expose your application. Like a Deployment manifest, a Service manifest is a YAML file that describes the desired state of the resource. It contains standard fields like apiVersion, kind, and metadata, along with a spec section for Service-specific configuration.

Create a file called service.yaml with the following content:

apiVersion: v1
kind: Service
metadata:
  name: my-web-svc
  namespace: apps
spec:
  type: LoadBalancer
  selector:
    app: my-web
  ports:
    - name: http
      port: 80
      targetPort: 80

This manifest defines all the necessary components to expose your application. Let's examine the key fields:

  • apiVersion and kind: These fields declare that you are creating a Service resource using the core v1 API group of Kubernetes.
  • metadata: Here, you specify the Service's name as my-web-svc and place it in the apps namespace, ensuring it can find the deployment in the same namespace.
  • spec.type: Setting this to LoadBalancer is the critical instruction that tells Kubernetes to provision an external load balancer via the cloud provider (AWS in this case).
  • spec.selector: This tells the Service which pods to send traffic to. It selects all pods that have the label app: my-web, which matches the label you defined in your Deployment's pod template.
  • spec.ports: This section defines the port mapping. It specifies that the Service should accept traffic on port: 80 (the standard HTTP port) and forward it to targetPort: 80 on the selected pods, which is the port nginx is listening on.

The use of a label selector is what makes the Service so powerful. It decouples the Service from the individual pods, allowing the Service to automatically track the healthy pods of your deployment even as they are created, destroyed, or replaced.

Deploying and Testing Your Service

With your Service manifest written, you're ready to deploy it to your cluster and test that it works. The process is similar to deploying your Deployment manifest, using kubectl apply to create the resource. However, testing a Service requires a few additional steps because you need to wait for AWS to provision the load balancer and then extract the public hostname before you can access your application.

Start by applying the Service manifest to your cluster:

kubectl apply -f service.yaml

Kubernetes receives the manifest, validates it, and creates the Service resource. The output confirms that the Service was created:

service/my-web-svc created

At this point, the Service exists in Kubernetes, but the AWS load balancer hasn't been provisioned yet. If you immediately check the Service status with kubectl get svc, you'll see that the external IP field shows <pending>:

kubectl get svc my-web-svc -n apps

The output shows the Service but without an external endpoint yet:

NAME          TYPE           CLUSTER-IP      EXTERNAL-IP   PORT(S)        AGE
my-web-svc    LoadBalancer   10.100.200.50   <pending>     80:31234/TCP   10s

The CLUSTER-IP field shows the internal IP address that was assigned to the Service. Other pods in the cluster can use this IP to access your application, but you can't use it from outside the cluster. The EXTERNAL-IP field shows <pending>, indicating that AWS is still provisioning the load balancer. The PORT(S) field shows 80:31234/TCP, which means the Service listens on port 80 and has been assigned NodePort 31234 on each cluster node. The NodePort is assigned automatically from the available range.

Rather than repeatedly running kubectl get svc to check whether the load balancer is ready, you can use the -w flag to watch for changes in real time:

kubectl get svc my-web-svc -n apps -w

This command displays the current Service status and then continues running, showing updates as they happen. You'll see the same <pending> status initially, and then after a few minutes, the output will update to show the external hostname:

NAME          TYPE           CLUSTER-IP      EXTERNAL-IP                                                              PORT(S)        AGE
my-web-svc    LoadBalancer   10.100.200.50   <pending>                                                                80:31234/TCP   10s
my-web-svc    LoadBalancer   10.100.200.50   a1b2c3d4e5f6g7h8-1234567890.us-east-1.elb.amazonaws.com                80:31234/TCP   2m15s

When you see the hostname appear in the EXTERNAL-IP field, you can press Ctrl+C to stop watching and proceed to test your application. The hostname is the public DNS name of the AWS load balancer that was created for your Service. This hostname is what you'll use to access your application from anywhere on the internet.

To make testing easier, you can extract the hostname programmatically and store it in an environment variable. This is useful because the hostname is long and difficult to type manually:

EXTERNAL=$(kubectl get svc my-web-svc -n apps -o jsonpath='{.status.loadBalancer.ingress[0].hostname}')
echo "Service endpoint: http://$EXTERNAL/"

This command uses JSONPath to extract just the hostname from the Service status and stores it in the EXTERNAL variable. The echo command then displays the full URL you can use to access your application:

Service endpoint: http://a1b2c3d4e5f6g7h8-1234567890.us-east-1.elb.amazonaws.com/

Now you can test that your application is accessible by making an HTTP request to this URL. The curl command with the -I flag makes a HEAD request that retrieves just the HTTP headers without downloading the full response body:

curl -I "http://$EXTERNAL/"

If everything is working correctly, you'll see HTTP headers indicating a successful response:

HTTP/1.1 200 OK
Date: Thu, 15 Jan 2026 16:45:30 GMT
Server: Werkzeug/2.3.0 Python/3.11.0
Content-Type: text/html; charset=utf-8
Content-Length: 615
Connection: keep-alive

The HTTP/1.1 200 OK status line indicates that your application responded successfully. The other headers show information about the server and response. You can also open this URL in a web browser to see your application's actual output, or you can use curl without the -I flag to see the full response body. The important thing is that you're now accessing your application from outside the cluster using a public endpoint, which means anyone with this URL can access your application.

If you want to clean up the resources you created in this lesson, you can delete the Service and Deployment. Deleting the Service is important because it triggers Kubernetes to delete the AWS load balancer, preventing ongoing charges for the load balancer resource:

kubectl delete svc my-web-svc -n apps
kubectl delete deploy my-web-deploy -n apps

These commands remove the Service and Deployment from your cluster. When you delete the Service, Kubernetes tells AWS to delete the load balancer, which takes a minute or two to complete. The Deployment deletion removes the pods that were running your application. If you want to keep your cluster running for future lessons but don't want to pay for the load balancer, make sure to delete the Service. You can always recreate it later by applying the same manifest file.

Summary and Next Steps

In this lesson, you learned how to expose your application using a Kubernetes Service. You saw that Services solve the critical problem of ephemeral pods and non-routable pod IPs by providing a stable network endpoint. You explored the different Service types, focusing on the LoadBalancer type, which automatically provisions an external load balancer on cloud platforms like AWS, making it ideal for public-facing applications.

You gained hands-on experience by writing a Service manifest, using a label selector to connect it to your deployment, and defining a port mapping. You then deployed the Service, observed the AWS load balancer provisioning process, and tested connectivity to your application's new public endpoint. This ability to expose applications is a fundamental Kubernetes skill. In the upcoming practice exercises, you will reinforce these concepts by creating and managing Services for different applications.

Sign up
Join the 1M+ learners on CodeSignal
Be a part of our community of 1M+ users who develop and demonstrate their skills on CodeSignal